

I was looking at Festool Domino Joiners and financially, they're way out of my league. And then I notice the knockoff jigs which really don't rate all that well because they're too flimsy...

And then I notice a whole box of parts I picked up in the closeout sale and start thinking, I can probably do better.
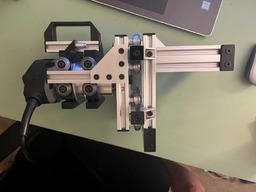
So, the basic premise was to attach two spindle mounts to a router and use the side holes in the mount for wheels on a 20x20 rail. Seemed easy enough...

until I flipped it over to do the other side and realized we've gotta problem...

One of the mounts didn't have holes in the opposite side. But I proceeded anyway, hoping it wouldn't be an issue. (Spoiler alert: It was.)
Anyway, the rest of the build is fairly straightforward. Mainly just frame and rails and wheels. The wheels on the router mount assembly give it the in and out motion for the mortises and the wheels between the front and rear frames give it the side to side.


The screws on the side of the upper handle rail allow it to be adjusted forward and back, using it as a means to set the plunge depth based on impact with the cross bar in front of it.


And the bit extension can be viewed in the site glass on the base.

A spring helps with auto-retraction. The spring is a #178 from Ace Hardware (sorry but I can't offer more specifics than that) and is a reasonably good fit for the task. It would have been nice had it been 1/2" longer but it was the only one they had that was even close. The spring is fitted over spacer pegs at both ends.


On the receiving end, I put nice long platforms and big grips for either standard or vertical cut orientation

Once I got it all together, I gave it a go and...

First cut was a bit off but seemed like I had a winner of an idea on my hands. End grain cut very nicely.
And then I went on to face grain. And things went downhill rapidly.

The lack of the second set of wheels on the router mount allowed for too much flex in the system. I also noted some slippage in the two hole connection of the side plate to the router rails.
I expect I will need to hand cut longer side plates to get a better grip on the rails.
Other issues noted were slippage of the acrylic plate on the wood surface and a lack of a proper end stop for boards narrower than the rails. I probably also need to look into speed settings on the router and also check to see if there is a more appropriate router bit.
Overall, I don't really consider the outcome as a failure, just as a work in progress. The issues are not insurmountable, just things that need worked through. I also need to work out a better depth adjustment to be able to center the cut better in the thickness of the lumber. And as I probably won't get the results posted prior to the OpenBuilds site going dark, I will post any follow-ups on Instructables where I post under tsallgood.
It's been fun. I hope we all cross paths again someday.
Mortiser
Build in 'Everything Else' published by Rick 2.0, Jun 13, 2025 at 4:51 PM.
A work-in-progress build using OpenBuilds parts to create a mortising jig.
-
-
Build Author Rick 2.0, Find all builds by Rick 2.0
-
- Loading...
-
Build Details
- Build License:
-
- CC - Attribution - CC BY
