Welcome to Our Community

Some features disabled for guests. Register Today.

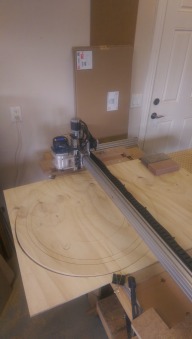
myOX : a 4' x 2' OX with potential

Discussion in 'CNC Mills/Routers' started by Serge E., Jun 19, 2014.

  1. Tweakie

    Tweakie OpenBuilds Team
    Moderator

    Joined:
    Jan 18, 2014
    Messages:
    784
    Likes Received:
    326
    The more I read about this the more I think that Canadians are getting bit of a raw deal regarding transportation of goods and people. :(

    Tweakie.
     
  2. Serge E.

    Serge E. Journeyman
    Builder

    Joined:
    May 6, 2014
    Messages:
    730
    Likes Received:
    252
    Further off topic : Otherwise, it is a great country to be in ... We don't hear of anyone having to go bankrupt because of illness and such. Just don't travel too far and stick to local goods. :duh: (from a guy who travels 4 hours one way to go to the market.... calling it a fun drive even if the market was closed that day and half the trip is along the most boring highway there can be !)

    It will be a beautiful day for "dumpster diving" in search of a couple power supplies that is, 11 C (around 50 F) ... no sun, but no snow either. I'm in southernmost Canada ... the Canadian Tropics that is ! Oh, ya, we do have a type of wood frog which can be frozen solid and brought back to life as well. Go figure, eh ? :confused:


    ... I'm sure a few of us wished we could do that every winter.

    How far off topic was that ?! :sleepy:
     
  3. Serge E.

    Serge E. Journeyman
    Builder

    Joined:
    May 6, 2014
    Messages:
    730
    Likes Received:
    252
    You got me there ... not quite. I'm in Tecumseh, a "bit" north (in the grand scheme of things) of the island and Pointe Pelée area ... More like southern Oregan than Northern California. Is that considered the Canadian sub tropics then ?

    If I was on the island, I would realy be scr... to get parts for myOX. I would have to wait for the ferry or plane, that would add to the last mile delays. :oops: Plenty of time to chase the pheasants and stamp grapes into wine. :zipit:
     
  4. Serge E.

    Serge E. Journeyman
    Builder

    Joined:
    May 6, 2014
    Messages:
    730
    Likes Received:
    252
    YES ... apparently the China 'slow boat' has arrived ... I should have the 24v 10a power supply waiting for me when I'll get home tonight ! :cool:

    10a might be tight to drive the 3x NEMA23 and 1x NEMA17 simultaneously ... but if that's the case, the 24v 20a PS is just around the corner, maybe a day or two away, with loads of "extra" juice for myOX.

    The theory is if only one coil is at full power at any one time, then 10a should make it ... Formulae seen recently say :

    A motor control will always draw less than 2/3 of the motor’s rated current when it is parallel (or half-winding) connected and 1/3 of the motor’s rated current when it is series (or full-winding) connected.

    So the 10 amp should probably be more than plenty ?!? I'll find out soon enough ... even if 2.5A per coil (2 per stepper) times 4 steppers gives 20 amps, assuming all 4 steppers are identical. Which ... in the very extreme worse case ... taking only 1/3, according to above, would require only 6 2/3 amps at full blast !? Can that really be right ?!? o_O:confused:

    The above link actually goes into the formulae and components to make your own basic unregulated power supply ... It just is not sinking in at my end (to date - lack of concentration and mostly will to understand :oops:). It seems too easy (!) Especially with the above calculations/formulae floating in the large void that is within my cranium.

    Apparently, doubling the voltage should also double the torque ... I can't wait to see that come about with myOX. The limit switches will definitely come in handy at that point, eh ? Doubling the GT3 would also seem a natural upgrade to minimise stretching and the likes, especially with the long axis, (1 length glued down in V-slot, the other riding on top). The Y axis seems to be the prime candidat for that tweak ... I might have enough spare GT3 to give it a try.

    Anyways, this weekend, finally, myOX should be good to start doing real work !! :duh::nailbite:
     
  5. Serge E.

    Serge E. Journeyman
    Builder

    Joined:
    May 6, 2014
    Messages:
    730
    Likes Received:
    252
    The 24 volts power supply has made a difference ... However, it is not an all positive one ! :banghead:

    The steppers are getting more juice for certain as the Z was running much warmer than with the 12 volts PS. The X and Y did not seem to get any hotter. So I tuned down the feed for Z (now a bit below the half way mark). I might have to tune down a bit more ...

    X seems to run just as well as before, maybe a bit noisier ... hard to say. Precision is still there, which is what counts most for now.

    As for the two Y steppers, well, the bad news continue. So my problem is not (strictly) one of lack of power. In fact, with extra power now being fed, I noticed what may be the actual problem ... and it is not missing steps or slippage of any kind. Here's the observations which might help some of you point me in the right direction :

    First, the far Y stepper is much noisier now.

    Second, even when carving air (the cold garage air is not as dense as a piece of scrap MDF or me) the Y stepper misbehave. As they are not in sync ! :eek:o_O

    Third, paying closer attention as I ran a 'long' job high in the air (a 6" or so fleur de Lys as well as the 80mm square fan grill for that matter) the weirdess, for me, behaviour was observed : the far Y stepper was apparently ignoring some moves or partially doing them, totally at random as well ! :eek::blackeye:

    Rather unsafe, but to help with the tracking down of the problem, beyond my personal issues, I carefully placed myself at far Y stepper, one finger on the pinion face, to feel if it rotated or not, an other finger (from other hand) on the back shaft, for same, and both eyes on the other Y stepper's pinion. Indeed, the Y stepper I was 'feeling' was randomly way off it's twin nearest CNC xPro controller. Short moves were most often fine with the very shortest hard to tell (obviously). But there was some jerkyness about the whole experience. The long moves didn't seem too bad for the most part, but some were randomly quite off. Stiffness and inertia probably helping along with the extra juice (the 'good' Y stepper probably doing most of the work ?) The 'average' - like 1" or so moves for lack of a better description, were completely off ! At times, the suspect Y stepper was simply not rotating it's shaft !! o_Oo_O Is that even possible ? Well, yes ... apparently, eh ?

    The controller IS using two drivers, the A being a mirror of the true Y, one coil inverted, so both Y stepper would (should) move in sync. So it could be a controller issue. I doubt, at least at this stage. I'll test tonight by 'flipping' the Y cables (what was A now Y and blabla). If it is the controller, the problem should transfer to the other Y stepper. Right ?

    The cabling to the far stepper IS longer (should not be an issue by itself with length being used), is mostly different (ya, I know, but I ran out of the "proper" wiring so I grabbed a thicker !! solid !! copper for main length - between controller and far Y, there is NO moving/flexing as it runs within the V-slot), the splice at the stepper end MAY not be what it should be (did I solder them is a question I'm asking myself at this point after a few rebuild :oops: while squaring things properly), blabla ... So THIS aspect IS becoming very suspect. :duh:

    Then, if you remember one or two of my early posts on this build, I had made a major wiring error, yes, with that same far Y, at first assembly AND, to make it worse still, did not notice the issue until several air runs ! In my using the 'what I had on hand' piece of wire for that long reach, I also used the same color for ... what was it ... green and blue. In so doing, I had wired both A and B coils as if one but crossing them (not simply in series). What a mess, eh ? :banghead: I had asked if this could 'damage' stepper - never getting an answer to that detail. Since correcting the wiring issue, everything seemed to be running 'ok'... or so I thought NOT forgetting my continued issues with ... you guessed it ... the very same far Y stepper.

    That last part is also very suspect. :duh: Short of taking the X stepper and swapping it with the far Y, they are the same steppers, I'm not sure how I can tell if the suspect stepper is 'damaged' or not. Any ideas before I strip down myOX for the nth time ?

    I'll have to (re)check the wiring to the far Y anyways ... so that will be some disassembly. New lesson : don't run wiring within a length of extrusion UNLESS you use some sort of quick connects ! In fact, you might want to use good quick connects for all of your connections for easier maintenance over life of your machine.

    Got to run (work calls) ...
     
  6. GrayUK

    GrayUK Openbuilds Team Elder
    Staff Member Moderator Builder

    Joined:
    May 5, 2014
    Messages:
    1,668
    Likes Received:
    627
    Logic would decree that you swap the, good, X stepper for the suspect Y stepper. :)
    Before that though, try running a small program that requires just the forward and back movement from the Y axis, in variable distances.
    Try to keep the X and Z, completely out of the equation, if not disconnected.
    Are the Y's completely skewing the X axis? On a forward and back movement, of exactly the same length, are the Y's bringing the X into an un-skewed state? :cool:

    Gray
     
  7. Serge E.

    Serge E. Journeyman
    Builder

    Joined:
    May 6, 2014
    Messages:
    730
    Likes Received:
    252
    Ya, I know. I am looking to not have to take myOX apart ... again. Although just the steppers is much easier than squaring ... It would be even easier if I had used (good) quick connects to just plug and unplug. A bus strip would be good just about now. (I know, that's in the original parts list, if memory serves me right.)

    Exactly, I've used the one axis back and forth trick for a while now actually, mostly checking for the accuracy. It seems that the problem is much less evident since the 24v power supply is in. But I've always done the back and forth manually... So a timing issue might not surface. I'll do a program to 'rapid fire' the back and forth and see if that makes a difference. Could the stepper itself be 'dropping' commands (lack of response on its part) ? It's not likely to be the controller since the other Y stepper is ok.

    The X and Z seem unaffected from day one. I'm thinking I messed up the stepper in early runs with the wiring error - hoping, no, I am praying, that I didn't mess the driver in the process as the CNC xPro has them surface mounted ! I still have Arduino with shield and drivers not too far ...

    The odd part, since the 24v, is that the left Y stepper randomly does not respond at all (no shaft movement). At 12v it was not doing that or it was less obvious/affected (if it is an internal issue). Is that possible ?

    I have not found anything like a stepper troubleshooting guide. You know, if this is happening (or not happening) look for this as the probable cause. Can a stepper be 'damaged' to behave like mine ? What happens if you wire a stepper completely wrong (as I did way back at the beginning) ? Surprisingly it was stepping when it was wired wrong. I've read not to directly apply the power to a stepper. Maybe my initial wiring error was just as bad to the stepper ...

    The whole assembly of an OX is not that complicated. It can actually be done as a weekend job, assuming all parts are on hand AND, more important, one avoids making all of the "stupid" errors I've been making. It looks like I've manage to do just about all possible errors thus far. :oops: It will make for a great "Memoirs of myOX : dos and [mostly] don'ts of an OX build !" :duh:

    Well, off to the cold garage I go ...
     
  8. dddman

    dddman Journeyman
    Builder

    Joined:
    Mar 2, 2014
    Messages:
    468
    Likes Received:
    187
    As you have an Arduino with the stepper shield, I would drive your stepper with it (no load, without the belt) to see if they seems fine (you can stick a piece of tape on it to see if they are synchronised (at least to your eyes)). You can measure the coil impedance (resistance) with a multimeter and see if all seems good. It can be as simple as a bad connection... (I can't remember if you tried it, you almost write a novel each time... we may call you anti-tweakie... :) ).

    (Yeah, I know... it's winter down here too... go snowblower go! :) )
     
  9. Hytech2k

    Hytech2k Veteran
    Builder

    Joined:
    May 6, 2014
    Messages:
    429
    Likes Received:
    331
    I'm not up on the xPRO board, I use a completely different setup, but just for testing purposes couldn't you just disconnect the suspect stepper from the "A" slaved port and piggyback it on the "Y"? And just run a "cut air" test to see if that resolves the issue, shouldn't be much load on the board if your just cutting air. At least that might tell you if the "A" driver on the board fried or is the issue in the stepper. If you swap the "Y" and the "A" wires around on the board, and the issue moves to the other stepper then the board has problems,but if the suspect motor still has issues then the motor is at fault.... Anyway Good Luck !!

    Edit: LOL just read your post (too many late work nights), did you end up swapping the wires around?
     
    #219 Hytech2k, Dec 18, 2014
    Last edited: Dec 18, 2014
  10. John Meikrantz

    John Meikrantz Well-Known
    Builder

    Joined:
    Nov 2, 2014
    Messages:
    169
    Likes Received:
    56
    Serge,

    I had a similar issue with the Y axis, where it just wasn't quite right. I found two problems - one when I put the belt drive on and tightened, the two sides were slightly skewed. (Far side was about a tooth or so ahead of near side, only evident when moving right up to the end of the side rails). By loosening and slightly shifting the belts, things moved back into alignment. Don't over tighten the belts, as that can put some odd stress on the motor shaft.

    The other issue was current. I am using the xPRO CNC board, and it allows current adjustment per motor. Sometimes the far motor would stall, etc. By adjusting the current for the drivers, I was able to stop the stalling behavior. I had the current maxed on the Y/A axis, and found that backing off to about 50-60% and tweaking stopped some of the noisy moments. Everything now runs much more smoothly!

    I'm using the xPRO with ATX power supply.

    Not sure if any of this will be helpful, but those two tweaks made a big difference for me.

    --JohnM
     
    Serge E. likes this.
  11. Serge E.

    Serge E. Journeyman
    Builder

    Joined:
    May 6, 2014
    Messages:
    730
    Likes Received:
    252
    Actually, just tried the swap ... must be too late at night to make sense, but things seems stranger then before. It looks like both Y steppers are now misbehaving ! One might lag, than the other. Then one moves a bit while the visual on screen is not showing that it should move in that direction ... Really odd and puzzling at this point.

    But I see a big hint in John's post (after yours) : tweaking of CNC xPro driver current could be at play (?)
     
  12. Serge E.

    Serge E. Journeyman
    Builder

    Joined:
    May 6, 2014
    Messages:
    730
    Likes Received:
    252
    Well, that might actually make sense in my case as well. o_O

    The skewed belt would explain just a bit of offset, so not at play here. I'll have to check it once everything else is much better. The 'squaring' will most likely benefit as I'm now a tiny bit off (over full 1500 mm X width) and this could help just enough.

    The belt tension might be a (small) factor as I tend to over tighten things ... sometimes to the breaking point ! I'll check that. Might as well recheck the set screws of the pinions while I'm at it. These adjustment won't hurt either.

    BUT, the big one, the current off the CNC xPro drivers is likely a substantial part of my problem. Here's the details lost in my previous 'novels'. At one point, even with the 12v power supply, everything worked much better except for not being squared. During that hunt, sidetracked with the issue, I did boost the current from about 50% to 100%. Things got worse for Y axis. I got lost in the other issue, so never readjusted the current. In fact, thinking it was still a power supply issue, I more recently went from 12v to 24v, drivers still at 100%. Yes, things actually seemed to get worse still. Including the Z starting to get real hot ! :rolleyes: I tuned down current to the Z, being just a NEMA 17 as opposed to the other 3 being NEMA 23... Current stayed at 100% for X and Ys !

    I should know better than that : if a tweak does not improve a situation, undo it and try adjusting something else. Change 1 thing at a time when tracing root cause of a problem. Otherwise, you are just pilling things up ...

    I think you are unto something there. :thumbsup: Ya, it does look like the Ys are just randomly stalling !!! But it's almost 3 am, so I'll do that tweak sometime tomorrow ... In fact, in observing things since I flip Y and A - my Y now going opposite it should !, X seems to be acting up just a tad as well with short stalls/pauses. It was not doing that before now. So I'll have to triple check wiring as well. There could be some bad contacts at play as well (?)

    As well, I need to double check the timing related GRBL settings ... I never got those tuned to my steppers, just guessed at the number which fell within the suggested/recommended range. They could be part of my trouble. Since the 24v, each NEMA 23 seem to be ... somewhat 'jerky', even the X. Before, especially the X, they seemed a lot smoother.

    Man, I've really stacked the errors, eh ? Did I manage to miss any errors a green OX builder could make ?

    Me thinks I am about to reach the end of the build portion of the journey, finally. Then comes to routing/milling ... :nailbite:

    Wish I could triple 'like' your post. :thumbsup: I'm almost tempted to go back to the garage right now :rolleyes: ... :sleepy:
     
  13. John Meikrantz

    John Meikrantz Well-Known
    Builder

    Joined:
    Nov 2, 2014
    Messages:
    169
    Likes Received:
    56
    One more thing that I forgot to mention - also increasing the max speed and acceleration made things much smoother on the Y axis.

    I followed the directions on this page for max rate and acceleration :
    https://github.com/grbl/grbl/wiki/Configuring-Grbl-v0.9 to get ballpark settings.

    I am using NEMA 23s on all axes. I really cranked up the speeds, and it made a big difference in overall smoothness. Also step pulse. This is what I wound up with:

    $0=10 (step pulse, usec)
    $110=7500.000 (x max rate, mm/min)
    $111=7500.000 (y max rate, mm/min)
    $112=2000.000 (z max rate, mm/min)
    $120=150.000 (x accel, mm/sec^2)
    $121=150.000 (y accel, mm/sec^2)
    $122=150.000 (z accel, mm/sec^2)

    All in all, much smoother, zippy travel.
     
    Serge E. likes this.
  14. Serge E.

    Serge E. Journeyman
    Builder

    Joined:
    May 6, 2014
    Messages:
    730
    Likes Received:
    252
    Sweet and thanks for the info. These were the elements I needed ... I was hesitant to kick some of those numbers so high. I'll be back in the garage shortly.

    If I am beginning to understand some of the theory behind steppers, in-between steps they could lose torque (as if become in neutral) ? So if pulses are too far apart, things can go wrong ... that much faster ... when there are opposing forces at play.
     
  15. Serge E.

    Serge E. Journeyman
    Builder

    Joined:
    May 6, 2014
    Messages:
    730
    Likes Received:
    252
    It looks those last few tweaks WERE much needed. :thumbsup::thumbsup:

    I tuned down pots for X and Y to about 80% (from 100%), changing 'step pulse' from 30 (!) down to 10 (as suggested), 'step idle' from 50 (!) down to 25, 'acceleration' changed from 10 to 150, 'feed' from 1500 to (only) 2500 and the 'seek' from 3000 to (only) 5000. Thanks John for getting me back on track with your last couple of posts.

    Now that I think of it, I had gone to the previous values thinking I needed to slow things down. These were done after my initial tests of the fan grill, which was quite better than anything done by myOX since.

    I'll have to tweak those numbers, PROPERLY, for myOX... But at least now, cutting air, seems orchestrated as per g-code short of one little detail.

    There is one more issue, which was probably there all along as well. TEMPERATURE of drivers ! I believe (or it does look like) there is a safety when getting too hot. Ya, slap me around a few times, I don't have the heatsinks on neither fan installed ! :oops: Worse part is that I have them since almost the very beginning. I was too busy chasing rabbits ! :confused: to install them earlier.

    From time to time, and apparently just the Y axis from what I could see, there is a 'pause' in the movement with just a slight noise (as if way under powered). Then the Y come back on line as if nothing happened. I guess the garage is cold enough to bring the temperature down within a couple of seconds. However, that's long enough, especially with much higher feed/seek speeds, to get a job royally messed up !

    So off I go to install the heatsinks and at least one of the fans I had planned to install once I could 'cut' a new shield in myOX. By the way, the plexiglass is not fully enclosed (at this time). Problem would of been worse and more evident.

    I'll also tune the pots a bit more as some had suggested a post or two back.

    Goes to show that we (as in I) often look far and wide for a cause or solution when they often are right there in front of our nose ! The worse part about all of this ? I was mentioning for quite a while that I needed to tweak by GRBL ! :( I knew the cause all along ! :banghead:
     
  16. Serge E.

    Serge E. Journeyman
    Builder

    Joined:
    May 6, 2014
    Messages:
    730
    Likes Received:
    252
    Finally looking at the specs of the driver chip used on the CNC xPro and, yes, there is thermal protection :

    8.3.7.2 Thermal Shutdown (TSD)
    If the die temperature exceeds safe limits, all FETs in the H-bridge will be disabled and the nFAULT pin will be
    driven low. After the die temperature has fallen to a safe level, operation automatically resumes.


    Problem is that the g-code keeps being sent, the logic most likely would loose track of tool position anyways (no feed back of current position ?) Maybe the controller should pause or something when this happens ? Off to the forum of CNC xPro ...
     
  17. Serge E.

    Serge E. Journeyman
    Builder

    Joined:
    May 6, 2014
    Messages:
    730
    Likes Received:
    252
    Yes ! It's working great now ! :D :thumbsup:

    (I had to run out to a birthday party, so the news are delayed by a few hours).

    The tweaking of the GRBL settings (step pulse, step idle, acceleration, feed and seek rates) certainly didn't hurt. Tuning the CNC xPro current limiting pots to about 70-75% (hard to tell) for X and Y must of helpd as well. But the mystery "stalls" where simply due to one (or more) driver chips going into "thermal shutdown" (rather than having a meltdown - thank goodness !)

    Stuck a small heat sink on each of the four driver chips and the myOX came to life, moving (fast now as well) & routing like it was meant to do. :D

    PC212468.JPG

    Pulled out a keychain size remote temperature sensor I had ordered from China a while back for use with my thermal forming projects. I checked the temperature of all four drivers' heat sink - about an inch away, while doing a "long" job - the above pictured "fleur de lys" which does multiple passes (I did something wrong with Meshcam converting black and white drawing). Precision looks good. But, wow :eek: the drivers do get hot !! Way in the 50c to 70c hot ! Without them, the chips certainly could reach much higher temps ...

    As anyone notice how the "A motor" driver, the mirror of Y in my case (default config), gets much hotter than the true Y driver ?! About 20c more ! o_O Is that normal or is there something about the A driver causing this

    Anyways, before installing the heat sink, with the current pots set at 100%, I suspect the A driver went into the thermal shutdown quite often, shutting down the ONE far stepper while the other continued on its merry way. Everything is thus messed up pseudo randomly in the Y axis. Tuning the current pots down - tweaking GRBL, making myOX move much quicker, I noticed both Y steppers would 'stall' in unison. A second or so passes, Ys would kick back into action for a while, and so on. That's when I thought : hey ! Might just be a thermal issue.

    Such an 'obvious' problem, now that I think of it, that no one (namely me) thought of checking for it.

    The "5 cents" part (or just about) was the one that messed myOX. It always seems to work out like that, eh ? It is a cheap easy to replace part that causes the most difficult problems to track.

    Stay tune for a couple of (long) YouTube of two runs : the old hello world of shapeOko and the first part of the Fleur de Lys run (won't bore anyone beyond the first 20 or minutes of it o_O).

    Me thinks I'll be able to check "completed" real soon now. myOX is about to do some real work (finally !!)
     
  18. Serge E.

    Serge E. Journeyman
    Builder

    Joined:
    May 6, 2014
    Messages:
    730
    Likes Received:
    252
    Here's the first quick run with myOX with no drivers going into hyperthermia - a borrowed 'Hello world' :


    The "Fleur de Lys" run is still uploading in YouTube.
     
  19. GrayUK

    GrayUK Openbuilds Team Elder
    Staff Member Moderator Builder

    Joined:
    May 5, 2014
    Messages:
    1,668
    Likes Received:
    627
    I think I, and many more on this site, will enjoy Christmas so much more knowing your machine is finally working well!! :thumbsup::D:thumbsup:
    Just don't break it between now and then!! :banghead:

    Well Done.
    Gray
     
  20. Serge E.

    Serge E. Journeyman
    Builder

    Joined:
    May 6, 2014
    Messages:
    730
    Likes Received:
    252
    Let me think here ... that's only a few days away, I think I can manage not ruining myOX by then. I should be able to run it safely until at least next year. Oh wait, that's only a couple of weeks away ! :p

    Notice how when things are going great the 'novels' get more like real short stories ? :ROFL:

    Just to stretch this post a tad. Mentioning myOX was now 'working right' at the birthday party has me faced with the task of updating a hand carved out of date family tree for the inlaws, probably having to create several copies of it. An easy task for myOX ... once I can get a drawing worked out to generate the respective g-code.
     
    pmany likes this.
  21. Serge E.

    Serge E. Journeyman
    Builder

    Joined:
    May 6, 2014
    Messages:
    730
    Likes Received:
    252
    And here is the "Fleur de Lys" run ... at least the first 'few' minutes of it since my converting a black and white drawing into g-code using Meshcam trial version seemed to retrace the outline a few too many times. But it is showing myOX, working "nice" !

     
    sgspenceley likes this.
  22. Tweakie

    Tweakie OpenBuilds Team
    Moderator

    Joined:
    Jan 18, 2014
    Messages:
    784
    Likes Received:
    326
    Looking good :thumbsup:

    Tweakie.
     
  23. Paruk

    Paruk Journeyman
    Builder

    Joined:
    Jul 13, 2014
    Messages:
    397
    Likes Received:
    149
    Man, that is the best news to hear so short before X-mas! Congratulations and have a lot of fun the coming weeks and months!:thumbsup:
     
  24. Serge E.

    Serge E. Journeyman
    Builder

    Joined:
    May 6, 2014
    Messages:
    730
    Likes Received:
    252
    Thanks to all for putting up with my learning curve. Not that many hours, but stretched over, what, nearly 6 months. I was starting to feel like I would not make through the build. But I pulled through after all. If I can make an OX, anyone can !

    I feel like I should write a book about the adventure thus far ... oh wait, looking back at all my posts, looks I already did write the book ! :D

    [​IMG]

    May you and your loved ones all have a very Merry Christmas and a Happy New Year. All the best wishes to one and all !

    [... get ready for the sequelS :duh:]
     
  25. snokid

    snokid Journeyman
    Builder

    Joined:
    Oct 11, 2014
    Messages:
    335
    Likes Received:
    104
    thanks for the information and happy new year!!!
     
  26. Serge E.

    Serge E. Journeyman
    Builder

    Joined:
    May 6, 2014
    Messages:
    730
    Likes Received:
    252
    Working on a family tree for myOX to reproduce. Just waiting for MeshCAM license to convert the GIMP created PNG and see what comes out. Will probably need to do two passes - one with a larger tool to rough out the mail shape and one with a fine tool :nailbite: to do the engraving of names, dates and such, maybe even the 'bark' on the tree. It's a big 'first' project for me and myOX.

    The holiday season is just adding a bit of delay in getting the license to unlock the now frozen and already extended free trial period.

    I also made the mistake (ya, an other one) of downloading SketchUP 2015 evaluation instead of the SketchUP Make 2015. The 'free' evaluation period is identical - you get PRO 2015 for 30 days (of actual usage, not just calendar days) BUT the first freezes solid after the eval period (need to buy a license at 500+$US !) while the second turns into the reduced Make version (free for personal use, no sharing !) Luckily, one can download and install Make over the Pro without loosing anything (that I could notice so far) short of the Pro only features (of course). And, no, you don't get an extra 30 days by reinstalling Make over Pro :oops:

    By the way, for a few more days, MeshCAM is 20% off over at CNCcookbook's web site ... You can bundle some of there software as well (could get MeshCAM with G-Wizard Calculator for less than just MeshCam at it's home - GRZ Software).

    As I wait for the MeshCAM license to come in, I'll play with the (reloaded) sketchUp Make 2015 for a few other projects, such as new version of plexiglass/lexan shields for Y gantry plates (protecting the steppers and controller from the dust and chips).
     
  27. Serge E.

    Serge E. Journeyman
    Builder

    Joined:
    May 6, 2014
    Messages:
    730
    Likes Received:
    252
    Things are running real nice, at least to my eye (the better one at that).

    Finishing tests on the piece of MDF, cutting various designs to warm up for the big 'family tree' project.

    The 80 mm fan grill worked out great. Sure, it's a deep engraving in a 3/4" sheet of MDF; but it was cut 'perfect'.

    Then there was a few runs of 'happy pig' as a test to do cutting boards (in some appropriate wood). Turns out using black and white images with MeshCAM to convert to g-code has a few caveat. First, the black lines (outline) needs to be thick enough for your bit (!) Maybe obvious to most, but I forgot that little detail. What happens is that the outline is not the path of the tool, but the actual part being cut. If too narrow, well, it just doesn't get taken into account. Makes plenty of sense ... but it didn't click in right away. :oops:

    Yes, I can use SketchUp (Make) to trace the outline, making it the tool path, then pull for thickness and do all other needed 'tricks' to get a cutting board, including the inset 'gutter' to catch juices and all such fun aspects. But I was 'learning' MeshCAM.

    Eventually getting to the Bowing Horse 2.5D engraving. First in the MDF, but, as I looked at it come to life (45 minutes !), it came to me ... why not engrave it in plexiglass. So here is the result (first plexiglass run) :

    bowing-horse_backlit.jpg bowing-horse.jpg We can see that my material was not perpendicular with the tool (bottom right corner stayed clear !)

    It would look better by leaving the outside of the horse clear. Next test run ...

    Mind you, all of these tests, including the horse in the plexiglass, was done using a straight 2 flute 1/8" (!) router bit. The plexiglass is going to be a lot better with a finer bit. But it will take a lot longer to get the end product finished.

    This is getting fun.

    Next, the 'family tree'. I still have an issue with the writting (names, dates). They are kind of 'thin'. MeshCAM will not actually write, but work all around the letters and numbers. It should do a great job with converting the tree, bark and all. But the lettering will have to be done as a separate overlay. The trick will be to align everything dead on !

    Oh, I notice my Z slides down when on standby with the router turned on. Not certain how I can stop that. It seems fine once running a job.

    I'm thinking of using a monochrome photo next. MeshCAM makes it so easy. :cool:
     
  28. Serge E.

    Serge E. Journeyman
    Builder

    Joined:
    May 6, 2014
    Messages:
    730
    Likes Received:
    252
    As good as the routing is getting with myOX, there are still a few issues to address. In no particular order, here they are :

    1) my Z axis is starting to slowly slide down as soon as the router is turned on and no power is sent to the NEMA 17.

    It didn't appear to do this earlier ... The stepper is also running on the hot side. Not burning hot, but much hotter than the NEMA 23. I might have to use a NEMA 23 for the Z. But there might be an other solution/issue here as well since it was not doing earlier. There is a lack of resistance though as I can push the router downward with minimal force ... The router I use is on the heavy side as well.


    2) the heat sinks are the magic in keeping the drivers from going into hyperthemia (stopping to cool down), but using a thermal grease is not best idea (I had) to stick them on the driver chips.

    The grease stays 'soft' and, with all of the moving around at 'high' speed, the heat sinks actually 'move' ... The one for the A driver, the hotest of the four drivers (figures, eh ?), just lost its heat sink ... it fail in the MDF dust !! So, yes, do use a thermal cement/glue. Would a dab of nail polish (as done with screws) or silicon (how hot can it get ?) be enough to hold the heat sink in place ?


    3) MeshCAM seems to create a border around all jobs, which is ok (if it wasn't that wide and adding mileage on the bit). However, it's routing it early in the job ... all the way to down, full thickness ! I would of thought this part of a job would be done last, not first. No?

    I have to read the manual. Being from the computer world, the last thing we seem to do is read the manual if all the other alternatives fail. :oops:


    4) I definitely need to get wiser with the tool selection and related parameters (ie. feed speed, depth per pass,...) No broken tools ... so far (great !), but I've been using a 1/8" bit (1/4" shaft) router bit on both MDF and plexiglass at the same feed rates, etc.

    The 'family tree' project is going to need several passes with various bits (to save time AND get fine details - the writing, done right).


    5) which brings up tool changing and need to master 'overlay' - running separate jobs on the same work piece keeping alignment dead on.

    MeshCAM does great with the 'tree' (trunk, branches, bark, etc.) It even allows tool change (in generating the g-code at least) between rough routing and finishing routing. However, it can't handle the writing... taking it from an image. SketchUp (Make) should allow me to do the writing. The trick will be to merge the two ... Tougher still, for me, is to change the tool without messing up alignment.


    6) which brings up the need for me to install the limit/home switches !

    This should allow the tool to return to a known coordinate, the start of each job, thus making 'overlay' runs as easy as running a single job. :rolleyes:


    That's it for now ...
     
  29. pmany

    pmany New
    Builder

    Joined:
    Nov 24, 2014
    Messages:
    35
    Likes Received:
    6
    2. I have seen heat sinks held on with zip ties.
     
  30. Serge E.

    Serge E. Journeyman
    Builder

    Joined:
    May 6, 2014
    Messages:
    730
    Likes Received:
    252
    That's an idea, at least short term. The temperature sensor shows 40+c, are the zip ties able to handle, say, 50+c ? Not certain the CNC xPro would make using ties 'easy' ... I'll have to check in the morning.

    Otherwise, I might just borrow some nail polish from the wife ... will it take the heat ?

    To avoid a stall, I had the vacuum sucking air near the heatsinkless driver and it seemed to work just as well. So it might be high time for me to install those fans sitting on the shelf. :oops: I've got four tiny ones as well as a 3x 80 mm and a bigger 120 or 140 mm ... shame on me for not using them earlier, eh ?

    Tomorrow will be working on the new plexiglass shield, making room for the fans, control buttons (pause, ...) et al.
     

Share This Page

  1. This site uses cookies to help personalise content, tailor your experience and to keep you logged in if you register.
    By continuing to use this site, you are consenting to our use of cookies.
    Dismiss Notice