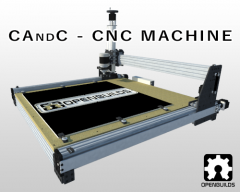
As someone with an old XP computer that won't accept Sketchup 2015, I thank you for packing the files down previous versions. Overall a very nice adaptation. The only suggestion I would make is reducing the height of the Z-axis rail. It doesn't really need to be any longer than the distance between the cutting deck and the top of the topmost wheels. Anything beyond that is just dead weight as it has no place to go.
Nice job, congrat !! Why the Z axis so long? I like the lead screw on X, are always better than the belts, but if you use the beltrings on Y you can loose the benefit of the screw. Is not better if you put the motors directly on the screw?
Maybe I can get your opinion. I made the Z-rail long so that you can remove the spoilerboard and lay the machine on any surface. My family liked the idea, but most of them are not engineers. Do you think I should remove it?
I added the belt because I could not direct mount the stepper, due to the fact that there are screws in the way. Because of the amount of turns is large to move the axis, stretch does not affect it very much. It also allows the stepper to not stick out, and uses dead space. I think...
CWidt, the problem with extending the Z-axis down lower is that the farther it extends down below the gantry beam, the more leverage it has on it. And the more leverage you put on it, the more flexure that is induced into the system by the resistive forces caused by the cutter head chewing its way through the material. If you only plan to cut foam you should be just fine but if you are thinking about cutting anything any more solid you probably won't get good results. You could probably gain some depth by substantially increasing the rigidity of the Z-axis carriage system but this will still only gain you an inch, maybe two. Lightweight machines like this really aren't designed for such forces.
I could get 200mm out of the Z axis and cut soft wood with it (pine for example), but I also use the lower and highest wheel on the sides of the Z-axis with a distance of 180 mm from each other. Z-axis is okay, double 20 * 80 mm V-slot for X-axis doesn't like it that much. Now, to cut anything harder then normal wood would not be recommended any way as the acme nutblocks get heavily abused, still have to try double acme nutblocks and see how that works out on my next build. Brass would be a good upgrade I think. Any way, thinking of having a gantry in front and behind the Z-axis, also reinforcing the Y-axis sideplates with V-Slot. What I don't get is why you use 3 shims and one spacer; I use a 9 mm spacer and it seems to line up well... Am I wrong? -Ronald OpenBuilds México
First we would like to thank you for taking the time to post this cool build! To answer your question about the OpenBuilds name and Logo please feel free to use it as its Open Source and free to use! Keep up the good work and Thank you again Mark
Hello viewers! I have created a page on my website where you can contact me personally for inquiries. If you have a comment, idea, or concern. This is the place to do so! http://conntraptions.com/projects/machines/cnc/candc/contact/
I currently have myOX's Z longer than usual (about 10") for similar reasons - dig deeper as the top of my work table can be removed. If my Z axis was even longer (AND somehow made firm/stable), it could reach down towards the floor. The goal is to go down at least 6", Even adding a 4th axis, even if 'manual' at first ... The engineering part : making sure the Z axis is firm to keep precision and strength as your tool bit goes down, down, down ... Think of it this way : hold a 15 lbs weight in one hand, but close to your chest. No problem, right ? Now stretch your arm straight out, parallel to the floor, and keep it like that for awhile - don't shake... Not so easy, eh ? Your router is fighting against material being removed rather than the gravity ... but it needs to follow precise curves for hours at relatively high speeds.
Hi, I really like your build . I am interested in doing a similar thing. But I want to use 4 c-beams instead of just two. Why did you use the other old technology. Also, why two motors for the x-axis. Also, what are you thoughts about having the bigger plate being on the inside of the Y axis. It could give you a little more x room. Thanks Steven
Q: Why did you use the other old technology? A: You mean the belts? Yea, that had to be done because there we so many screws in the way to mount the V-slot to the plate, that there was no room to directly attach the motor. Also, because of the weird screw spacing, I could not multi-purpose the existing screws. Q: Also, why two motors for the x-axis. A: Good questions, I removed them in version 14, which I am posting soon. SketchUp just mirrored the motor to the other side Q: Also, what are you thoughts about having the bigger plate being on the inside of the Y axis. A: I do not completely understand this one. The brace-plates (which are located on every axis) are optional. I added them because I had extra room. There are many dead spots in the machine, so I had some room to add braces. If I did not answer these exactingly, please tell me! Sorry for the lack of updates, end of school is about a week away. I have so many assignments!
when I said old tech I meant why didn't you us the c-beams for the X and Z Axis Also as far as the brace plates for the Y axis. Have you thought of reversing them. Having the braces be on the outside to cover the wheels from getting too much junk in them . Also now your x axis would actually make the machine a little wider. Thanks Steven
I really like the new CBeam. I kinda wish the CBeam was around last fall when I built my 1500x750 OX ... I am really thinking about downsizing my OX to 1000x750 and using the CBeam, starting with the Y axis, then do the X axis. My machine runs great but I really want to get away from the belts. I'm gonna keep an eye on this post