Welcome to Our Community

Some features disabled for guests. Register Today.

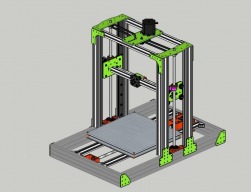
V Rail 3D printer

Discussion in '3D printers' started by Josh B, Sep 8, 2015.

  1. Josh B

    Josh B Well-Known
    Builder

    Joined:
    Nov 4, 2014
    Messages:
    116
    Likes Received:
    42
    Josh B published a new build:

    Read more about this build...
     
  2. Keith Davis

    Keith Davis Veteran
    Builder

    Joined:
    Dec 11, 2013
    Messages:
    507
    Likes Received:
    398
    Hi Josh. Solid looking design!

    As for the Z axis, I definitely vote for the single motor. I spent May and June testing various dual motor designs against single motor designs running dry prints involving thousands of Z lifts throughout 24 hour, 8 inch high, prints. After dozens of these tests, and consulting Prusa's evidence for NEMA motor microstepping errors, I've concluded that it is, by design, impossible to keep 2 NEMA class motors in sync over time. And worse, auto-bed-leveling schemes actually increase the error rate. Measuring the two sides of the X axis with digital depth gauges it was not uncommon to find the two sides off by more than a layer height at end of print using two motors, regardless of driver (RAMPS, Melzi, Azteeg, Printrboard), whereas two belt driven single motor designs have logged more than 50,000 Z lifts with perfect accuracy. You can see the resulting printer here http://www.openbuilds.com/builds/onez.2278/.

    The main problem was getting closed loop belts the right size for running the two screws. RobotDigg has a wide selection at great prices and their delivery time is now usually 9 days to USA. RobotDigg also has 8mm bore pulleys for the screws. A NEMA 17 can run two belted acme screws but at high voltage and temperature. Stick with your NEMA 23. As for ratio, don't over-think it. Use the same size pulley on the screws that you do on the motor and you have the same ratio as a direct drive. In the firmware simply use the same setting for steps-per-mm that you'd use for direct drive. Your NEMA 23 will have plenty of power without need for down gearing.

    If you are going to use a closed loop belt for the single motor Z axis, consider doing the same on the Y axis. Mount the Y axis motor parallel with the screw, fix a pulley to the screw with a matching pulley on the Y axis motor and run the screw with a short 208mm or 132mm closed loop belt. That would make for a compact, under the bed, design that would not increase the height or depth of the printer footprint. And, it will look really cool - justifying the use of an acme screw instead of a belt. If you already have some closed loop belts for the Z axis and would like some 208mm closed loop belts to try out on the Y axis, let me know. I have 6 of them from an abandoned design I'd gladly pass on to you.
     
    Josh B likes this.
  3. Josh B

    Josh B Well-Known
    Builder

    Joined:
    Nov 4, 2014
    Messages:
    116
    Likes Received:
    42
    Thanks Keith, I was hoping someone would have some input on the Z axis. I agree, the dual Z motors is a pain in the hind end, always out of level.
    I was planning on using a closed loop belt for the Z, if you look at the nema 23 plate at the top center, you'll see that I elongated the hole for a tension pulley. I made it quite long so I have a lot of adjustment and/ or belt size choices. Did you use lead screws rather than belts with any of your designs? Specifically for the Y or X axis? I'm just curious what kind of speeds vs precision I can expect.
    Also, thanks for the input on the pulley size, that's something I am over thinking, I just want to be sure that I'll be able to print at decent speeds, 100mm/min +.

    Josh
     
  4. Keith Davis

    Keith Davis Veteran
    Builder

    Joined:
    Dec 11, 2013
    Messages:
    507
    Likes Received:
    398
    I do not use acme screws for printers, in spite of the fact that they look really awesome. Consult Josef Prusa's http://prusaprinters.org/calculator. (His calculator for lead screws is mislabeled - for manual input his field labeled "Leadscrew pitch" should read "Leadscrew lead" since "lead" is actually the mm/revolution (lead = pitch * starts)).

    On a Z axis using a 1/16 stepper, an 8 lead Tr8*8-4 acme screw can not use full 0.1 layer increments since each step is 0.04mm. Layers 0.2, 0.4, 0.6, etc, are OK but 0.1, 0.3, 0.5 etc land on half steps causing the motor to jump to the closest full step. Since I have no control over the layers that user of my printers may want, I opt for 8mm threaded rod with 1.25mm lead which does land on full steps at 0.1 layer increments. (A Tr8*8-2, with only 2 starts instead of 4, would land on full 0.1 layers, or a Tr8*8-4 using a 1/32 stepper would too.)

    I've never tried an acme screw for X or Y axis, though I see some designs that do. How fast they are, I don't know. But consider, a motor revolution on your Tr8*8-4 moves 8mm travel, while a revolution using a 20 tooth GT2 pulley moves 40mm travel. So, your motor will be running 5 times faster on a 100mm/sec print than if you use GT2 belts/20 T pulley. NEMA 17 can run that fast, but the driver is probably going to run pretty hot. Like I say, I've never tried it, but the math kept me from trying it.
     
    Mark Carew likes this.
  5. runninfarmer

    runninfarmer Well-Known
    Builder

    Joined:
    Feb 22, 2015
    Messages:
    99
    Likes Received:
    48
    You should be able to land on full steps with the 8mm lead acme screw that's offered by the parts store. With 1/16 stepping and 1.8 degree steppers, 8mm travel per screw revolution, you should be getting 0.0025 mm travel/step. This is based on the following math:

    (1 rev/360 deg)*(1.8 deg/1 full step)*(1 full step/16 steps)*(8mm travel/1 rev) = 0.0025 mm/step or 400 steps/mm.

    If you want 0.1 mm layers, then 0.1 mm/0.0025 mm/step = 40 steps. So every 0.1mm layer should be 40 steps. I would soon have the acme screw for less friction, straightness, and precision. Standard screw threads always bound up on me. My math may be wrong, but that's what I come up with.
     
    Josh B likes this.
  6. Josh B

    Josh B Well-Known
    Builder

    Joined:
    Nov 4, 2014
    Messages:
    116
    Likes Received:
    42
    Been doing some reading on screw vs belt and there are a lot of different opinions, some heated discussions too. I don't really care how the screws look, I just don't like messing with the belts. I have belts and screws on my OX and I've never had to adjust or tighten a screw.
    I was considering these for the X and Y : http://roton.com/Mating_Components.aspx?family=7060998
    5 start screw with a lead of 25.4mm/revolution. Guess I didn't put much thought into the type of screw for the Z axis, better think that through a bit more.
     
  7. Keith Davis

    Keith Davis Veteran
    Builder

    Joined:
    Dec 11, 2013
    Messages:
    507
    Likes Received:
    398
    +runningfarmer I use Prusa's method for a 1/6 step motor and Tr8*8-4 .
    One revolution moves 8mm.
    One revolution has 200 steps. (1.8 x 200 = 360)
    8/200 = 0.04 mm per step.
    2 steps = 0.08mm, 3 steps = 0.12mm, 4 steps = 0.16mm, 5 steps = 0.2mm. Consequently, 0.1mm would require 2.5 steps.

    +Josh B It's hard to compare screws and belts on a milling machine vs printer. On a printer the X & Y belts are moving only the mass of the extruder or bed. On a milling operation a belt moves similar mass but also is applying the cutting force. On a miller, belts that are not engaging a stationary track should stretch under that load. That is why acme screws are ideal for X & Y on a mill. But, you're not milling at 100+ mm/sec, which is ideal for a belt on a printer. Per your link, that kind of lead gets up to the belt speeds, but, I'm thinking that a screw that moves an inch per revolution may require a NEMA 23 motor. That distance should require about 3 times more torque than a Tr8*8-4 which is moving about 1/3 the distance per step.
     
  8. Josh B

    Josh B Well-Known
    Builder

    Joined:
    Nov 4, 2014
    Messages:
    116
    Likes Received:
    42
    So, who's math is correct? This is the same issue I've found while researching screw vs belt, lots of people using different math to prove there opinion. I'm not saying either one of you is wrong or right as I haven't a clue...yet! Thanks for the education, I need all I can get.
     
    runninfarmer likes this.
  9. Josh B

    Josh B Well-Known
    Builder

    Joined:
    Nov 4, 2014
    Messages:
    116
    Likes Received:
    42
    Wish I could find some 12mm 10 start 25mm lead acme screws!
     
  10. Josh B

    Josh B Well-Known
    Builder

    Joined:
    Nov 4, 2014
    Messages:
    116
    Likes Received:
    42
    Keith, can you help me understand where the number of starts on the screw would come into the equation?
     
  11. runninfarmer

    runninfarmer Well-Known
    Builder

    Joined:
    Feb 22, 2015
    Messages:
    99
    Likes Received:
    48
    Yes, for a full step it's (8mm travel/1 rev)/ (200 full steps/rev)= 0.04 mm/full step. I said 1/16 stepping not 1/6th stepping, so you'd have (0.04mm/full step)*(1 full step/16 steps) which = 0.0025 mm/step. Most people run their 3D printers at 1/16th stepping, so you will not have half steps with the openbuilds leadscrew. So again, for one 0.1 mm layer, you get 0.1mm / 0.0025 mm/step = 40 steps.
     
  12. runninfarmer

    runninfarmer Well-Known
    Builder

    Joined:
    Feb 22, 2015
    Messages:
    99
    Likes Received:
    48
    Confusion typically comes with talking about stepping. Most people are using 1.8 degree/step motors which is where the 200 steps comes from. Dividing 360 degrees by 1.8 gives you 200 full steps/rev as Keith pointed out. You usually don't use full stepping because of poor resolution. As you increase your stepping, resolution increases. When I say 1/16th stepping, this means you've multiplied one full step by 16. This means you now have 200*16 which now equals 3200 steps per 1 motor revolution. This is much larger than the 200 steps per 1 motor revolution with full stepping. As long as you setup your equation so that units cancel where they should you'll be fine. I've calculated all my machines this way and never had a problem.
     
  13. Kyo

    Kyo Veteran
    Staff Member Builder Resident Builder

    Joined:
    Feb 27, 2014
    Messages:
    673
    Likes Received:
    702
    Not hard to find, just pricey when compared to the OB tr8*8 screws, There are others as well but these two were the cheapest from my research.
    Thompson
    Part# SRA10-12X2.5M
    Igus
    Part# PTGSG-12x25-R-ES


    One of my printer's is fully leadscrew driven. Here are the specs for what I used. I would be happy to film some sort of speed test on it.
    Z-axis -- 10mm dia. 1 start 2mm pitch. Running with 64oz 17HS16-2004S motors and a4988 drivers..
    X+Y-axis -- 12mm dia. 6 start 25mm lead 2.5mm pitch. Running with 76oz KL17H248-15-4A and a4988 drivers..

    While my motors run nice and cool and have no problems moving things around quickly. The drivers do get very hot to the touch. Around 100-120mm/s they get to hot and start to skip steps.. I am running at 60mm/s with infill at 80mm/s right now, with out problems.. I also have some drv8825 with heat sinks on the way..

    Edit: Speed test demo 100mm/s...
     
    #13 Kyo, Sep 9, 2015
    Last edited: Sep 10, 2015
  14. Keith Davis

    Keith Davis Veteran
    Builder

    Joined:
    Dec 11, 2013
    Messages:
    507
    Likes Received:
    398
    +Josh B Threaded rod always has only one start, therefore pitch and lead are the same. Acme threads can have multiple starts and lead (the distance traveled) = starts * pitch. In these calculations pitch is irrelevant, lead is what we are measuring.
    [​IMG]

    + runningfarmer You are correct - IF you rely on microstepping for Z layers. But let me quote Prusa at his calculator for "Optimal layer height for your Z axis" (http://prusaprinters.org/calculator/)

    Helps you to select layer height in a way, that Z axis moves only by full step increments. Z axis isn't usually enabled during inactivity. If the axis is disabled during micro-step, axis jumps to the closest full step and intorduce error. This effect is occuring to some extent even while leaving the Z axis motors enabled. This is most usefull to machines with imperial leadscrews but also for unusual layer heights with metric leadscrews.

    At first I doubted his assertion that "axis jumps to the closest full step". So I set up a printer using 8mm threraded rod with the X carriage belt removed and carriage parked to one side with a digital depth gauge mounted to the X axis. I loaded the SKP for OpenBuilds Universal Build Plate in Sketchup and raised it to 100mm. I then sliced it with .2 layers and set it to lift .2 on each non-print move. With 72 holes to have to Z lift around per layer, that totals over 36,000 Z lifts for the print, or 3600 lifts per 10mm of travel. I then measured the height of the X axis at bottom and ran the print with no filament. Pausing every 10mm I measured the height. Using .2 lifts, I consistently raised 10mm, as expected. But, if I set the lifts at .22 (forcing microstep parking) the difference could be as much as a layer off from 10mm. As Prusa had found, setting the motors to remain engaged during rest decreased the problem, but did not remove it. I then changed from 8mm threaded rod to 8 pitch acme screws and set the lifts to .3 (forcing them to stop on microsteps). The increase was so dramatic that I didn't even finish the entire print (about 24 hrs) before pulling the acme screws out of the machine.

    +Kyo I am running at 60mm/s with infill at 80mm/s right now, with out problems. I suppose that would be a feature if you were pushing a 10 lb. extruder or build bed, but I'm running 300mm/sec for perimeters and infill using GT2 belts on my OneZ printers (PLA @ 215C w/Universal E3D) with motors and drivers "warm to the touch". Where is the advantage when the acme screw is not providing cutting force or moving far more mass than an extruder or build bed?
     
  15. Kyo

    Kyo Veteran
    Staff Member Builder Resident Builder

    Joined:
    Feb 27, 2014
    Messages:
    673
    Likes Received:
    702
    No advantage really, Speed was not my goal with this build.. When finished it will be serving as a 3d printer / laser engraver-cutter / pcb mill. I wanted something robust enough to handle it without sweating. While the printer is easily able to print at similar settings as yours, I knew going in I would be limited by my choice of screws, motors and drivers. My choice to build a lead screw based printer was to try something new while learning about a drive system I have never used before overall speed was of little concern.

    As one of the few who have actually built a pure lead screw driven printer my post was only to give a point of reference to the OP to help him make a decision along his build.

    When my filament order and drv8825 drivers come in, I will try a couple fast prints to see just how crazy fast I can get her to print.. :) I don't mind running tests just to see how well it can preform..
     
  16. Josh B

    Josh B Well-Known
    Builder

    Joined:
    Nov 4, 2014
    Messages:
    116
    Likes Received:
    42
    + Keith Davis - 300mm/sec! Wow, that's smoking. Are the prints usable at that speed, how is the resolution? Not knowing the in's and out's, I'm surprised that the extruder can keep up at that speed.

    +Kyo - That is thing is smooth, do you have a build log that I can browse? That's exactly what I'm after, I will check into those screws. I do realize that I'm going to have more upfront investment but this is a one time deal so I don't mind.

    I will say that I'm not after a speed demon here, I just want something that prints reliably accurate and repeatable parts and that can handle two or maybe even three hotends. But, I would like that accuracy and repeatability to happen at 60-80mm/sec rather than my current 40-50mm/sec. My dislike for the belts is strictly due to my cheap Chinese Prusa i3 knock-off that seems to require that everything be re-adjusted or tightened after every other print.
    I hope my Azteeg X3 can handle this thing when it's built! Also, I've made a change in materials. Rather than aluminum plate for connection components, I'll be using G-10.
     
  17. Kyo

    Kyo Veteran
    Staff Member Builder Resident Builder

    Joined:
    Feb 27, 2014
    Messages:
    673
    Likes Received:
    702
    Thanks, I do have a build log, here is a link. It is largely based on the Lautr3k build with changes to accommodate my part selection. I am running the newest version of marlin on a ramps 1.4 with a 2560 mega, the azteeg x3 is compatible with ramps and marlin so you should be fine there.
     
    #17 Kyo, Sep 10, 2015
    Last edited: Sep 10, 2015
  18. Josh B

    Josh B Well-Known
    Builder

    Joined:
    Nov 4, 2014
    Messages:
    116
    Likes Received:
    42
    Keith - in regards to the X/Y axes, where the layer height is not of concern, what would the implications of using a torqspline screw be?
    When I plug in the torqsplines 25.4mm/revolution into the Prusa calculator, using 1/8 step, I get 62.99 steps/mm. Is this going to throw my prints off over a 12" bed width?
     
  19. Josh B

    Josh B Well-Known
    Builder

    Joined:
    Nov 4, 2014
    Messages:
    116
    Likes Received:
    42
    _Your link is bad -
     
  20. Kyo

    Kyo Veteran
    Staff Member Builder Resident Builder

    Joined:
    Feb 27, 2014
    Messages:
    673
    Likes Received:
    702
    sorry about that, they have been corrected.
     
  21. Keith Davis

    Keith Davis Veteran
    Builder

    Joined:
    Dec 11, 2013
    Messages:
    507
    Likes Received:
    398
    + Josh B There are three thresholds for speed.

    The first one is the frame. Old RepRap A frames, Prusa i3 Birch or Acrylics just can't deliver the rigidity. V-Slot extrusion frames certainly can because they are designed to produce rigidity for CNC milling. I have a BldrBot (http://www.openbuilds.com/builds/bldrbot.632/) built on V-Slot with X & Y belts that just logged it's 9,000th hour printing ABS and PLA at 100mm/sec and I've never touched a belt once I had them setup. If the frame is rigid and belts are tight, resolution is excellent.

    The second threshold is the extruder's ability to heat up that much filament that fast. The BldrBot is limited to 100mm/sec because it uses a QU-BD 9 with a PTFE liner. That limits the "melt zone" to only 5mm. On the printer that is running 300mm/sec I'm using an E3D with a metal barrel which has a 13mm "melt zone" and another 20mm pre-heat "transition zone" above the barrel's heat break. Then above that I tap out the aluminum fin body to 4mm and insert a PTFE tube that runs from the top of the barrel to the drive gear. That prevents heat creeping up PLA and provides a channel all the way from the gear/idler to the nozzle for flex filament. Because the PTFE is above the "melt zone" & "transition zone" I can also print hi temp Nylon and Polycarbonate filaments up to 300C.

    But, speed depends on the filament. PLA transitions from solid to liquid and I can actually print it at 350mm/sec. But ABS transitions from solid to plastic to liquid. That extra phase change requires more heat and I'm limited to 250mm/sec with ABS. On the down side, printing NinjaFlex is still at a pitiful 35mm/sec.

    One you have a "melt zone" long enough to melt the filament the next threshold is temperature. It takes more heat so a higher temp is required. That's why I limit PLA to 300mm/sec at 220C because 350mm/sec at 230C is just too hot for PLA (perimeters around small holes will crystallize).

    But, beware, speed isn't all it's cracked up to be. Example, I have a 7" x 3.5" plate I print for the RAMPS box. The difference between 100mm/sec and 300mm/sec is only 1/3 less time not 3 times faster. Using 45 degree infill the max stroke is 120mm, but only about 80mm of that is running at 300mm/sec. The deceleration and acceleration at each end eat up the remaining 40mm. Add some holes to have to work around with more deceleration and acceleration and the speed advantage diminishes quickly. With smaller prints you may never actually accelerate to full speed at all. If you can print at 100mm/sec you are doing fine pal. The only reason for engineering for faster speed is so you can say it does it, which is a biggy if you are designing a printer for sales ;). On the other hand, if the frame is rigid, belts tight enough for the "twang test", motors and drivers running cool enough, and an adequate extruder, that 7" x 3.5" plate looks and mics out as an exact duplicate whether it is printed at 50mm/sec or 300mm/sec.
     
    Kyo likes this.
  22. Josh B

    Josh B Well-Known
    Builder

    Joined:
    Nov 4, 2014
    Messages:
    116
    Likes Received:
    42
    Wow, lots of input..thanks a ton!
    As of now. I've settled on the 10 x 2 trapezoidal lead screw for the Z axis from Roton: http://www.roton.com/Mating_Components.aspx?family=7060746 .
    For the X and Y axis, I'm considering a 10 x 35 28 start screw from Helix Linear:
    http://www.helixlinear.com/Product/ProductName/115148/Metric-Lead-Screw-10-mm-x-35-mm-Alloy .
    Or the 12 x 25 5 starts screw from Helix Linear:
    http://www.helixlinear.com/Product/...tric-Lead-Screw-12-mm-x-25-mm-Stainless-Steel .

    Thoughts? I'm finishing up the model in SU and these two axes are the only items remaining for completion.
     
  23. Josh B

    Josh B Well-Known
    Builder

    Joined:
    Nov 4, 2014
    Messages:
    116
    Likes Received:
    42
    Kyo,
    Did you use anti-backlash nuts on your screw driven printer? Just wondering if the benefit of the nut out weighs the cost in this application.

    josh
     
  24. Kyo

    Kyo Veteran
    Staff Member Builder Resident Builder

    Joined:
    Feb 27, 2014
    Messages:
    673
    Likes Received:
    702
    No I did not, anti backlash nuts were not shown in the catalog when I ordered my screws. So I am using the nuts that came with the lead screws ( no extra cost ), I would have to contact the manufacture to see if anti backlash nuts are even available for my screws..
     
  25. Josh B

    Josh B Well-Known
    Builder

    Joined:
    Nov 4, 2014
    Messages:
    116
    Likes Received:
    42
    So, I can assume your not having any issues with backlash at higher speeds?
     
  26. Kyo

    Kyo Veteran
    Staff Member Builder Resident Builder

    Joined:
    Feb 27, 2014
    Messages:
    673
    Likes Received:
    702
    I don't have a solid way to really measure backlash, but none that shows up in the prints as far as I can tell. However wear and tear over time may change that! If you can get anti backlash nuts and they are not a huge increase in price I see no reason not to get them..

    If they add a great deal to the cost, in the end it is just a 3d printer and replacing the standard nuts at some point in time is not to big a deal. You can also double nut with pre-loaded spring in between or split the nut and wrap with a spring steel band to make your own anti backlash nut..
     
  27. Josh B

    Josh B Well-Known
    Builder

    Joined:
    Nov 4, 2014
    Messages:
    116
    Likes Received:
    42
    Got a quote from Helix Linear for the 12 x 25 lead screw. Looks like one 24" screw with AB nut is $75.14 with out shipping. I thought it would be more than that, my final cost will be less as my screws will not be 24". Also, have to figure out if they will turn the ends to my specifications or not.
     
  28. Josh B

    Josh B Well-Known
    Builder

    Joined:
    Nov 4, 2014
    Messages:
    116
    Likes Received:
    42
  29. Mike Andrews

    Builder

    Joined:
    Jul 3, 2015
    Messages:
    10
    Likes Received:
    2
    Lots of good info! We are pulling together a bit of a giant printer with Monster. But pretty much the same overall goals as you are here. 3D printer that can also handle some possible CNC and laser work. I was at the Portland Mini-MakerFaire last weekend and one of the folks there had a small printer with a CNC spindle as part of the X-axis assembly. They were running Repetier with scripts to be able to machine the part on the bed either right after the print or during it. I didn't see which. (I'll add the link to their site when I get home - I can't remember it at the moment) Parts off the machine were very impressive.
     
    Josh B likes this.
  30. stargeezer

    stargeezer Journeyman
    Builder

    Joined:
    Feb 20, 2015
    Messages:
    328
    Likes Received:
    117
    I've tried them on a CNC Router. I discovered before I even finished the build that they were just not going to work out. By the time I got them adjusted loose enough that they traveled freely enough to not jam up, there was too much slop in the assembly to be of any use. For what you are spending on this build, "saving" $20 on these would be false economy.
     
    Josh B likes this.

Share This Page

  1. This site uses cookies to help personalise content, tailor your experience and to keep you logged in if you register.
    By continuing to use this site, you are consenting to our use of cookies.
    Dismiss Notice