Welcome to Our Community

Some features disabled for guests. Register Today.

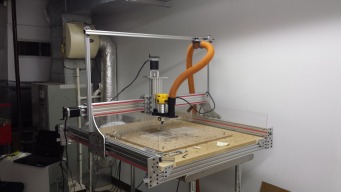
My CNC Router Built Around The New C-Beam Rail

Discussion in 'CNC Mills/Routers' started by Robert Bailey, May 30, 2015.

  1. Robert Bailey

    Robert Bailey Well-Known
    Builder

    Joined:
    Mar 23, 2015
    Messages:
    117
    Likes Received:
    71
    Robert Bailey published a new build:

    Read more about this build...
     
    #1 Robert Bailey, May 30, 2015
    Last edited by a moderator: Jul 16, 2015
  2. Steven Bloom

    Steven Bloom Journeyman
    Builder

    Joined:
    Dec 18, 2014
    Messages:
    194
    Likes Received:
    105
    Very nice !!
     
  3. Robert Bailey

    Robert Bailey Well-Known
    Builder

    Joined:
    Mar 23, 2015
    Messages:
    117
    Likes Received:
    71
    yep, I got 4 to test with , then replaced all the load bearing wheels with the extreme wheels. I just used the regular wheels on the bottom to lock every thing together. also used the regular wheels for the Z axis.
     

    Attached Files:

    silopolis and Joe Santarsiero like this.
  4. Robert Bailey

    Robert Bailey Well-Known
    Builder

    Joined:
    Mar 23, 2015
    Messages:
    117
    Likes Received:
    71
    if anyone is wondering about the holes across the bottom of the gantry, the plan is to run a 80mm piece across and tie the gantries together to make it more rigid .
     
    silopolis likes this.
  5. Ronald van Arkel

    Staff Member Builder Resident Builder

    Joined:
    May 7, 2014
    Messages:
    472
    Likes Received:
    245
    Why not put 2 of 40 or 60 mm at the extremes of the bottom so the gantry will be a bit stiffer? Also, still use one at the back of the gantry for cables and more stiffness. The plates look like the ones I'm designing for my Acme OX as well, but I'll make them less thick ;).

    Did you do some feed tests with the machine? How do you have your configuration setup? 1/8 of a step and max. feed rate at 2000mm/min? Voltage and Ampere settings? Something like 24vDC and 1.2A? Would be interesting to know! Thank you. Great looking build!

    -Ronald
     
  6. Robert Bailey

    Robert Bailey Well-Known
    Builder

    Joined:
    Mar 23, 2015
    Messages:
    117
    Likes Received:
    71
    Had my cad guy get me a picture out of solidworks so you could see what the end result will look like. our current gantry plates are nothing like the picture but the holes for the wheels are in the same location.
    we started out to make a set of plates the could be used with belts or lead screws. I just chose to use the c-beam an not drill all the extra holes. I plan on putting an 80mm across the bottom to make the gantry
    stronger just haven't got to that yet. as you can see on the gantry plates we but 5mm holes down the back and across the bottom for good measure, never know what you might need. we will make no plates with
    the router when it is running, we are brain storming on doing a Z gantry to get back some lost Y length.

    we ran some tests yesterday with a g-code test file ,the alien, with a pen taped to the router. I had to bring the max velocity and feed down to 2000. will most likely have to go slower when cutting. I have the TinyG
    hooked up to a 24VDC 10 amp supply I got off ebay. I hooked it up to a lab PS I bowered from work and it show about 1.5 amp draw when drawing the alien.

    Fell free to ask questions or point things out, this is the first build and we keep seeing things to change all the time.
    Robert
     

    Attached Files:

  7. Ronald van Arkel

    Staff Member Builder Resident Builder

    Joined:
    May 7, 2014
    Messages:
    472
    Likes Received:
    245
    Thank you Robert,

    The info you gave me is very useful to me.

    It seems that it's hard to get the feedrate above 2000mm/min with the long, 1030-1040mm Acme rods. I've build a similar machine before and could reduce the resonance a bit by using treat lock tape (looks like thick teflon tape) on the Acme and then shove the bearing on it. I also used blue Locktite to "glue" the bearing into the plate holes. Sanding the Acme rod with fine grid paper made the ride smoother and I used BAT3 grease on the Acme. All this helped a lot for the smoothness of the movement. I don't know how long the tape will do it's job as the machine went to a customer.

    You must have set the drivers at a 1/8 step; I think they come stock like that on the TinyG.

    -Ronald
     
  8. Robert Bailey

    Robert Bailey Well-Known
    Builder

    Joined:
    Mar 23, 2015
    Messages:
    117
    Likes Received:
    71
    Yep I have the motor step rate on 1/8. i think my problem was trying to push this monster faster than the motors could go and one would get out of sync. the problem with screws is the deflection when there isn't any support. I think the 1000mm C-Beam is about as long as you will be able to push without a lot
    of deflection especially on the small 8mm screw. would love to do a rack and pinion system, but this is what my learning budget can handle for the moment. going to post a few more pics tomorrow. cutting the cross
    members tonight and assembling it tomorrow morning.
     
  9. Robert Bailey

    Robert Bailey Well-Known
    Builder

    Joined:
    Mar 23, 2015
    Messages:
    117
    Likes Received:
    71
    Got the 40mm and the 80mm attached to the gantry this morning. the 40mm will be used for the cable chain and the 80mm just ties the bottom of the gantry together. I also pimped it out with a little
    red in a few slots. I also did another test run, this time with the smiley face. might get it to cut something next week, headed out of town for a couple of days so it will have to wait.
    Robert
     

    Attached Files:

  10. Mark Carew

    Mark Carew OpenBuilds Team
    Staff Member Moderator Builder Resident Builder

    Joined:
    Jun 28, 2013
    Messages:
    2,758
    Likes Received:
    2,440
  11. Steven Bloom

    Steven Bloom Journeyman
    Builder

    Joined:
    Dec 18, 2014
    Messages:
    194
    Likes Received:
    105
    Wow !!! Great build
     
  12. Robert Bailey

    Robert Bailey Well-Known
    Builder

    Joined:
    Mar 23, 2015
    Messages:
    117
    Likes Received:
    71
    Thanks guys, been busy at work so haven't had a lot of time to work on it. we did get to cut the first test. it is an adapter plate for a speaker for a piece of equipment we build where I work.
    now that we are all back from vacations I hope to take the next step and make it out of .032 aluminum. hopefully today.

    Here is the CNC in action on one of its test cuts.


    Attached Files:

  13. Robert Bailey

    Robert Bailey Well-Known
    Builder

    Joined:
    Mar 23, 2015
    Messages:
    117
    Likes Received:
    71
    here is some more pictures, haven't had much time to work on it. Getting ready to drill the main board with 5/16 holes for alignment dowels and 1/4 threaded inserts for hold downs.
    added side shields to deflect stuff from getting into the tracks. after putting the lexan on I figured I could have put some angle aluminum to cover the wheels and track. Still testing software to get code
    into the tinyG. Don't want to use the chillipepper stuff, want this to be offline to the internet. going to test grblgru tomorrow..
     

    Attached Files:

    silopolis, Knut Bøje and GrayUK like this.
  14. Robert Bailey

    Robert Bailey Well-Known
    Builder

    Joined:
    Mar 23, 2015
    Messages:
    117
    Likes Received:
    71
    forgot to add this, I have bench tested my SSR's and they switch on at less than 1.5 volts so the tinyG can turn on the router and another device, like a vacuum. all I have left is to make a few final connections
    and test it out.
     

    Attached Files:

  15. Mark Carew

    Mark Carew OpenBuilds Team
    Staff Member Moderator Builder Resident Builder

    Joined:
    Jun 28, 2013
    Messages:
    2,758
    Likes Received:
    2,440
  16. James_Hopkins

    Builder

    Joined:
    Jul 16, 2015
    Messages:
    28
    Likes Received:
    6
    Robert, your build looks great. I am about to start the exact same build with 3 1000 mm c rail and 250 mm for the z axis.
    Is it possible for you to share the cad drawings for all the plates you made?
     
    Rlwilson2 likes this.
  17. Robert Bailey

    Robert Bailey Well-Known
    Builder

    Joined:
    Mar 23, 2015
    Messages:
    117
    Likes Received:
    71
    my coworker has gone for the day but I can get them, they are in solidworks. I had him make me a 1:1 pdf that I printed out to make the plates. did the cuts on my dewalt chopsaw and drilled the holes on
    my drill press. as soon as I get my machine fully tested I am going to have it make new plates that are more precise. here is what I had on my pc. I included an end plate that we came up with, but was going to cost
    $500 at a local shop to have made.
     

    Attached Files:

    silopolis and Rlwilson2 like this.
  18. Timbomill

    Timbomill New
    Builder

    Joined:
    May 17, 2015
    Messages:
    2
    Likes Received:
    0
    Awesome Build Robert , best I've seen that would Please my needs . Thanks for posting the gantry plate pdf , would love to see the Z mounting plates and simple End plates in pdf . No hurry but if you could in the future , that would be great . Also what length C-beams are you using On the one you have built and pictured ?
    Tim
     
  19. Robert Bailey

    Robert Bailey Well-Known
    Builder

    Joined:
    Mar 23, 2015
    Messages:
    117
    Likes Received:
    71
    My coworker "Brad" lives 8 hours a day in solidworks did the drawings. we took the OX plates and did some mods. we are working on some new ones which will reverse the top channel an add a couple of inches of 'Y' travel. I'll talked to him Friday and he will post the files. I build it all with the 1000mm beams, if you follow my build then you will not but the bundles. did some more work on it Saturday, put a new work surface on it and drilled 5/16 peg holes and 1/4-20 threaded inserts, wont have any problem holding down projects. the spoil board will be drilled to allow the pins and bolts to go through and lock into the work surface. as soon as I get that drill and verified I will post it also, it is 24"x24" but could be made to fit the entire work surface.
     

    Attached Files:

    silopolis likes this.
  20. Timbomill

    Timbomill New
    Builder

    Joined:
    May 17, 2015
    Messages:
    2
    Likes Received:
    0
    Thanks , I will watch for some more files and Video's , Awesome Machine ! :)
     
  21. Rlwilson2

    Rlwilson2 New
    Builder

    Joined:
    Feb 3, 2015
    Messages:
    9
    Likes Received:
    0
    I am watching as well.. What is your working area? How stiff is the gantry?
     
  22. Robert Bailey

    Robert Bailey Well-Known
    Builder

    Joined:
    Mar 23, 2015
    Messages:
    117
    Likes Received:
    71
    I ma using 1000mm beams all around, the gantry is very stiff but this week I notices several thousands wiggle in the x and z axis, we tore it all apart and found
    the black wheels wiggle. we made sure the shims were in between the bearings but couldn't get it to go away. most of them the bearings just feel out, so their fit is loose. luckily I had ordered extra
    extreme wheels so I had 4 to put on the top and bottom of the Z axis, and that seems to have fixed it. might be something mark need to look into. going up tomorrow to drill out the spoil board, then redo some measurements and start making better
    plates and brackets. I will post more drawings as soon as we finish the design. think we are going to flip the X axis to make it easier to work on the X and Z. right now you have to dissemble the Z to replace
    the X screw block.
     
  23. Robert Bailey

    Robert Bailey Well-Known
    Builder

    Joined:
    Mar 23, 2015
    Messages:
    117
    Likes Received:
    71
    finished the spoil board today, lines up great with the main work surface, been working on a tinyg gcode sender. modeled after the grbl panel, but writing in C#. I am learning to program again, but
    I have several programmers in the office that guide me when I get stuck. and the working area is about 32x32
     

    Attached Files:

  24. Robert Bailey

    Robert Bailey Well-Known
    Builder

    Joined:
    Mar 23, 2015
    Messages:
    117
    Likes Received:
    71
    Please don't use my gantry plates, we found an error that causes problems. somewhere we got solidworks drawings that weren't correct or something. the wheel spacing
    is off about 1-1.5 mm, we have redrawn them and are in the process of drilling and will test them out over the next couple of days. I deleted the pdf file, if you have it delete it. I will post new ones as soon as we verify that the new ones work.
     
  25. Greg F

    Greg F New
    Builder

    Joined:
    Aug 2, 2014
    Messages:
    1
    Likes Received:
    0
    Hi Robert Bailey how is the software coming along for the TinyG I'm also looking for something I can use offline....
     
  26. Robert Bailey

    Robert Bailey Well-Known
    Builder

    Joined:
    Mar 23, 2015
    Messages:
    117
    Likes Received:
    71
    Haven't gotten as far as I would like, have worked on the user interface mostly, I haven't got any serial stuff written yet. we have had several set backs with the machine. wheels loose, flex in the Z axis.
    we redesigned the X gantry and the Z assembly to make it more stable. so far I have broken several end mills all 1/8", including 2 'O' flutes from toolstoday.com , cannot seem to find a happy spot with the
    speed and feeds. anything over 1/64 DOC and 10-15 IPM snaps the bits. 1/4 bits run faster and don't seem to clog up. Just added a air system to clear chips, will have a mist system designed next week. I will try to add pictures after the holiday.

    As far as the software goes, any suggestions for options and features would help. I already have edit and save of controller settings, Z probe, working on program stops and tool change, automatic change of units based on Gcode file, manual commands. If someone wants the source I will provide it as long as they give their source back to the community. I am not a programmer so it is most likely not the best way to do things.
     
    Mark Carew likes this.
  27. Robert Bailey

    Robert Bailey Well-Known
    Builder

    Joined:
    Mar 23, 2015
    Messages:
    117
    Likes Received:
    71
    done a lot of work on the machine this month, we are having issues with the rigidity of the Z-axis in the Y direction. we made new X plates and added a 4th wheel on both sides and added 2 sets on the back
    to try and make it more ridged, but it still rocks. we have concluded that the open face of the C-beam is flexing along with the wheels/bearings and screws. anything more than one IPS plunge and the Z-axis
    cants outward several 1000's of an inch. we are trying to decide on getting rid of the c-beam on the X or to try and flip it around. I also cant seem to mill 6061-t6 worth a crap. Plastic and thin aluminum
    seems to do ok, 5-10 IPS and 4-5 on the router speed. made a lot of difference when we added the air blower to it. I just got the mister, just have to make a bracket to attach it. the small aluminum bracket
    is a switch mount that my office needed, the one on the left is what we have made singles are $160, $450 for 11 of them. took me and the cad guy 30 minutes to cad/cam it um and mill them, another 30 min and I had
    a total of 5 made. I am also trying my hand at making a TinyG Gcode sender, it is posted under the control software, far from finished.
     

    Attached Files:

    silopolis likes this.
  28. Steven Bloom

    Steven Bloom Journeyman
    Builder

    Joined:
    Dec 18, 2014
    Messages:
    194
    Likes Received:
    105
    I am working on my Sea-Ox still and have not tested it out, but I think your problem could be in your design of the Z. On your design like many of the others you use 3 -4 wheels on each side and just end the screw on the Z with a bolt. It all seems fine but it lets the X and Y Axis flex the screws. In my picture here you can see that not only am I using double wheels on a C-Beam but I am using the Front plate to fasten everything together.

    2015-09-16 18.49.06.jpg
     
    silopolis likes this.
  29. Robert Bailey

    Robert Bailey Well-Known
    Builder

    Joined:
    Mar 23, 2015
    Messages:
    117
    Likes Received:
    71
    I'm getting flex in both directions, we put a digital dial indicator on the X direction of the Z and got it to move a couple 1000's by squeezing the open area of the C-beam, which we think is adding to the issue.
    If we do a plunge rate of 1 IPM and a 1/64th DOC it seems to be able to handle it without walking, but an rpm of 15-18k with a loose fixture that end mill grows a pair of legs doing 6061 aluminum.
     
  30. Mark Carew

    Mark Carew OpenBuilds Team
    Staff Member Moderator Builder Resident Builder

    Joined:
    Jun 28, 2013
    Messages:
    2,758
    Likes Received:
    2,440
    One idea I have been wanting to try this real world in the example builds for the C-Beam actuators. The ideas is to use 4 trucks with a plate mounted to them like some of the industrial machines have in the way of bearing blocks.
    I think this would make for a very strong an accurate gantry. Using the larger solid wheels would also be a cool concept to try as well.
    Just an idea I thought I would throw out there, hope it helps
    CBeam_OpenBuilds Example 4 truck idea.jpg
     

Share This Page

  1. This site uses cookies to help personalise content, tailor your experience and to keep you logged in if you register.
    By continuing to use this site, you are consenting to our use of cookies.
    Dismiss Notice