Welcome to Our Community

Some features disabled for guests. Register Today.

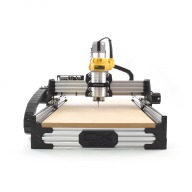
ooznest OX CNC Machine

Discussion in 'CNC Mills/Routers' started by Ryan Lock, Apr 28, 2015.

  1. Ryan Lock

    Ryan Lock Veteran
    Builder

    Joined:
    Oct 12, 2014
    Messages:
    530
    Likes Received:
    293
    @Muxa Greats looks like we are getting there. With the final cut did you do it a full depth, or still in incremental steps? I think have the belts as tight as possible would give the best results. Also make sure the pulley grub screws are tight.

    Yes you could try changing the pulley. What about first increasing the micro stepping? The xPro is set at 1/8 it can go up to 1/32.

    Best Regards

    Ryan Lock
     
  2. Muxa

    Muxa New
    Builder

    Joined:
    Sep 9, 2016
    Messages:
    23
    Likes Received:
    12
    Final cut was at full depth.
    Thanks for the tip, I'll try tightening the belts and increasing microsteps.
     
  3. Ryan Lock

    Ryan Lock Veteran
    Builder

    Joined:
    Oct 12, 2014
    Messages:
    530
    Likes Received:
    293
    Ok, maybe try the final cut incremental steps.
     
  4. Conehead

    Conehead New
    Builder

    Joined:
    Aug 30, 2016
    Messages:
    38
    Likes Received:
    5
    Ha, did my first two tests today.
    Maybe I will drill the holes tomorrow for the spoiler board.
    Still I am totally unsure which bits to buy. And probably they will take another week to arrive.
    By accident I bought 11 bits to drill PCB. Guess I cannot use them for wood :/

    But here are my first results!
     

    Attached Files:

    GrayUK likes this.
  5. Jen

    Jen Well-Known
    Builder

    Joined:
    Nov 18, 2016
    Messages:
    30
    Likes Received:
    31
    My first OOZNEST OX experience:

    I am an old timer when it comes to CNC but a total new comer to the open source model of machine building.

    Just finished building an OOZNEST OX. I chose to purchase a complete kit. This one is 1000 x 750 mm. My experience has been nothing short of a pleasure.

    The packaging was superb. Everything was individually wrapped, clearly labelled, and not a single screw was missing.

    The instruction manual is a work of art, with clear, conscience instructions arraigned in a logical order. Its accuracy was spot on.

    The materials provided were all of good quality, and fit perfectly, even the few 3-D printed parts.

    I built my router during the evenings spending three or four hours a night. From start to finish it took me four evenings. In total about fourteen hours. If I knew what I was doing I could have probably done it in half the time.

    The best part is that by purchasing my router in kit form I was able to afford a much larger machine than my budget would otherwise allow.

    The router itself seems to be designed very well. The materials are nice and heavy the structure is quite ridged and it appears that it should have no trouble holding a reasonably tight tolerance.

    KUDOS to Ryan and the entire OOZNEST team for making this a pleasurable and economical experience. I am looking to years of service from my OX

    Jennifer
    Bridlington, England
     
    crispin, GrayUK and Anthony Bolgar like this.
  6. Ryan Lock

    Ryan Lock Veteran
    Builder

    Joined:
    Oct 12, 2014
    Messages:
    530
    Likes Received:
    293
    @Conehead Looks like you getting there. It is a learning experience buying the endmills, but once you have settled on a few you like you will be away.

    @Jen Thanks for the praise, much appreciated. Hope the machine serves you well :thumbsup:
     
    GrayUK likes this.
  7. Jen

    Jen Well-Known
    Builder

    Joined:
    Nov 18, 2016
    Messages:
    30
    Likes Received:
    31
    Thank cone head,

    I have built this machine to fill two specific needs, so I already knew what I wanted to do with it before I even made the purchase.

    This is actually my third CNC router. The first was a home made ball screw and bread board contraption that I used to learn about home CNC. The second was made by friend who owns a "job shop". It was over kill with regard to precision and weight and had a smallish 12x12 cutting area.

    Before I moved to England I used it for building and selling wooden clocks as a hobby business in Floriduh. Unfortunately I could not justify shipping It when I moved.

    I plan to continue making clocks as needed but this routers purpose is to augment my ukulele making efforts. I am an accomplished "Ukster" who not only plays but has been hand making them for some years. Recently I talked a large music shop owner into buying a number of my ukuleles. Now I have to make the darn things!

    Having started my career as a high precision machinist, then switching to shop floor automation (robotics) in the early 1980's, then finally settling in as a manufacturing systems applications developer gives me a unique skill set making tool selection a no brainier.

    @Jen thank you for making this cool router available.
     
    Ryan Lock likes this.
  8. pjunger

    pjunger New
    Builder

    Joined:
    Nov 25, 2016
    Messages:
    2
    Likes Received:
    0
    HI
    Has build my OZNEST 750x1000 complet kit with GRBL 0.9 - and powered it on. I can move around with the using UGS. No problem.
    But when it comes to make circles I gets problem - I have tried the simples way - made a circle in Fusion 360 and create the GCODE. But only gets a lot af Error 33 back. When it comes to execute G02 and G03 commands.
    Using the same metode to create a square works very fin.

    I have tried to find small Gcode examples there will do a circle - but haven't any one there works.

    What have I done working in the settings ? - Any suggustions

    Thanks
     
  9. Darathy

    Darathy New
    Builder

    Joined:
    Jul 12, 2016
    Messages:
    74
    Likes Received:
    21
    Mostlikely you use wrong post process i use modified(i have removed the G92 commands so it doesnt reset my zero points) Generic BoXZY(grbl) in fusion 360 and evrything works great. I have attached the modifed version in the post.
     

    Attached Files:

  10. pjunger

    pjunger New
    Builder

    Joined:
    Nov 25, 2016
    Messages:
    2
    Likes Received:
    0
    Thanks - I will test not, but first tomorrow - as I have to leave for the New Year dinner.

    Happy new year to you.

    /Per
     
  11. Stephan Schmidl

    Builder

    Joined:
    Nov 30, 2016
    Messages:
    21
    Likes Received:
    1
    Hi guys, finished my CNC OX from OOznest thes days.
    Can anyone tell me, what the max. feed rate is, that is possible with the OX?
    I want to mill foam at the beginning, 250 seems a little slow to me, but I dunno, what th Ox can handle.
    Using 6mm 3flute mill with a Makita router clone, the Katsu.
    Thank you in advance
    Stephan
     
  12. Ryan Lock

    Ryan Lock Veteran
    Builder

    Joined:
    Oct 12, 2014
    Messages:
    530
    Likes Received:
    293
    @pjunger You need to select a post processor which doesn't use arcs as this isn't supported in GRBL. I am not sure why the best one is in Fusion360. But with Cut2D I use standard G-Code .tap (No arcs).

    @Stephan Schmidl 250 is very slow. For aluminium 400-600mm. For wood 1000-1200 is a good starting point but it depends from material to material
     
  13. Giarc

    Giarc OpenBuilds Team
    Staff Member Moderator Builder Resident Builder

    Joined:
    Jan 24, 2015
    Messages:
    3,008
    Likes Received:
    1,676
    I was cutting foam shapes at about 4000 mm/min when making a Halloween gravestone decoration. When engraving shapes and letters on the foam, I slowed it down to 2000 mm/minute. No specific reason why, I think I was just playing it safe.
     
  14. Jeroen Swyngedouw

    Builder

    Joined:
    Jan 2, 2017
    Messages:
    1
    Likes Received:
    0
    hey Ryan,

    I was looking into your OX CNC kit and it is looking very promising for his price. But i was wandering, can it be easily upgraded with a laser module? To make it an laser cutter.

    greetings jeroen swyngedouw
     
  15. Stephan Schmidl

    Builder

    Joined:
    Nov 30, 2016
    Messages:
    21
    Likes Received:
    1
    Well guys, thank you for the replys...one more question:
    What exactly defines the speed of a cnc machine?
    Feed rate + acceleration?
    Thank you for giving me the hint to the feed rate....but where should I calibrate the acceleration of the machine?
    Tried to cut foam with 2000, but couldn´t imagine a noticable speed benefit compared to 1000.
    Thanx
    PS.: By the way.....where can I increase the microstepping?
     
  16. Stephan Schmidl

    Builder

    Joined:
    Nov 30, 2016
    Messages:
    21
    Likes Received:
    1
    Well sorry for that dumb question about the microstepping....just found the Jumpers :)
     
  17. Ryan Lock

    Ryan Lock Veteran
    Builder

    Joined:
    Oct 12, 2014
    Messages:
    530
    Likes Received:
    293
    We don't offer the upgrade, but there is no reason why you couldn't attach a laser to it, you will just need to find suitable controller/software to pair it with.


    @Stephan Schmidl Feed rate defines the speed. Acceleration determines how long it takes to reach that feedrate. For instance if you are doing small intricate work you may never reach the feed rate as there wouldn't be enough time to accelerate before a direction change.
     
  18. NLucier

    NLucier New
    Builder

    Joined:
    Sep 11, 2016
    Messages:
    18
    Likes Received:
    11
    If you are trying to cut at 2000mm/min, make sure that the controller is set to allow it to actually get there (values 110-112 control x-z max rate on the CNC Pro). If trying at 2000 was no faster than 1000, then the controller is probably set to 1000 and needs to be increased. I can't remember what my controller was set at when it arrived, but the back of the electronics install manual has a set of safe values to use. I ended up bumping my max X & Y to 4000mm/min.
     
    Ryan Lock likes this.
  19. michael nilsson

    Builder

    Joined:
    Aug 10, 2016
    Messages:
    5
    Likes Received:
    7
    After using my Ooznest OX for quite some time i feel confident in evaluating it and sharing a few shortcomings with the machine and also a few big pluses compared to lets say the x-carve. I bought the complete OX 1x1meter kit with electronics and everything.

    After unboxing the machine and checking all the parts against the included parts list i found out that i indeed was missing a fan and one crucial piece of linkage for the cable-chain. This was my first test of Ooznest customer service and let me just say that within a couple of hours new parts where on it´s way. You couldn´t ask for anything more from these guys! After that initial snag the rest of the assembly went supersmooth thanks to the outstanding manuals that are included in the kits.

    the assembly took close to a week as i only worked on the machine for 1-2 hours per day and after that i started to experiment with UGS. A few crashes later and i started to get the hang of things. But the machine didn´t feel ridgid and my x-gantry constantly seemed to shift and miss steps (or so it seemed). I went back and checked all the wheels and sure enough i had completely missed to snug up a few wheels. And this is the first shortcoming of the design as adjusting wheeltension is not as straight forward as it would seem. It´s kinda tight and hard to reach some of these excentric spacers.

    I also can´t help to feel that adjusting the belt-tension could be a little more fool-proof. I don´t know how but that is a shortcoming of all belt-driven machines am i wrong?

    After a few more testcuts i decided to try engraving and the resolution of the steps made by the machine seemes very big and my carvings ended up looking more or less bad. A quick email to Ooznest again and within a day or so Ryan came back to me with the solution, solder together two solderpads on the cncxpro to get the machine running smoother. Ryan, i dont know what exactly that setting did but man my machine is running so smooth and true now i cant believe it.

    In the beginning i felt that the lack of limitswitches were a big deal but after getting to know the machine i can say that i dont miss them anymore. They were missed in the beginning as i often ended up crashing my carriage due to lack of experience.

    + Much more ridgid than the X-carve
    + Great manuals
    + Top notch customer service (and im not exactly an easy customer)
    + Great price

    - many tensioning operations are made by feel and for a beginner that can be daunting.
    - for the first days i could have used some limitswitches (not saying anything about the kit though)

     
    Robert Towner, Ryan Lock and GrayUK like this.
  20. Ryan Lock

    Ryan Lock Veteran
    Builder

    Joined:
    Oct 12, 2014
    Messages:
    530
    Likes Received:
    293
    @michael nilsson Thanks for the honest words, always helpful to know where we can improve things.

    I think in a future design a bolt system to tighten the belt will be implemented instead of just pulling on it. Regarding the xPro all the controllers are now defaulted to Mixed decay mode to solve this roughness issue at slow speeds.
     
  21. Alan Foster

    Builder

    Joined:
    Sep 14, 2016
    Messages:
    28
    Likes Received:
    10
    Hello Ryan, just thought i would send you an update, we were very busy through November and December so didn't get much done with the CNC Machine, but we got her fired up and moved to a different location, wired her to a laptop and our one drive for the files, and she works a treat! had a few problems with feed rates being to high for the different composites we use, i have added a link below to a video and a couple of photos of a job we are doing this week, good thing is this one job will pay for the expense of the CNC machine and the software so its a win win situation.

    I hope you have a very busy and productive new year Ryan, i know we will


    cncmachine.jpg

    thank you

    Alan Foster
    Atherton Media/LeighSigns
     
    Ryan Lock and GrayUK like this.
  22. Ryan Lock

    Ryan Lock Veteran
    Builder

    Joined:
    Oct 12, 2014
    Messages:
    530
    Likes Received:
    293
    @Alan Foster Thanks for the update. Super cool to see one in a production setting, glad it is working out well for you. We are super busy shipping kits at the moment, just getting back into the swing of things now the holidays are over with.
     
  23. Alan Foster

    Builder

    Joined:
    Sep 14, 2016
    Messages:
    28
    Likes Received:
    10
    Good nice to hear your busy Ryan, we will be pushing it quite a bit with acrylics and composites, and we are using vcarve which is brilliant software, just got to get the feed rates correct for the bits we are using, and need to find a better way of fly cutting the bed, as we had a bit of flex with the dewalt 615 either that or it wasn't in the collar squarely as the bed has a slight ridge on each pass which was around 10mm.

    Thanks
    Alan
     
  24. Muxa

    Muxa New
    Builder

    Joined:
    Sep 9, 2016
    Messages:
    23
    Likes Received:
    12
    @Alan Foster, can you share some info on the dust shoe you are using? I've built a dust show which mounts to the spindle, but I've realized this is not the best setup for me, so I've been contemplating on a dust shoe design which mounts to the X gantry. And this morning I find your video with such a shoe, which looks very well built. Any info on it is appreciated.
     
  25. Ryan Lock

    Ryan Lock Veteran
    Builder

    Joined:
    Oct 12, 2014
    Messages:
    530
    Likes Received:
    293
    Vectrics products are very good, so simple to use. Hmm not sure, maybe tighten the wheels up a little bit on the Z-Axis?
     
  26. Alan Foster

    Builder

    Joined:
    Sep 14, 2016
    Messages:
    28
    Likes Received:
    10
    thanks for the reply Ryan, yes maybe that's the problem, although we have changed to a chinese aircooled spindle now which is quite heavy although with small cuts like we are doing (2mm) on composites we aren't going to notice the flex, maybe ill order a "proper" flycutter tool from cncroutershop.com, which is a division of AXYZ which make the big commercial routers.We use them for all the router bits and they have a wall chart for your workshop on their website which you can download, where you can see all the feed rates and cutting depths for each router tool plus spindle sizes for different types of routers which is a real bonus.

    Like i said though it is still is very much a work in progress, and some planned modifications are to extend the bed to accommodate 1220 x 2440 sheets and to extend the height by doubling up on the extrusion.

    Musa, the dust shoe itself is simply a piece of acrylic cut into a rectangle and then a 3mm slot machined in and door draft excluder brushes from B&Q pushed into it, we machined a couple of holes one for the spindle and one for the hoover, (we need to change the hoover to something quieter, as it's the noisiest thing in the workshop.)

    The bracket itself what holds the dust show in place is basically an old camera tripod and it is just cobbled together, what i would like to see is a Z gantry plate with a bit more width side to side to allow a better mounting
    for a slide able dust shoe, so i may make that modification someday.
     
    Ryan Lock likes this.
  27. Alan Foster

    Builder

    Joined:
    Sep 14, 2016
    Messages:
    28
    Likes Received:
    10
    One other thing Ryan if you could help with this, I think I may need to calibrate the sizing or something, we cut some letters out at 600mm and 230mm on the file, but the machine cut them out at 570mm and 220mm respectively, how will I do the adjustment on this?
     
  28. Darathy

    Darathy New
    Builder

    Joined:
    Jul 12, 2016
    Messages:
    74
    Likes Received:
    21
    You need to ajdust the Steps per mm: RepRapCalculator

    just put like this:
    Expected move lenght: 600
    Actual move lenght: 570
    Current stepps:your current value

    And it will calculate the correct steps and put them in your controller( dont know which you using)
     
    Robert Towner and GrayUK like this.
  29. Ryan Lock

    Ryan Lock Veteran
    Builder

    Joined:
    Oct 12, 2014
    Messages:
    530
    Likes Received:
    293
    @Alan Foster As Darathy said. But that looks like quite a big difference to be caused by incorrect steps/mm if they are set to the manual values. What have you got them set at at the moment?
     
  30. Jestah

    Jestah Well-Known
    Builder

    Joined:
    Dec 4, 2013
    Messages:
    148
    Likes Received:
    84
    I would also check my CAD and CAM very closely as i find that often than not when I am out by round numbers its not steps per setting. Wrong size tool, scaling issue or maybe a funny offset in play?
     

Share This Page

  1. This site uses cookies to help personalise content, tailor your experience and to keep you logged in if you register.
    By continuing to use this site, you are consenting to our use of cookies.
    Dismiss Notice