Welcome to Our Community

Some features disabled for guests. Register Today.

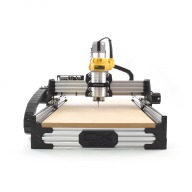
ooznest OX CNC Machine

Discussion in 'CNC Mills/Routers' started by Ryan Lock, Apr 28, 2015.

  1. Alan Foster

    Builder

    Joined:
    Sep 14, 2016
    Messages:
    28
    Likes Received:
    10
    Ill have to check everything later today, everything we do are regards printing and vinyl cutting is exported to .eps from coreldraw our main design software, which exports fine into various other printing rips and cutting software for the vinyl cutter.

    So it may be the settings in vcarve for doing the toolpaths or the Grbl controller, my business partner Tony has been looking through the various tutorials over this weekend so he will be in shortly and we will get to the bottom of it, but thanks everyone for your reply's

    Alan
     
    Ryan Lock likes this.
  2. Jestah

    Jestah Well-Known
    Builder

    Joined:
    Dec 4, 2013
    Messages:
    148
    Likes Received:
    84
    Feel free to email me at [email protected] your Vcarve file if you want me to have a little look over it. I would mainly be looking at your tool sizes and offsets as its VERY lucky to have a calibration issue cause very "round" changes to actual cut sizes.
     
    Ryan Lock likes this.
  3. Alan Foster

    Builder

    Joined:
    Sep 14, 2016
    Messages:
    28
    Likes Received:
    10
    thanks for that Jestah, it probably is something simple, admittedly we don't know vcarve that well at all, i could do with someone sitting here explaining to me what all the different settings are for tool offset, etc.

    we use mainly fine carbide cutting tools with a diameter of around 2 to 3mm, for cutting acrylics and aluminium composites usually with a maximum cut depth of 2mm at a feed rate of 500mm per minute, and usually it sits happy and plods away at it.
     
  4. Jestah

    Jestah Well-Known
    Builder

    Joined:
    Dec 4, 2013
    Messages:
    148
    Likes Received:
    84
    I wonder if we could setup a teamvier/remote connect session (as I live down at the bottom of the world in NZ) ? It would be even better if we could some how record it and then post it up for other to see as well! Any one got a good way to do this?

    Also don't forget to do the vcarve basic tutorials as they are amazing!
     
  5. Conehead

    Conehead New
    Builder

    Joined:
    Aug 30, 2016
    Messages:
    38
    Likes Received:
    5
    Hey guys.
    I have been quite busy recently so unfortunately I only had a little bit to play around with my ooznest.
    Last week I did some test carving (dust shoe) and there are some things I have noticed:

    1. Circles are not perfectly round, they are a little oval. What might be the problem?
    2. I attached a picture of the last two cuts. Both are made with the same settings and exactly the same wood and used the same bit. The bottom one is way more frayed. How is this possible?
    3. My machine (and/or my wasteboard) seems to be not perfectly flat. When the bit almost touches the wasteboard on the top, there seems to be up to a 2mm difference at the bottom. Does anyone else have this problem or has any idea how to fix it ideally? This makes it really hard to cut stuff with tabs or with a specific depth.

    I use a Kress 1050 machine, an arduino board and easel as software.
    And do you have any tips which bits to use for cutting wood and 3d puzzles? Currently I use a 2 flute upcut bit with 1/8" (3,16mm).
    Thanks again for all your great help!
     

    Attached Files:

  6. dddman

    dddman Journeyman
    Builder

    Joined:
    Mar 2, 2014
    Messages:
    468
    Likes Received:
    187
    @Conehead
    1. You should check for your X vs Y calibration.
    2. It might just be a dull endmill or cut direction
    3. You can flatten it with a larger router bit, and/or play with your wasteboard crossmembers to adjust them at the same height. It might be the part you cut too that is warped.
     
  7. Ryan Lock

    Ryan Lock Veteran
    Builder

    Joined:
    Oct 12, 2014
    Messages:
    530
    Likes Received:
    293
    Hi,

    1. Also check your pulley grub screws are tight. Is your xPro in fast decay mode, this helps.
    2. What type of mill are you using?
    3. Maybe worth surfacing your spoiler board so you know it is perfectly square with the cut bit.
     
    Mark Carew likes this.
  8. Robert Towner

    Builder

    Joined:
    Sep 26, 2015
    Messages:
    9
    Likes Received:
    1
    Hi Ryan -
    I know I saw a post somewhere that explained how to tell if we are in fast or slow decay, but now I cat seem to find it. Can you please share this info again.
    Thanks!
    Robert
     
  9. Ryan Lock

    Ryan Lock Veteran
    Builder

    Joined:
    Oct 12, 2014
    Messages:
    530
    Likes Received:
    293
    Hi Robert,

    On the back of the xPro, if you remove the serial sticker, you will see solder jumpers labelled x,y,z,a. If you solder these, it will then be in fast decay, and run much smoother.

    Ryan
     
    Robert Towner likes this.
  10. Keith Moreno

    Builder

    Joined:
    Feb 3, 2017
    Messages:
    2
    Likes Received:
    1
    Hello all, I just found this kit and would love to order it. Im in the the US and I'm thinking about the full build kit,1000mmX1500mm. Are their any gotcha or anything I need to understand before ordering? Im going to mainly use it for woodworking, making parts, Etc.
     
    RedHart likes this.
  11. Ryan Lock

    Ryan Lock Veteran
    Builder

    Joined:
    Oct 12, 2014
    Messages:
    530
    Likes Received:
    293
    Hi @Keith Moreno the only things you need apart from our kit, are cutting bits, and MDF Spoiler board. The hardest part isn't building the machine, but learning to use it, specially the CAM Software, and knowing what bits, and speeds etc to use, but it will all come with experience.
     
  12. Keith Moreno

    Builder

    Joined:
    Feb 3, 2017
    Messages:
    2
    Likes Received:
    1
    Thanks for the info. Now to save some money
     
  13. Inaudable

    Inaudable New
    Builder

    Joined:
    Oct 15, 2016
    Messages:
    5
    Likes Received:
    0
    Hi all, I'm wanting to do the z axis mod that mel earp and others have done. So do they add v-slot to the front and back, lower the spoil board supports, then the spoil board itself into the machine?
    I have the 1000 x 750, so it only has the 2 lower spoil board supports, I'm thinking ill need another so that i have one either side, and one down the middle to add a bit of extra support for the spoil board, that is is losing by moving into the machine. does this sound correct?
    Is it all ill need for this mod?

    Thanks for any help :) here is a pic of my setup atm.
    2017-01-12 19.13.15.jpg
     
  14. Ryan Lock

    Ryan Lock Veteran
    Builder

    Joined:
    Oct 12, 2014
    Messages:
    530
    Likes Received:
    293
    Nice setup! Yes that is pretty much correct.
     
  15. Redleg

    Redleg New
    Builder

    Joined:
    Feb 13, 2017
    Messages:
    1
    Likes Received:
    0
    Any one on here from north east England.. I'm considering buying one but would love to see one first..
     
  16. vonsy

    vonsy New
    Builder

    Joined:
    Apr 25, 2016
    Messages:
    7
    Likes Received:
    5
    Hi,

    Just finish my setup :) here's a live cut.


    Cheers.
     
    VooDoo, Inaudable, GrayUK and 2 others like this.
  17. darrepac

    darrepac New
    Builder

    Joined:
    Feb 28, 2017
    Messages:
    54
    Likes Received:
    9
    Salut Vonsy

    Could you describe your setup (router and controller which doesn't seem to be the Xpro,...)?

    Merci
     
  18. Rhys Gerrard

    Builder

    Joined:
    Mar 3, 2017
    Messages:
    8
    Likes Received:
    0
    Hey! Just bought this from Ooznest and looking forward to getting it! Total Novice here too...

    We've gone for the 750x750 unit however looking for some ideas on where to get consumables including bits etc. Any tips, tricks or information anyone can provide would be most useful! We're planning on cutting Acetal, Tufnol and Aluminium.

    Hope to hear from you all soon.

    Rhys
     
  19. Ryan Lock

    Ryan Lock Veteran
    Builder

    Joined:
    Oct 12, 2014
    Messages:
    530
    Likes Received:
    293
    Rhys Gerrard likes this.
  20. Giarc

    Giarc OpenBuilds Team
    Staff Member Moderator Builder Resident Builder

    Joined:
    Jan 24, 2015
    Messages:
    3,018
    Likes Received:
    1,682
    +1 on the Whitesides. I have a Whiteside V-bit for v-carving and love it. It is also helpful for calibrating the CNC due to the pointy-ness of it. I don't know where you are so these sources may be impractical for you, but here it goes:


    I have purchased several endmills here: End Mill Discount - Carbide End Mills, Extra & Extra Extra Long Mills, Micro Tools, Thread Mills

    I also needed longer ones for cutting thicker materials and bought these two from Kodiak Cutting tools:
    1/4 xtra long 2 flute Solid Carbide End Mills | Kodiak Cutting Tools
    1/8 xtra long 2 flute Solid Carbide End Mills | Kodiak Cutting Tools . I have been happy with both.

    On Ebay or Amazon, you can find a 10 pack of 1/8 inch single flute endmills for about $15.00 I have had good luck cutting aluminum with them, but they are not always the diameter they claim to be. So, if you buy some (and this goes for every brand) you should measure them with a caliper and input that diameter for the cutter into your CAM software if hundredths of mm are important to you. I found this out when I cut plates for an eggbot and my 5 mm holes were really tight. When I measured the endmill, its diameter was under 1/8 of an inch which caused the variance. Here are some for plastics and MDF: EMY 10PCS 1/8 Inch 3.175mm Carbide Flat Nose 22mm End Mill CNC Router Bits Single Flute Spiral Set Tool for Nylon Resin ABS Acrylic PVC MDF Hardwood - - Amazon.com
     
    otavio savietto and Ryan Lock like this.
  21. Rhys Gerrard

    Builder

    Joined:
    Mar 3, 2017
    Messages:
    8
    Likes Received:
    0
    Thanks @Ryan Lock and also @Giarc really appreciate the reply. As a starter, what would you recommend in purchasing? I need to do a bit more research on the bits etc.

    I know that the Spoiler board isn't included with the Ooznest OX CNC, so just looking to know what thickness and size would be to get. I've ordered the 750mm X 750mm CNC machine with the Dewalt Router.

    Any tips, tricks or suggestions would be greatly appreciated!

    Rhys
     
  22. Giarc

    Giarc OpenBuilds Team
    Staff Member Moderator Builder Resident Builder

    Joined:
    Jan 24, 2015
    Messages:
    3,018
    Likes Received:
    1,682
    The first thing most people do, and personally I think it is necessary, is surface their spoilboard with a larger bit like this: https://www.amazon.com/Dia-Double-Flute-Straight-Bit/dp/B00004T7BP/ref=sr_1_4?ie=UTF8&qid=1488656449&sr=8-4&keywords=3/4+inch+router+bit. You could do it with a 1/8" bit if you wanted, but it would take a long time. Surfacing ensures that the gantry is the same height from the spoilboard everywhere which will ensure you are cutting accurate depths on all your projects. For aluminum, I would use the 1/8" single flute cutters that are cheaper because you may break a few when dialing in the appropriate feeds, spindle speeds, and depth of cut for your particular machine.

    As a starter, here is some cheap 1/8 inch endmills that are useful for wood and plastics. They would probably work for aluminum, too. HQMaster 10PCS 1/8" 17mm Carbide Flat Nose End Mill CNC Router Bits Double Flute Spiral Set Tool Nylon Resin ABS Acrylic PVC MDF Hardwood - - Amazon.com

    Unfortunately, I can't find the single flute endmills I use for aluminum for sale anymore. They worked well and were 10 for $14.
    A good v-bit is helpful for engraving on wood.

    For a spoil board, I used two layers of 3/4" particle board for the base. Unless I am cutting really thick materials, I fasten a smaller spoil board on top of these. This way the spindle doesn't drop as far to cut thin items like aluminum resulting in less of a lever effect on the z axis (less deflection). Also, that way I am not having to replace the much larger spoil board due to wearing it out. I have lots of scrap pieces of 3/4 inch particle board in the shop. Once I wear this first one out I can just toss it. I have surfaced it 3 times now so it is only 15 mm thick vs the 19.05 it started at.
     
    #502 Giarc, Mar 4, 2017
    Last edited: Mar 4, 2017
    Rhys Gerrard, Ryan Lock and GrayUK like this.
  23. Ryan Lock

    Ryan Lock Veteran
    Builder

    Joined:
    Oct 12, 2014
    Messages:
    530
    Likes Received:
    293
    @Rhys Gerrard A couple of 1/4" & 1/8" 2 fluted solid carbide bits (Upcut or downcut depending on what your cutting) Also a V Cutter for signage work.

    For the spoiler board, i have an 18mm MDF piece, and make a regular pattern of holes, and push threaded inserts into them. Then use the Openbuilds 5 hole joining plates as clamps. But as Giarc said, if you cutting a lot of thing stuff probably best to build it up so the Z-Axis isn't canter-leaving as much. For the dimensions of the board it should be 666x750mm for your size.
     
    Rhys Gerrard likes this.
  24. Conehead

    Conehead New
    Builder

    Joined:
    Aug 30, 2016
    Messages:
    38
    Likes Received:
    5
    Hey there. After a long break I have some time to work on my CNC again.
    Unfortunately my wires to the motors are too short, because I want to lay them outside of the cnc.
    This is because I use an arduino and need to wire it up via usb. Thats why my arduino should not move and the cables need to be longer.

    Would I be able to use this cable 2m for each motor?
    4 x 0,75 mm²
    H03VV-F

    Thank you!
     

    Attached Files:

  25. Ryan Lock

    Ryan Lock Veteran
    Builder

    Joined:
    Oct 12, 2014
    Messages:
    530
    Likes Received:
    293
    Hi,

    Yes they are more than big enough. The ones supplied with our motors are 0.33mm2

    Ryan
     
  26. Conehead

    Conehead New
    Builder

    Joined:
    Aug 30, 2016
    Messages:
    38
    Likes Received:
    5
    Sweet. And its not a problem that this wire is copper and 2 meters long?
    What would be the longest length without any problems?
     
  27. Bjorn Mikkelsen

    Builder

    Joined:
    Jan 22, 2017
    Messages:
    27
    Likes Received:
    1
    Hi all.

    A very happy owner of the 1000x750 OX which I ordered in the beginning of febuary.
    From what I can see I have the xPro v3 controller. According to the description it say it should now be possible to switch between decay modes via jumpers. I cant seem to find these jumpers. Is it still necessary to solder to switch to fast decay? and is there a way to see from UniversalGCodeSender what decay mode the board is in?

    Thanks in advance and thanks for a great forum.

    Regards
    Bjorn
     
  28. Ryan Lock

    Ryan Lock Veteran
    Builder

    Joined:
    Oct 12, 2014
    Messages:
    530
    Likes Received:
    293
    Should be ok, we supply 2.5m long with the kits.

    They are still solder jumpers on the back of the board. By Default the board is in Mixed decay mode, which we have found to work well. To compare the V2 was defaulted in slow decay.

    Ryan
     
  29. Bjorn Mikkelsen

    Builder

    Joined:
    Jan 22, 2017
    Messages:
    27
    Likes Received:
    1
    Hi Ryan

    Thanks for the fast answer :)
    So do you still recommend putting it in fast mode ? or is mixed mode now the prefered mode ?

    Thanks.
     
  30. Chillimonster

    Chillimonster Well-Known
    Builder

    Joined:
    May 6, 2015
    Messages:
    153
    Likes Received:
    81
    My Ooznest Ox has been doing me proud over the last 12 months and has certainly earned its keep cutting my arcade machines various panels and parts (www.chillisarcade.co.uk)

    New belts needed now though, and its a little larger than i need for what i am doing (I have the 1500 x 1000, but the largest piece i cut is 800 x 600), so was possibly thinking of moving over to a 1000 x 750 C beam based machine and utilising as much of the mechanical parts as i can from this build (Steppers / electronics wheels / bearing etc)

    Has anyone done this (I presume so as i cannot be the first to make the switch)

    Need to get my head around what is needed for the switch and dedicate a weekend to get stuff moved around in the workshop to give myself room.
     

Share This Page

  1. This site uses cookies to help personalise content, tailor your experience and to keep you logged in if you register.
    By continuing to use this site, you are consenting to our use of cookies.
    Dismiss Notice