Welcome to Our Community

Some features disabled for guests. Register Today.

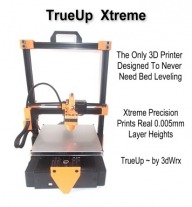
TrueUp Kit Version

Discussion in '3D printers' started by Keith Davis, Mar 24, 2017.

  1. Keith Davis

    Keith Davis Veteran
    Builder

    Joined:
    Dec 11, 2013
    Messages:
    507
    Likes Received:
    398
    Keith Davis published a new build:

    Read more about this build...
     
    Giarc likes this.
  2. Hedgehog

    Hedgehog New
    Builder

    Joined:
    Apr 5, 2017
    Messages:
    13
    Likes Received:
    0
    This is very nicely engineered. Thank you for solving the true-up problem!
    In the spirit of build it right.... I wonder if you'd consider making the following modification, for the reason given:
    1. Use a 12" x 12" platform base: A standard (minimum) dimension for MIC6 Aluminum is 12" x 12" and this reduces the cost considerably. A MIC6 build platform should solve the warp problem for good. Ack that the minimum thickness of approx 6mm means heat times will be longer but this is a small price to pay for a build that "just-works".
    see [1]

    Second, is a question: Would a lead screw of 8mm with a 2mm pitch be possible given the teeth and drives available. The 1.25mm pitch is not a problem, but class 12 threaded rod is much more expensive than lead screws, and this seems to be the way to ensure you don't get bitten by rods bending. etc.

    Again thanks for an exceptional build.

    [1]: Order Aluminum Cast Plate in Small Quantities at OnlineMetals.com
     
  3. Rick 2.0

    Rick 2.0 OpenBuilds Team
    Staff Member Moderator Builder Resident Builder

    Joined:
    Dec 20, 2013
    Messages:
    2,892
    Likes Received:
    1,551
    Click on the create a custom size tab. 8.5" square is considerably cheaper than 12" square.
     
  4. Arda Ozkaymakci

    Builder

    Joined:
    Mar 28, 2017
    Messages:
    4
    Likes Received:
    0
    Hi Guys,

    I'm started to build this and i wonder can i the diamond hotend for this build? If anyone tried it? Where can i get some help?
     
  5. Keith Davis

    Keith Davis Veteran
    Builder

    Joined:
    Dec 11, 2013
    Messages:
    507
    Likes Received:
    398
    You would need to design a way to bolt any other extruder to the X carriage. The X carriage has two M5 mount holes 20mm apart. See following assembly pages to see what that would take
    TrueUp Glide Install & Level X Axis
    TrueUp Glide Extruder Assembly
     
  6. Keith Davis

    Keith Davis Veteran
    Builder

    Joined:
    Dec 11, 2013
    Messages:
    507
    Likes Received:
    398
    So, convince me what you would accomplish. You seem to be applying a solution to a problem on other printers when that problem does not exist on a TrueUp.
    An MK3 aluminum heat bed (with integrated heating elements) and a plate of glass or mirror is flat (warpless) and costs a fraction of a plain sheet of aluminum plus heatbed bolted to it's bottom.
     
  7. Hedgehog

    Hedgehog New
    Builder

    Joined:
    Apr 5, 2017
    Messages:
    13
    Likes Received:
    0
    Thanks for feedback. I don't believe you are comparing apples to apples.

    Apologies for being ambiguous in my original post.....
    It was the customize pricing I used to claim it is cheaper to have a 12" x 12" rather than customized dimensions:
    I had a hunch (the cost of customization processes) that customized dimensions would cost more. To confirm this I entered 12" x12" in the customized pricing table and the cost was 35.55% (74.88 vs 55.24) more than the standard pricing.
     
  8. SugarJ

    SugarJ Well-Known
    Builder

    Joined:
    Nov 16, 2015
    Messages:
    126
    Likes Received:
    47
    Why not use a $12 piece of borosilicate glass on top of the heatbed as suggested rather than a $55 piece of MIC6? Also, using a larger base piece of aluminum means making the whole printer larger, defeating the purpose of a smaller portable build like this one.

    Edit: as for your earlier question about leadscrews, I'm building mine with TR8x2mm screws and intend to fabricate my own nylon nuts. Using a 16 tooth pulley instead of a 20 tooth should give you a per step resolution of .01 mm.
     
    #8 SugarJ, Apr 5, 2017
    Last edited: Apr 5, 2017
  9. Hedgehog

    Hedgehog New
    Builder

    Joined:
    Apr 5, 2017
    Messages:
    13
    Likes Received:
    0
    Hi Keith,
    Thanks for taking the time to respond so promptly.
    I believe the problem is flex in the aluminum build plate when heated, as best I can tell all these plates are all rolled AL.

    Problem:
    The "True-up" printer plate-nozzle will be "true" before you start printing but I don't expect it to be while printing on a heated bed. The further to the extremes I expect the greater the magnitude of variation/warp/twist.

    I don't believe I'm imaging the issue:
    I know of 0.375" x 28" x 35" MIC6 plate warping significantly when heated to 240C (465F), this is as expected (in that case the heat source was from one side - the plates were used to move molds along a production process, and the mixture in the mold revealed the slope to the naked eye).

    I also don't believe this issue can be eliminated by design (e.g. your true-up (at start-up) correction), but rather the best we can hope for is "correctly managed by design".
    Apologies if this is long winded:
    1) Is MIC6 (or equivalent cast) aluminum the appropriate build plate medium? Yes: "Thermal Cycles: MIC6 can be repetitively cycled through a thermal exposure without affecting or altering the physical properties of the plate. Thermal treatments during each cycle can range from 250 to 600 °F (120 to 315 °C). Full support under the plate during the thermal cycle is recommended – the thinner the plate, the more important this consideration becomes." Source: [1]. The thinnest (common) MIC6 is approx 6mm (0.125"). Note that MMIC6 is by definition cast. Some 60/7075 grades of AL are cast and some rolled. Rolled is less flat out of the gate, and has higher inherent tensions/stresses _and_ in different directions.
    2) Is warping unavoidable? Yes. See above example. Even thick MIC6/cast plate will warp when heated if this is not managed correctly - the nice property of the cast AL grade proposed is that the plate returns to its preheated state and even (moderate) warping is not (not 'not ever') permanent, or cumulative. So, if warping can be managed/minimised, it won't be permanent/cumulative for many many many cycles.

    This suggests some design changes.
    Incremental changes:
    1) Increase the heated build platform to 12" x 12" (x 0.25") and use MIC6 or some equivalent grade of cast AL.
    2) Keep the universal (base) build plate assembly as is:
    a) Drill 4 countersunk holes for M5xN countersunk screws in the MIC6 plate to align with the universal (base) build plate and the thermal (wired) plate (these holes will be well inside the edges of the MIC6 plate)
    b) Cover the thermal (wired) plate with thermal paste (type used to marry heat sink with CPUs), align the holes in the corners of the thermal plate with the holes in the MIC6 plate.
    c) Insert M5xN countersunk screws (we are now at step 5-3) and the springs.
    3) Use (several) glass sheets as clip/slip on/off build plates

    I'm guesstimating (happy to be corrected) that:
    - The range of the thermal cycles (room temp to 120C) is within the MIC6 tolerances such that the MIC6 plate does not need to be braced in any meaningful way.
    - The heat source (8.4" x 8.4"), while not covering the 12" x 12" MIC6, and only from one side, is sufficiently large and uniform to prevent severe/meaningful warping with extended life of thermal cycles.

    Radical changes:
    - Brace the MIC6 plate (are the brace straightness and tolerances as true as the MIC6 plate?), could maybe invert the carriage/rail from a kossel of this purpose? The Y axis center wing span (step 4-2) becomes nearly 10" or 11"
    - If we're confident about the tolerances and stiffness of the build frame (but I note the 8020 frame material seems to be extruded not cast- correct?) it should be possible to eliminate the spring loaded M5 screws, and lower the whole build platform and rely on the printer frame being square.
    - Add threaded feet to the extremities of the printer frame, and add spirit levels to the printers X, Y and Z axis/frames to focus peoples attention there and away from the orientation of the build plate.
    - Boosted heater power?

    My 2c :)

    [1] pg 4, http://www.arconic.com/mill_products/catalog/mic-6.pdf
     
  10. Hedgehog

    Hedgehog New
    Builder

    Joined:
    Apr 5, 2017
    Messages:
    13
    Likes Received:
    0
    Hi Sugar J,
    Agreed that can all be done. In the order of your questions:
    1) Why not use cheap glass?: Yes, but I prefer to use cheap glass as a removable component. It seems to me the aluminum thermal plate is assured to warp. If not on the first print, very then shortly afterwards. See all the Prusa Research on technology for measuring the distances between the printer bed and extruder head, then the non-linear correction calculations to correct the z-axis. To me this all seems nuts. Also, seeing a spring loaded build plates everywhere, and no threaded feet on the printer frame extremities rang warning bells... but this is my first week in 3D-printer land so I'm probably falling into all the traps for young players?

    2) Why not use a smaller AL platform?: You can and it will be cheaper (as opposed to cost effective). But if this is a prototype, and not just a proof-of-concept then the biggest cost savings as volume ramps up will come from using standardized components that are already available.

    Many thanks for the tip on the lead screw and teeth count. I'll use that.

    Kind regards
    Hedge
     
  11. Hedgehog

    Hedgehog New
    Builder

    Joined:
    Apr 5, 2017
    Messages:
    13
    Likes Received:
    0
    Thanks JustinTime. I'm not familiar with the history to date, so it does seem I have grasped the wrong cause for what I'm seeing..... Do I understand correctly that you are saying all the bed leveling/tramming software, guides etc is just to take into account normal wear&tear and is not driven by shifting/warping build plates?
    From experience and al manufacturer specs I did assume that heated build plate warp/stress was behind all the code and guides around build plate corrections.

    Thanks for sharing.
     
  12. Keith Davis

    Keith Davis Veteran
    Builder

    Joined:
    Dec 11, 2013
    Messages:
    507
    Likes Received:
    398
    Hedgehog
    Since you just road up to 3d printing, here's some history on print beds. To his credit and acclaim, Prusa developed the first heat beds, greatly expanding the types of plastics we can print. He did that by etching element traces to a PBC board. Brilliant breakthrough! His new MK2, with 9 point leveling that you reference is still a PCB board, albeit a 3mm one. If you research forums you will see that many of the early MK2 boards were shipped warped so bad you could lay a level across it and see the gaps. The original thinner ones had similar problems. The manufacturing process for PCB does not lend itself to producing flat surfaces.

    But, even if you start with a perfectly flat PCB board, by the time it's mounted it's no longer flat. The reason, as you tighten one corner to lower it, you bent the board. A few years ago people used 3 point mounts instead of 4 just to escape that problem. The standard way people got beyond PCB warpage was to use a glass or mirror on the PCB. But, if the PCB was warped too much, the glass or mirror was not evenly heated. Then, along came aluminum.

    There are kits you can buy ($20-25) that are a flat sheet of aluminum with the 4 corner holes so you can place the PCB heater bed between the springs and the aluminum. The improvement: as you tighten one corner of the bed down it does not bend the aluminum sheet, instead the other 3 springs adjust tension accordingly. That way, the bed remains as flat as the aluminum sheet. Later, manufacturers just added the heating traces right to the aluminum sheets This is what the TrueUp uses ($12-25) So how perfectly flat is the surface of the aluminum sheet? Doesn't matter. If you binder a glass or mirror on the aluminum to print on, the flatness of the glass or mirror is what matters. I use a mirror (if my nose is in the wrong place when I look into it, it's not perfectly flat). Glass really handles heat well as far as warpage goes.

    Keep in mind, we are discussing flatness of the print bed here, not level. Level refers to keeping the X and Y planes aligned for uniform height across the build area during travel up the Z axis. They are really different considerations.
     
    Hedgehog and Rick 2.0 like this.
  13. Hedgehog

    Hedgehog New
    Builder

    Joined:
    Apr 5, 2017
    Messages:
    13
    Likes Received:
    0
    Many thanks Keith. That was perfect.
     
  14. Hedgehog

    Hedgehog New
    Builder

    Joined:
    Apr 5, 2017
    Messages:
    13
    Likes Received:
    0
    Hi All,
    Could someone (who has Sketchup) be kind enough to export all the .skp files to COLLADA .dae files and add them to the kit .zip archive?
    Sorry to impose.

    Best wishes
    Hedgehog
     
  15. Keith Davis

    Keith Davis Veteran
    Builder

    Joined:
    Dec 11, 2013
    Messages:
    507
    Likes Received:
    398
    Sure, here ya go ->
    http://3dwrx.com/TrueUp/kit-dae.zip

    The SKP collection is separated into individual group files, each ready for printing.
    The DAE has two files (black and color) that contain all of the parts found in the SKP file batched into those two files. The batch files are arranged so the groups are pretty easily separated.
     
    Hedgehog likes this.
  16. Hedgehog

    Hedgehog New
    Builder

    Joined:
    Apr 5, 2017
    Messages:
    13
    Likes Received:
    0
    Update 1: two passes through the printed items and instructions completed.
    Update 2: The Assembly instructions I referred to were these here[1]. It appears they may have changed recently? There is no version information to work out where we are at.
    <blush>
    Update 3:
    There are two sets of instructions freely available via this interwebs thingy. I used the wrong one. It is not clear how I can prevent this happening to you ;)
    </blush>
     
    #16 Hedgehog, Apr 8, 2017
    Last edited: Apr 9, 2017
  17. loglow

    loglow New
    Builder

    Joined:
    Feb 15, 2017
    Messages:
    25
    Likes Received:
    2
  18. loglow

    loglow New
    Builder

    Joined:
    Feb 15, 2017
    Messages:
    25
    Likes Received:
    2
    Also, what are these little things for?
     

    Attached Files:

  19. Hedgehog

    Hedgehog New
    Builder

    Joined:
    Apr 5, 2017
    Messages:
    13
    Likes Received:
    0
    Hi loglow, I've clarified the source I used. I've had a chance to look over the second set of instructions and it does appear "TrueUp Glide Kit Assembly Manual" is for the version of the kit currently available. One should not (currently) use the "TrueUp Glide DIY Assembly Tutorial".

    Frustrating.

    Best wishes
    Hedgehog
     
    #19 Hedgehog, Apr 8, 2017
    Last edited: Apr 9, 2017
  20. Keith Davis

    Keith Davis Veteran
    Builder

    Joined:
    Dec 11, 2013
    Messages:
    507
    Likes Received:
    398
    That is a fake M8 nut. It goes below the M8 nylon nut in the glide body. A M5x10 set screw impinges against this fake nut to keep the nylon nut in place. On my printers the nylon nut is a press fit into it's glide body cavity, but if you are printing your own, that may not be the case - therefore this fake nut is essential for keeping the Z axis where you level it to. If you buy a Kit, you'll not see this. Since the nylon nut is a press fit, the glide body is shipped with the nylon nut already fitted, and this fake nut also fitted and secured.
     
  21. Elmo Clarity

    Elmo Clarity Journeyman
    Builder

    Joined:
    Jan 17, 2015
    Messages:
    505
    Likes Received:
    149
    Do you have any pictures of how the two feet attach to the Z uprights? The two pictures I saw of them in the assembly guide don't seem to match the STL parts.
     
  22. Keith Davis

    Keith Davis Veteran
    Builder

    Joined:
    Dec 11, 2013
    Messages:
    507
    Likes Received:
    398
    Elmo. I've changed 1-11 and 1-13 in the Assembly Guide TrueUp Glide Frame Assembly
    In the BOM at the top of the steps click the Printed Parts Display link to view the parts for Frame Assembly, they are the two top parts in the display.
     
  23. Hedgehog

    Hedgehog New
    Builder

    Joined:
    Apr 5, 2017
    Messages:
    13
    Likes Received:
    0
    Hi Keith, Sorry to trouble you again. It seems the STL & DAE that Sketch Up exports is malformed. The DAE manages to crash FreeCad, see here[1].
    Is there an option in Sketchup that allows you to export in a parametric format? STEP or DXF?

    Apologies for the hassel but I've tried everything to get these models imported and made solid/manifold

    [1]: Export (attached) as DAE file crashes FreeCAD - FreeCAD Forum

    Thanks in advance.
     
  24. Keith Davis

    Keith Davis Veteran
    Builder

    Joined:
    Dec 11, 2013
    Messages:
    507
    Likes Received:
    398
    Hedgehog

    No Sketchup only exports to DAE. But, it appears to be a RAM problem from what others were saying on that forum. Download the ZIP http://3dwrx.com/TrueUp/kit-dae.zip again. I have separated all of the original SKP files and exported them separately. Maybe each will be small enough for FreeCAD to open them.
     
    #24 Keith Davis, Apr 15, 2017
    Last edited: Apr 15, 2017
  25. Keith Davis

    Keith Davis Veteran
    Builder

    Joined:
    Dec 11, 2013
    Messages:
    507
    Likes Received:
    398
    I just realized that I had those two feet in two different stl files. I've corrected that, they are now only in the corner-tops_front-foot_feet.skp & corner-tops_front-foot_feet.stl files.
     
  26. Hedgehog

    Hedgehog New
    Builder

    Joined:
    Apr 5, 2017
    Messages:
    13
    Likes Received:
    0
    Thanks Keith. Trying again now.
     
  27. loglow

    loglow New
    Builder

    Joined:
    Feb 15, 2017
    Messages:
    25
    Likes Received:
    2
    I'd like to share this repository which represents my build of this printer:
    GitHub - loglow/TrueUp-Glide-Mod

    I'll keep updating it as things continue to progress.
     
  28. Keith Davis

    Keith Davis Veteran
    Builder

    Joined:
    Dec 11, 2013
    Messages:
    507
    Likes Received:
    398
    Loglow, could you briefly describer the mods you've made and what they accomplish for others browsing the discussions?
     
  29. loglow

    loglow New
    Builder

    Joined:
    Feb 15, 2017
    Messages:
    25
    Likes Received:
    2
    Sure thing! Compared to the original build, the highlighted differences are:
    • Utilizes the Bondtech BMG Extruder module
    • Incorporates a Raspberry Pi 3 Model B running OctoPi into the control box
    • Includes an optional printed enclosure for the power supply unit
    • Consolidates several printed parts and introduces several new ones
    • Utilizes heat-set threaded inserts in several instances
    The repo currently has a complete set of STL files as well as the complete master SketchUp file. However, additional specific details regarding the modifications will be added soon, as well as a complete BOM spreadsheet.
     
  30. GeoMetJosh

    Builder

    Joined:
    Aug 19, 2016
    Messages:
    9
    Likes Received:
    0
    I am a little confused how to connect the y-belt to the y-idler pulley. Does anyone have a picture of what it looks like when its done right? Thanks so much!
     

Share This Page

  1. This site uses cookies to help personalise content, tailor your experience and to keep you logged in if you register.
    By continuing to use this site, you are consenting to our use of cookies.
    Dismiss Notice