Welcome to Our Community

Some features disabled for guests. Register Today.

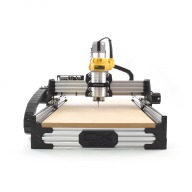
ooznest OX CNC Machine

Discussion in 'CNC Mills/Routers' started by Ryan Lock, Apr 28, 2015.

  1. KEN MACDONALD

    Builder

    Joined:
    Dec 25, 2015
    Messages:
    60
    Likes Received:
    6
    Hi I have bought the same spindle and plan on using the x pro 3. Where have you mounted it?
     
  2. Ryan Lock

    Ryan Lock Veteran
    Builder

    Joined:
    Oct 12, 2014
    Messages:
    530
    Likes Received:
    293
    Hi,

    We have mounted the xPro on the 20x40 on the X Gantry. In the files tab, there is a stl download for these parts.

    Ryan
     
  3. KEN MACDONALD

    Builder

    Joined:
    Dec 25, 2015
    Messages:
    60
    Likes Received:
    6
    Hi Ryan Thank you. Are these parts available anywhere. I have no way of making them.
    Ken
     
  4. Ryan Turner

    Builder

    Joined:
    Mar 1, 2016
    Messages:
    68
    Likes Received:
    13
    @Ryan Lock

    So, I think I ordered my OX last August, What upgrades have been made to the Ooznest OX since then? Is all the cable shielded? I am just curious as once in a while my machine will start by moving to the first cutting position and then stop. I have to restart the job, or sometimes it does nothing and I am thinking shielded cable and usb may be a way forward.

    Incidentally, I noticed someone has a Henry/hetty hooked up to their ox. Have you seen these home build cyclone separators?


    The cheap one came one top, so I bought a Chinese cyclone and a plastic drum and I am going to build one. Poor Hetty gets a battering.
     
  5. Ryan Lock

    Ryan Lock Veteran
    Builder

    Joined:
    Oct 12, 2014
    Messages:
    530
    Likes Received:
    293
    We 3D Print them, there not on our site, but send us an email [email protected], and we can sort you out.

    The cables are are still the same. The only changes are we now ship a much better shielded USB Cable, and we also include ferrites for all the cables. I can send you out a set if you like, this may solve your stopping issue.
     
  6. Ryan Turner

    Builder

    Joined:
    Mar 1, 2016
    Messages:
    68
    Likes Received:
    13
     
  7. Ryan Turner

    Builder

    Joined:
    Mar 1, 2016
    Messages:
    68
    Likes Received:
    13

    @Matt-Sparks

    V Channel Blanking plates? I have just double belted and I am looking for a neat solution to clamping, yours seems the easiest but it I can do it neater, I'd like to. I've looked for your blanking plates but can't see anything, maybe you are calling them something different?

    Thanks :)
     
  8. lees76

    lees76 New
    Builder

    Joined:
    May 29, 2016
    Messages:
    15
    Likes Received:
    3
    Any of you guys use Mach3?

    Would you be kind enough to share your Motor Tuning and setup Settings.

    I have the OX 1000 x 1500
     
  9. Ryan Turner

    Builder

    Joined:
    Mar 1, 2016
    Messages:
    68
    Likes Received:
    13
    @Ryan Lock

    I received the ferrets, I assume the single 8mm goes on the z axis, which end?
     
  10. Ryan Lock

    Ryan Lock Veteran
    Builder

    Joined:
    Oct 12, 2014
    Messages:
    530
    Likes Received:
    293
    The 8mm is for the router wire, router side.
     
  11. Ryan Turner

    Builder

    Joined:
    Mar 1, 2016
    Messages:
    68
    Likes Received:
    13
    @Ryan Lock

    Thanks. I didn't see the writing till I had posted!
     
  12. lees76

    lees76 New
    Builder

    Joined:
    May 29, 2016
    Messages:
    15
    Likes Received:
    3
    Sorry another question,

    I have the cable trays all connected, and want all the cables to come over to one side and through the y axis cable chain,

    Is the a tidy way of feeding the wire from the motor on the far side (slave), i thought about passing it through the track underneeath the x axis cable tray but the t-nut is in the way?
     
  13. Ryan Lock

    Ryan Lock Veteran
    Builder

    Joined:
    Oct 12, 2014
    Messages:
    530
    Likes Received:
    293
    The only un-interrupted way to run it would be inside the slot on the frontside of the 20x40 extrusion.
     
  14. Biglouie

    Biglouie New
    Builder

    Joined:
    Apr 8, 2017
    Messages:
    11
    Likes Received:
    2
    Hi Ryan, I was wondering about the Ferrets in my kit. Where do they get set for each? Any help much appreciated. Order in for more GT3 belt, think I'll double belt from the outset!
     
  15. Ryan Lock

    Ryan Lock Veteran
    Builder

    Joined:
    Oct 12, 2014
    Messages:
    530
    Likes Received:
    293
    Hi,

    The motors ones go near the xPro, the PSU ones near the PSU, and Router one near the router.

    Ryan
     
    biglouieuk likes this.
  16. Ryan Turner

    Builder

    Joined:
    Mar 1, 2016
    Messages:
    68
    Likes Received:
    13
    I literally just emailed you the same question.
    So ferrites don't have to be both ends?
     
  17. Ryan Turner

    Builder

    Joined:
    Mar 1, 2016
    Messages:
    68
    Likes Received:
    13
    So whilst installing the double belt mod I looked around for double belt tensioners.

    Couldn't find any and I've looked high and low so I decided to design and 3D print one myself.

    The simplest solutions are often the best! Whilst wandering through Wilkinsons to get some brackets I stumbled across some knock down fittings aka modesty blocks

    If you drive a slightly oversized bolt through them they give a nice thread. The top block has an oversized hole with no thread so it tightens easily. The bolts sticking out are currently a bit long but with a smaller bolt and a plate on the end of the bolt they will tension nice and evenly. I had to recess the back of the block out to go over the existing bolt heads IMG_3669.JPG
     
    GrayUK likes this.
  18. Ryan Lock

    Ryan Lock Veteran
    Builder

    Joined:
    Oct 12, 2014
    Messages:
    530
    Likes Received:
    293
    @Ryan Turner Just one for each cable nearest the source of noise.

    On the Double belt mod, if you have the bottom belt stuck down the whole way along its length, the top one doesn't really need to be tensioned that much because the stretch distance is limited to the distance that it comes off the wheels and over the pulley.

    But if you don't stick the bottom one down, then yes tension them both, like your solution :thumbsup:
     
  19. Ryan Turner

    Builder

    Joined:
    Mar 1, 2016
    Messages:
    68
    Likes Received:
    13

    Yeah, I didn't stick it down :). Double sided is great stuff but if you screw up sticking it down it's an absolute pain in the ***.
     
    Ryan Lock likes this.
  20. Ryan Lock

    Ryan Lock Veteran
    Builder

    Joined:
    Oct 12, 2014
    Messages:
    530
    Likes Received:
    293
    Very true :banghead:
     
  21. biglouieuk

    Builder

    Joined:
    May 29, 2017
    Messages:
    4
    Likes Received:
    0
    thanking you :)
     
  22. biglouieuk

    Builder

    Joined:
    May 29, 2017
    Messages:
    4
    Likes Received:
    0
    Evening @Ryan Lock

    I have been reading various and i see that its wise to add a fuse and a TVS between the OX power and the xpro v3

    Is that the same with the full kit (using provided 24v power), still needed? I have what I need, thought I'd ask.

    Also, re my question on fast decay, my v3 seems to have 2 columns with three pins. i cant work out from the piccie on the back which pins to jump still. If you have a picture of such, it would be amazing.

    Thanks in advance!

    Rob
     
  23. MplsArtist

    Builder

    Joined:
    Apr 11, 2015
    Messages:
    41
    Likes Received:
    3
    Here's chance for me to give back to the forum.

    Rob:
    I needed to do the same thing for my machine to run better. At the local hobby shop I purchased a small, battery operated solder gun that came with some very thin solder wire. I added dab of solder between the first two contacts as indicated on the schematic for fast decay. After I did that, the machine runs beautifully. I've attached before and after photos with a mock up of where to put the solder. before.jpg after.jpg after.jpg
     
  24. Biglouie

    Biglouie New
    Builder

    Joined:
    Apr 8, 2017
    Messages:
    11
    Likes Received:
    2
    Thanks man. Wow. So I solder the back of the board! I was thinking it was on the front side of the board and putting a little 2.5mm plastic jumper over the pins!

    I'll break out the solder iron. The picture. On the back makes more sense now too!

    Thx for helping me out.

    Rob
     
  25. MplsArtist

    Builder

    Joined:
    Apr 11, 2015
    Messages:
    41
    Likes Received:
    3
    You're welcome. Ryan Lock from OOZnest has been very helpful to me getting my 1500x1500 up and running. He told me about the fast decay soldering. Your solder dots don't need to be as small or neat as my photo retouching dots. Just don't let any solder touch the right most contacts.
     
  26. Biglouie

    Biglouie New
    Builder

    Joined:
    Apr 8, 2017
    Messages:
    11
    Likes Received:
    2
    Got it. Thx for the help. I've been putting limit switches on the machine today and they will need a bit of solder on the switches so I'll break out the iron! And the magnifying glass!
     
  27. Ryan Lock

    Ryan Lock Veteran
    Builder

    Joined:
    Oct 12, 2014
    Messages:
    530
    Likes Received:
    293
    @MplsArtist Thanks for answering the questions for me!

    Regarding the diode, if you have parts, then there is no harm in adding it. We don't supply the parts to add it with our kit.
     
  28. biglouieuk

    Builder

    Joined:
    May 29, 2017
    Messages:
    4
    Likes Received:
    0
    I got some of these limit switches from Ryan at Ooznest. Rather than solder the wires onto the switches, I was thinking of putting some connectors on. They seem to be 3.5mm connections, but I cant find anything suitable. Can any of you more experienced peeps think of an elegant way to connect these without solder. I couldnt find any 3.5mm crimps, but a small plug onto the com, no and nc would be lovely. Scared of my solder iron!

    Rob
     
  29. Ryan Lock

    Ryan Lock Veteran
    Builder

    Joined:
    Oct 12, 2014
    Messages:
    530
    Likes Received:
    293
    Yh i just had a look on RS, and couldn't find any suitable sized ones, that tab is 3.5x0.4mm, if i can think of anything else i will let you know.
     
  30. Biglouie

    Biglouie New
    Builder

    Joined:
    Apr 8, 2017
    Messages:
    11
    Likes Received:
    2
    Cool thx Ryan.

    I'll get some shielded cable and solder them for now or maybe solder on a connector with wires. I shouldn't need to pull them about too much anyway. I'm over thinking it all probably. :)
     
    Ryan Lock likes this.

Share This Page

  1. This site uses cookies to help personalise content, tailor your experience and to keep you logged in if you register.
    By continuing to use this site, you are consenting to our use of cookies.
    Dismiss Notice