Welcome to Our Community

Some features disabled for guests. Register Today.

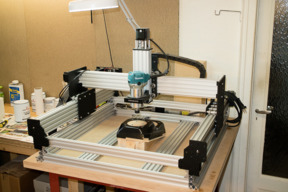
WorkBee CNC build - My honest opinion, tips and help

Discussion in 'CNC Mills/Routers' started by T4Concepts, Feb 6, 2018.

  1. CNCKitCompany

    Builder

    Joined:
    Jan 22, 2018
    Messages:
    35
    Likes Received:
    11
    I've been using a measurement of 200mm extra on the x and y axis, based on something Ryan mentioned before. Though this isn't exacting and like you mentioned, about bench size versus machine volume.
     
    Camvec likes this.
  2. johnnycnc

    johnnycnc New
    Builder

    Joined:
    Sep 11, 2017
    Messages:
    31
    Likes Received:
    7
    If it overhang the front you could build a vise to hold wood pieces to cut out joinery with the spindle?
     
  3. Stephen Cotterell

    Builder

    Joined:
    May 1, 2016
    Messages:
    3
    Likes Received:
    1
    I've been following this thread and well done so far. :) The workbee looks excellent and your build posting is first rate. I've had a look through the youtube links and have learned a great deal about the build process and workflow with the SketchUp family of software. I also appreciate the attention to detail with Oozenest and feedback with Ryan there. I hope to buy one of these kits (prob 1000 x 750 screw) and would like to mount a 0.8kW or 1.5kW watercooled spindle (prob with radiator mounted on frame to reduce weight). Keen to know how your build comes to fruition, but you must be very pleased with your logo print. A great step. Will be with you and it's great to see others following with interest. We all look on.
     
  4. T4Concepts

    T4Concepts Journeyman
    Builder

    Joined:
    Dec 7, 2017
    Messages:
    108
    Likes Received:
    114
    Many thanks Stephen and very kind of you to say so :thumbsup: I know it states 'Veteran' next to my forum name, but I'm far from it :rolleyes: Personally, I think that you couldn't go far wrong with a WorkBee kit for many reasons, firstly, it's the quality and excellent design of the machine itself, that all leads to an extremely tough machine that I think can deal with just about any type of milling or routing you intend to do. And secondly, very important in this day and age, customer service ! .......... the best I've encountered in a long while :thumbsup:

    The first stage of DIY CNC'ing accomplished ................ top quality cnc machine, the rest is your choice of software. When I got into this a few weeks ago, I did notice the extraordinary amount of software available, both free and paid, that is available to produce your master piece. I chose my 750mm x 750mm WorkBee as a smaller package for a particular task, but for general use a larger machine would work just as well, my way of thinking was, a smaller cnc machine would always be stronger than a larger one.

    As for the CAD and CAM software I have been quite surprised at just how good the free alternatives are, I thought I would try the free alternatives first then move onto the paid versions at a later date. I don't think I'll need to, as I'm pretty sure I could achieve everything I need to do with what I already have. The support and tutorials for SketchUp and SketchUcam are also very good, which will undoubtedly make the learning experience much easier. The first steps into learning everything about CNC machines and how they operate, is to join a forum, and the OpenBuilds forum is just the place. Wonderful people, and with members always glad to help ;)

    The sheer satisfaction of seeing your very first GCode being transformed into something is brilliant ! At first you're hovering over your machine watching it going through it's paces, hoping that you haven't goofed .......... then you see your creation coming to life. Almost like magic ! :D The quality of the printed logo is quite amazing actually, it got me thinking that if I had a cutter installed onto the tool holder, that I would be able to cut out vinyl lettering and logo's. So now I've found another job I can do with my machine.

    Hope to see one of your builds in the near future mate :thumbsup:


    TURK
     
    fwm891 likes this.
  5. fwm891

    fwm891 Well-Known
    Builder

    Joined:
    Feb 2, 2018
    Messages:
    54
    Likes Received:
    25
    Agree with Turk here, Look through the other sections of the forum and you'll be greeted with every aspect of the DIY CNC experience. Though I've not received my WorkBee YET! Ryan has answered every question fired at him about it promptly - no complaints there. Turks thread is a gold mine too.
     
  6. T4Concepts

    T4Concepts Journeyman
    Builder

    Joined:
    Dec 7, 2017
    Messages:
    108
    Likes Received:
    114
    Thanks for the kind words Francis :thumbsup: and yes, Ryan's the man ! he helped me big style. I was on the phone to him every other day with a barrage of questions :rolleyes:
    I'm sure you'll have a good head start for when you get your WorkBee ......... not long now ! Did you see just how accurate you can get with these things, the ability to adjust tolerances up to 0.06 of a millimetre ! That should come in very handy for your inlays on your guitars ;)


    TURK
     
    fwm891 likes this.
  7. TurfnSurf

    TurfnSurf New
    Builder

    Joined:
    Jan 6, 2018
    Messages:
    32
    Likes Received:
    17
    Okay, so is the positioning accuracy 0.06mm or is the repeatability 0.06mm or ?

    Looks good!.
     
  8. T4Concepts

    T4Concepts Journeyman
    Builder

    Joined:
    Dec 7, 2017
    Messages:
    108
    Likes Received:
    114
    Hi mate,

    0.06mm was just the option I chose on the Z axis when I 'homed' my work position, as I used a feeler gauge, but I'm pretty sure you can set up any axis as accurately as you would need. I haven't calibrated the machine yet, but it looks to be just about right at the moment, having said that, I haven't had to do any precision work yet, just a test logo. Still learning at the moment mate, but when I need to profile my headlight mounting bracket parts they will have to be bang on target.


    TURK
     
  9. fwm891

    fwm891 Well-Known
    Builder

    Joined:
    Feb 2, 2018
    Messages:
    54
    Likes Received:
    25
    Ooznest/WorkBee states: Accuracy - 0.05 - 0.10mm (Screw Driven) Or 0.10 - 0.20mm (Belt Driven)
     
  10. Ryan Lock

    Ryan Lock Veteran
    Builder

    Joined:
    Oct 12, 2014
    Messages:
    530
    Likes Received:
    293
    @johnnycnc If built a good enough table, you could just support the machine front and back, and then have the whole middle section with no table. You could then mount things below the machine and indeed do joinery jobs.

    @T4Concepts Thansk again for the kind words :thumbsup:.

    @fwm891 Yup that is correct. For the belt drive, the smaller the machine the better the accuracy will be.

    Ryan
     
  11. Mark Carew

    Mark Carew OpenBuilds Team
    Staff Member Moderator Builder Resident Builder

    Joined:
    Jun 28, 2013
    Messages:
    2,759
    Likes Received:
    2,438
    Just wanted to say what a great build @T4Concepts Very fun to follow along with and really informative. From the looks of it @Ryan Lock you have done an amazing job putting this WorkBee kit together and the proof is in the positive user feedback. Great job guys thank you for sharing :thumbsup:
     
  12. T4Concepts

    T4Concepts Journeyman
    Builder

    Joined:
    Dec 7, 2017
    Messages:
    108
    Likes Received:
    114

    How nice of you to say so Mark, many thanks :thumbsup:

    What at first looked like a very difficult process in learning everything about CNC machines, how they operate and how to assemble one, was all made quite straight forward actually .................... thanks to guys like yourself and Ryan, and of course this great forum. It's I who should be thanking you.

    I hope this build thread will continue to be a valuable resource for others, I've still got an awful lot to learn but I do hope to share some of my creations, and the things that only a cnc machine is capable of. I've spent countless hours viewing your videos that undoubtedly helped me a great deal. I've only just started with some very basic videos of my own, as I learn I also hope to upload more howto videos also. All this stuff has really given me a new lease on life, how to get creative and make stuff ! Including another bigger CNC machine :D


    TURK
     
    Mark Carew, Ryan Lock and fwm891 like this.
  13. spandadk

    spandadk New
    Builder

    Joined:
    Jan 24, 2018
    Messages:
    5
    Likes Received:
    2
    Great job with the documentation T4Concepts!
    I just finished putting together my own 1000x1000 screw driven Workbee and only just managed to do a successful homing cycle before calling it the day.
    I used your photos as reference in situations where I was a bit confused myself - which I was many times :)

    I'm yet to do any tests myself (also a rookie with all of this).

    I experienced one thing that left me with a question:
    While homing, I noted that both my Y screws were wobbling quite a bit. I didn't get a chance to check the X + Z screw (will do that in the weekend)

    Wobble seemed similar to the wobble in this video (though in the video it's happening on the Z screw - happens after 5 secs in the video):


    Anyone have an idea on what to do about that?
     
  14. T4Concepts

    T4Concepts Journeyman
    Builder

    Joined:
    Dec 7, 2017
    Messages:
    108
    Likes Received:
    114
    Hi Spandadk,

    I'm by no means an expert at this myself, I'm sure they'll turn up soon enough to put me right though, but the first thing I would check is the tension on the ACME drive screws, it may be that you tightened them too much ................ as in compressed them. Try to loosen them off first. If that doesn't seem to make any difference the only thing left to do is to remove them, find a nice flat surface and roll them to see if they're slightly bent. That's the very thing I did before I installed mine, just to see of they were dead straight.

    Sounds like a nice machine a metre square WorkBee, and I'm glad that some of my build thread helped to clear-up a couple of things. The 'Homing' thing is what had me for a while, as everything I read or saw on YouTube was referred to as 'Homing', yet they were in different places ! :confused: It was a couple of days before I came across David The Swarfer' thread about the 'Work Position Homing' as opposed to the 'Machine Home Position' .................... kind of a 'Eureka' moment you could say :D


    TURK
     
  15. spandadk

    spandadk New
    Builder

    Joined:
    Jan 24, 2018
    Messages:
    5
    Likes Received:
    2
    Thanks for the suggestions T4Concepts - I tried both things and first I did notice that I had tightened the ACME drive screws quite a bit, however loosening them, did have no effect.
    I also took out one screw and didn't see any noticeable bent.

    I'm not sure if it can be related, but I can't get all the v-wheels to touch the rail - regardless of how I try to turn each of the eccentric screws (starting all from 6mm mark bottom down).
    Normally I can get the 6 wheels at bottom to touch fairly ok, a couple with a bit more tension on the rail than others, but the 8 at top, will then atleast have 1 v-wheel which isn't touching the rail and a couple of wheels with quite a bit more tension than others

    Anyways. will try and e-mail Ooznest for suggestions (and not spam your topic further about it : )

    But just as reference, this is a recording of the wobble I currently see:

     
  16. spandadk

    spandadk New
    Builder

    Joined:
    Jan 24, 2018
    Messages:
    5
    Likes Received:
    2
    Just wanted to chip in with my latest "findings":
    - The issue with my wheels not being able to touch the rails all at once was solved by loosening the screws/m5 nylon lock nuts for the 4 top wheels and then re-tightening them again (while being on the extrusion). This seemed to make the wheels fit on the C-beam extrusion a lot better, and now all wheels at bottom and top touch the rail with close to little friction (after adjusting the excentric spacer). So guess any tension there might have been throughout the build was removed by this.

    The wobble issue and the "bad" part (for me) - I probably found the main issue to the wobble:
    And it comes back to what T4Concepts said earlier and I can only recommend anyone new to this (like me) that the first thing you do is:
    "find a nice flat surface and roll the acme lead screws to see if they're slightly bent"

    With my wheels properly in place, I popped up UGS to jog the Y-axis - the issue though, was still present.
    I decided to take out the acme lead screw yet again and roll it on a better surface than my previous post.
    And surprise surprise, the lead screw IS bent - the one from the video (y-axis-left) a bit more bent than the y-axis-right lead screw. The x-axis lead screw has same level of bent as y-axis-right.

    Sadly I didn't do the roll test before starting, so I don't know if it came like that or I just messed it up somehow. Guess i'll have to try and order some new ones and hope that solves it all :(
     
    GrayUK and sebcbien like this.
  17. fwm891

    fwm891 Well-Known
    Builder

    Joined:
    Feb 2, 2018
    Messages:
    54
    Likes Received:
    25
    OK the wobble looks bad but is it actually affecting the machines ability to move accurately? If the throw is great enough to affect the motion of the gantry then there is a problem. If the gantry remain stable then I think its something that looks bad (therefore cosmetic). What it may do over time is give additional wear to the threaded nuts on the Y axis...
    I would think on this size lead screw there is enough flexibility to cope with some bending.
    In the same way that you engaged the wheels on the rails can you loosen the screw nuts and see if there is an optimal position for them relative to the leadscrews - just a thought
     
    #77 fwm891, Mar 4, 2018
    Last edited: Mar 4, 2018
  18. Giarc

    Giarc OpenBuilds Team
    Staff Member Moderator Builder Resident Builder

    Joined:
    Jan 24, 2015
    Messages:
    3,008
    Likes Received:
    1,676
    Is the screw long enough that you can flip the plates around and have the bearings on the outside so the screw is in tension rather than compression, which is better (I believe). This is how I designed mine so I would have less "whip" at the 1500mm length. But I also used 1/2"-10 five start screws.
     
  19. T4Concepts

    T4Concepts Journeyman
    Builder

    Joined:
    Dec 7, 2017
    Messages:
    108
    Likes Received:
    114
    I agree Spandadk that 'wobble' is quite severe, and now that you've done the 'roll test' I would look at buying replacements. And as fwm891 mentions, if it doesn't effect the operation of the machine now, it will in time due to excessive wear. I may not of emphasised enough in my build thread the importance of assembling the various assemblies accurately with precision, I treated all my assemblies as different sections, I assembled them on a known flat surface and used an engineers square, then assembled the different sections and double checked everything with my set square again. The image below is a classic example of assembling one of the Y axis gantry plates with the V-Slot wheels, what looked square by eye proved it wasn't ! The minor difference of a mere millimetre told me that the assembly was twisted, which would probably lead to the V-Wheels not running true >>

    26_2076_IMG_4270.jpg


    Same goes for the rest of the assembly, I think it's quite wise to check and double check that everything is square during the assembly. CNC machines are precisions tools and should be treated as such. But me being me, any old excuse to get my callipers, micrometer and engineers square's out ! :D >>

    27_2081_IMG_4287.jpg


    Don't worry about 'Spamming' my build thread mate ..................... I started this build thread with the intention of showing how I built my WorkBee with the hope that it will help other members to build theirs. As a 'WorkBee Owners Discussion' group ;) any tips or issues can be discussed here, we're all here to learn from one another :thumbsup:


    TURK
     
    GrayUK likes this.
  20. T4Concepts

    T4Concepts Journeyman
    Builder

    Joined:
    Dec 7, 2017
    Messages:
    108
    Likes Received:
    114
    What d'you use yours for ? ..................

    I've seen a lot of great cnc builds on this forum, but not many people actually discuss what they're doing with them. Many I've seen quite a few ( judging by the sizes of them ) are purely for routing wood, sign making and the like. In my case ( as I may just as well get the ball rolling ), my prime objective is to help me design automotive headlights. Up until now, I've been doing everything by hand with the help of numerous jigs. Now that I've spent a few weeks with my WorkBee I'm really beginning to realise just how versatile that particular design is. The two different spoil board levels is a genius idea, 'Method Two' in the user manual will give you a maximum plunge depth of up to 47mm, but that can be increased even further by adding extra V-Slot extrusions under the base, this would also increase it's rigidity.

    This is set up as 'Method One'. Whereas your spoil board would sit on top of the vertical V-Slot extrusions >>

    29_IMG_4473.jpg


    And this is 'Method Two' .......... simply by installing the V-Slot extrusions horizontal your spoil board gets mounted inside the machines frame . And here we come to the reason why I bought the WorkBee, I can sit my work piece inside the cnc machine so I can machine the top of it. I've yet to make a proper work piece holder to secure my part firmly in the frame, but you get the idea >>

    28_IMG_4300.jpg


    The other idea I had was to actually form my headlight mounting brackets, usually done by hand this can be a time consuming exercise ................ and as I'm using PU foam, the stresses involved will be minimal. This is one of my designs I completed last year, the basis of a prototype headlight mounting assembly >>

    30_IMG_1857.jpg


    Once the PU foam above is formed it's then coated with a special resin, sanded and polished, I then make the moulds using silicone rubber >>

    31_IMG_2338.jpg


    I then pour into those silicon moulds a special formulated heat resistant resin to make the vacuum forming 'plugs' >>

    32_IMG_3960.jpg


    Then the part is vacuum formed using 3mm ABS. Here my WorkBee CNC will come in very handy yet again, as I need to profile and cut all the mounting holes to install the headlight units. Needless to say, all these parts must be absolutely precise >>

    33_IMG_4010.jpg


    And here's one of my prototypes ..................... It's all very fine designing, fabricating and assembling one or two prototypes by hand but on larger quantities, you certainly couldn't guarantee accuracy every time, but with a cnc machine you can >>

    34_IMG_4251.jpg


    I've still got a few things to do to my WorkBee, I'm going to buy extra lengths of C-Beam extrusion to install underneath to make it higher, this will give me a little more depth of cut as my part is quite an awkward shape, and I need to design a mounting block to install my part on, this should help to position my part accurately every time. I thought of using blocks of wood to mount the cnc machine on, but in a workshop where the temperatures seem to fluctuate depending on season, I think the wood would throw the WorkBee out of square due to the wood contracting. So what modifications do you guys intend on doing to your WorkBee's, and what special jobs d'you intend in using your cnc for ?

    Would be nice to know ................ particularly the modding side of things, maybe someone's got a real nice idea I could use ! :rolleyes:


    TURK
     
    Mark Carew and fwm891 like this.
  21. GrayUK

    GrayUK Openbuilds Team Elder
    Staff Member Moderator Builder

    Joined:
    May 5, 2014
    Messages:
    1,668
    Likes Received:
    627
    It seems like a long time ago, that we discussed amongst ourselves, as to how you were going to proceed. :rolleyes:
    I'd forgotten the original reason for doing your machine. :(
    It can't be long now before you start your assembly line. :D
    Chips with everything soon :thumbsup::thumbsup::D:D
    Gray
     
    T4Concepts likes this.
  22. T4Concepts

    T4Concepts Journeyman
    Builder

    Joined:
    Dec 7, 2017
    Messages:
    108
    Likes Received:
    114
    Thanks Mr Gray :thumbsup:

    Well that's my plan, and in theory it seems OK ................. but sometimes we have to change our carefully conceived plans. Another way to increase the cut depth would be to have a cut-out in a torsion box style worktop, that I'm also considering. But wouldn't that sacrifice the rigidity of the torsion box work top ? The point I'm making here is, once your WorkBee is completely assembled and ready for use, there are other ways of customising your CNC machine to fit your needs. I thought it may be interesting to see what others have done to theirs, and why.

    I've spent a couple of weeks with SketchUp and SketchUcam, and then USG Platform, they all work perfectly well together, but fwm891 but me onto 'Cut3D' which looks to be a fantastic piece of software. The obvious advantage is, it's capable of everything within one package as opposed to going from to another. And it's quite a respectable price also. Anybody got any experience with it ?


    TURK
     
  23. fwm891

    fwm891 Well-Known
    Builder

    Joined:
    Feb 2, 2018
    Messages:
    54
    Likes Received:
    25
    Turk - take a look at the Vectric forum theres a section on Cut3D (and the other softwares) with a gallery and Q&A's Been looking at the Cut2D and Vcarve software comments
    Francis

    Vectric Forum • View forum - Cut3D
     
  24. GrayUK

    GrayUK Openbuilds Team Elder
    Staff Member Moderator Builder

    Joined:
    May 5, 2014
    Messages:
    1,668
    Likes Received:
    627
    Vectric are very thorough with all they do. :thumbsup:
    It is a shame that their main program is out of the reach of most Hobby CNCers. :cry:
    Their other, smaller programs are very good as well, and as you say, quite affordable. :)
     
  25. T4Concepts

    T4Concepts Journeyman
    Builder

    Joined:
    Dec 7, 2017
    Messages:
    108
    Likes Received:
    114

    :thumbsup: .................. Funny you should say that Francis, I've just been reading it ! I'm currently looking at their members gallery, it's pretty amazing what people are doing with it.

    As you say Mr Gray, Vectric seem be a rather good company, excellent choice of software with prices to suite every pocket. I also just found Cut3D on another UK site for £195.00 plus £6.00 postage ! :D
    I guess I'll download the trial version first and have a play.


    TURK
     
    fwm891 likes this.
  26. Ryan Lock

    Ryan Lock Veteran
    Builder

    Joined:
    Oct 12, 2014
    Messages:
    530
    Likes Received:
    293
    @T4Concepts I really love seeing what our users are doing with their machines. We ship all these machines out, but very rarely get to see what the end use is. There is probably lots of really exciting things being done with them just like what you are doing. So thanks for sharing!

    Vectric is a really good company and the software is so simple but powerful to use. However you will still likely need to use UGS or similar to connect to the machine and transfer the file.

    @spandadk Hopefully you will have your replacement screws very soon :) I will check them personally for straightness.
     
  27. T4Concepts

    T4Concepts Journeyman
    Builder

    Joined:
    Dec 7, 2017
    Messages:
    108
    Likes Received:
    114
    One of the reasons why I asked Ryan was, while looking through and reading some of the comments on the forum, I noticed a great deal of members were planning on building or already have cnc machines of 1500mm and even 1700mm ................. that's a huge cnc machine in my book .................... and some people are even discussing machines of 4' x 8' ! So I was wondering what sort of work they would be doing on a cnc of those dimensions. I've also seen some very very large DIY cnc machines on YouTube, but you never actually see them make anything.

    I guess that's what the 'Projects' page on this forum is for, but yet again, no big stuff. So lets see some BIG stuff guys ! ;)


    I noticed yesterday that 'Vectric' are a UK company, I'll be talking to them soon about 'Cut3D' as I'm still a little confused about the built-in 'Post Processor'. The way I understand it, you still need a CAD program to design your part, then you import that .STL file into 'Cut3D' to create the tool paths ( Gcode files ) then run that Gcode via your 'Post Processor', in my case I'll be using 'Universal Gcode Sender Platform' .............. but UGS Platform isn't in the list of 'Post Processors' ! at least, that's what I'm reading on the Net. Also, correct me if I'm wrong, the 'Post Processor' ( the piece of software that's required to send the Gcode to your cnc machine ) has to be compatible with GRBL. Am I understanding that right or am I completely off with that one ?

    Vectric have some superb tutorial videos on their site ( and on YouTube ), but they never show the entire procedure. They tend to always show V-Carve Pro in operation, how would that compare to 'Cut3D' though, is the process exactly the same ?


    TURK
     
  28. fwm891

    fwm891 Well-Known
    Builder

    Joined:
    Feb 2, 2018
    Messages:
    54
    Likes Received:
    25
    Turk - Although I can't save anything within the Cut2D trial version - if I try too from the vast array of file types are Grbl (inch) and Grbl (mm) both saving as G-Code. I would think Cut3D would be very similar...

    Mark Moran at Vectric has been very Helpful to me with questions.
     
  29. T4Concepts

    T4Concepts Journeyman
    Builder

    Joined:
    Dec 7, 2017
    Messages:
    108
    Likes Received:
    114
    Thanks for tip Francis :thumbsup:

    I remember reading somewhere that somebody tried a 'universal' Post Processor that he found in the Cut3D PP list ..................... he didn't say how he got on though ! :cool: Unfortunately many of these discussion threads tend not to follow through with the matter at hand, so you're kind of left in the lurch ! I haven't spoken to Vectric as yet either, but I'm pretty sure you can download test Gcode files off their website, so I'll be trying that as well.

    Of course, I will let everybody know how I get on, and probably end up doing a little write up about my thoughts on the Vectric Cut3D program if I decide to buy it, just got a few things to sort out first though.

    It's pretty obvious to me by now that your CNC machine, as good as the WorkBee is, the true potential of the machine really lies on your workflow and the software you intend in using to create your parts. And of course, your own ability to use the software correctly. And as you rightly said in your build thread, your option to go for paid software as opposed to OpenSource software, is the ease of use and the time it takes to complete certain tasks. It's certainly worth considering investing a couple hundred quid and do away with all that extra frustration.


    You got yours yet ?


    TURK
     
  30. fwm891

    fwm891 Well-Known
    Builder

    Joined:
    Feb 2, 2018
    Messages:
    54
    Likes Received:
    25
    Turk,
    No emailed Oosnest yesterday - it's going out this week...

    I've been playing with Cut2D again and after engaging the grey cells realised that I could cut guitar neck shapes out if I break it down and machine as smaller parts. Also did some maths (well Excel did the maths!) and working with the standard ellipse equations it was possible to set out the reverse side of a guitar neck as an ellipse as a series of stepped cuts. Quite coarse at the mo as I only did a few steps to make sure things would work.
    Next step is to try with smaller steps and a ball nose bit rather than a square end mill... 2nd image
     

    Attached Files:

    #90 fwm891, Mar 6, 2018
    Last edited: Mar 6, 2018

Share This Page

  1. This site uses cookies to help personalise content, tailor your experience and to keep you logged in if you register.
    By continuing to use this site, you are consenting to our use of cookies.
    Dismiss Notice