Welcome to Our Community

Some features disabled for guests. Register Today.

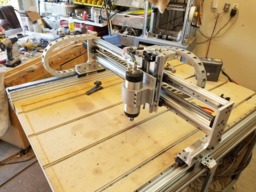
Sphinx Upgraded plates / ballscrews and linear rail

Discussion in 'CNC Mills/Routers' started by Troy Proffitt, Dec 11, 2018.

Tags:
  1. Troy Proffitt

    Troy Proffitt Journeyman
    Builder

    Joined:
    Oct 11, 2016
    Messages:
    126
    Likes Received:
    101
    Troy Proffitt published a new build:

    Read more about this build...
     
  2. LuMMuX

    LuMMuX New
    Builder

    Joined:
    Sep 12, 2018
    Messages:
    6
    Likes Received:
    7
    Before I starting working on my sphinx, I got distracted with the thought of using ballscrews and linear rails. Fortunately the black Friday sale helped me decide and now I'm building Kyo's original setup :) Upgrading to rails and ballscrews is definitely in my future. Thank you for posting your progress.

    Do you mind posting where you sourced your rails and ballscrews?
     
  3. Troy Proffitt

    Troy Proffitt Journeyman
    Builder

    Joined:
    Oct 11, 2016
    Messages:
    126
    Likes Received:
    101
    Cut out and installed the z stepper motor mount:
    Model added to project page
    20181212_201005.jpg
     
  4. Gilsegev

    Gilsegev Well-Known
    Builder

    Joined:
    Feb 28, 2018
    Messages:
    48
    Likes Received:
    27
    Very nice build so far! A few questions:
    1) What are the rails connected to? Is that v-slots?
    2) Why three sets of rails? The X axis needs one (1000mm?) and the Z needs another (300mm). What is the third rail for?
     
    #5 Gilsegev, Dec 13, 2018
    Last edited: Dec 13, 2018
  5. Troy Proffitt

    Troy Proffitt Journeyman
    Builder

    Joined:
    Oct 11, 2016
    Messages:
    126
    Likes Received:
    101
    1. Yep, connected to vslot using m3 tnuts
    2. Im replacing all 3 axis with linear rail. X 1500mm, y 1000mm and z 300 mm
     
  6. Gilsegev

    Gilsegev Well-Known
    Builder

    Joined:
    Feb 28, 2018
    Messages:
    48
    Likes Received:
    27
    Got it thanks!
    40x40 I assume?
    This looks like a great conversion idea. Any idea as for the overall cost for your machine?
     
  7. Troy Proffitt

    Troy Proffitt Journeyman
    Builder

    Joined:
    Oct 11, 2016
    Messages:
    126
    Likes Received:
    101
    Y axis uses 2 40x40mmx1000mm and the x axis uses 2 1500mm cbeams. Original price with the 2.2kw spindle is probably around $1500. The linear rails and ballscrews for the upgrades cost about $650 and about 45 for the 3/8 aluminum plate material.
     
  8. Gilsegev

    Gilsegev Well-Known
    Builder

    Joined:
    Feb 28, 2018
    Messages:
    48
    Likes Received:
    27
    Thanks! Please keep on posting your progress. I am very interested to see how it comes out and how much more rigid it's going to be!
     
  9. Troy Proffitt

    Troy Proffitt Journeyman
    Builder

    Joined:
    Oct 11, 2016
    Messages:
    126
    Likes Received:
    101
    20181215_112930.jpg All done except a belt for the z axis stepper.
    [​IMG]
     
    Binoy, freon12 and CNCMD like this.
  10. Gilsegev

    Gilsegev Well-Known
    Builder

    Joined:
    Feb 28, 2018
    Messages:
    48
    Likes Received:
    27
    It looks MEAN! I love it.
    You said before that your X axis uses 2x1500mm cbeams. I think you meant Y/ The gantry travels on the X which looks like your 1000mm v slots whereas the dual motors handle the Y @ 1500 cbeam. Right?
     
  11. Troy Proffitt

    Troy Proffitt Journeyman
    Builder

    Joined:
    Oct 11, 2016
    Messages:
    126
    Likes Received:
    101
    The way i have it placed in my garage, the left - right is the 1500mm length, so in my mind it's the x axis :)
     
  12. Gilsegev

    Gilsegev Well-Known
    Builder

    Joined:
    Feb 28, 2018
    Messages:
    48
    Likes Received:
    27
    ok ok X then :)
    Which software did you use to design the parts? I can open them in windows 3D paint but I can't really get any real measurements out of it.. Do you have an option to export DXFs?
    Also note that your left arm file is corrupted.
     
  13. Troy Proffitt

    Troy Proffitt Journeyman
    Builder

    Joined:
    Oct 11, 2016
    Messages:
    126
    Likes Received:
    101
    I used tinkercad to design and estlcam to cut them out. Im sure there is some app that can convert svg to dxf. Tinkercad only exports svg obj and stl.
     
    #14 Troy Proffitt, Dec 15, 2018
    Last edited: Dec 15, 2018
  14. GrayUK

    GrayUK Openbuilds Team Elder
    Staff Member Moderator Builder

    Joined:
    May 5, 2014
    Messages:
    1,668
    Likes Received:
    627
    Hi Troy. Nice machine :thumbsup::thumbsup:
    Can I suggest getting yourself some of that bottom of the door type Brush Draught Excluder?
    Cut some pieces as wide as your Hiwin Carriages and stick them, before and after, each one. :)
    This will really help to keep the debris from the carriages. :thumbsup:
     
  15. Giarc

    Giarc OpenBuilds Team
    Staff Member Moderator Builder Resident Builder

    Joined:
    Jan 24, 2015
    Messages:
    3,015
    Likes Received:
    1,680
    Open the file in Tinkercad then export as SVG. Open the SVG in inkscape, then export it as a DXF. Only takes about a minute or two per per part. I tried it on the "cnc arm right file". It works and the hole spacings measured out to what I assume was correct (20 mm) when I checked it in Fusion 360.
     

    Attached Files:

  16. GrayUK

    GrayUK Openbuilds Team Elder
    Staff Member Moderator Builder

    Joined:
    May 5, 2014
    Messages:
    1,668
    Likes Received:
    627
  17. Gilsegev

    Gilsegev Well-Known
    Builder

    Joined:
    Feb 28, 2018
    Messages:
    48
    Likes Received:
    27
    Thanks Giarc! I got it to work with fusion. My one problem is I dont have the exact measurements to scale it.. I opened one of the files (think it was right arm) and the ruler wasn't showing numbers when I used it. I'll figure it out, no biggie.

    @Troy Proffitt - your left arn file is empty. FYI
     
  18. Troy Proffitt

    Troy Proffitt Journeyman
    Builder

    Joined:
    Oct 11, 2016
    Messages:
    126
    Likes Received:
    101
    Here is the left arm
     

    Attached Files:

  19. Giarc

    Giarc OpenBuilds Team
    Staff Member Moderator Builder Resident Builder

    Joined:
    Jan 24, 2015
    Messages:
    3,015
    Likes Received:
    1,680
    If you do it how I did it, it is scaled properly. If you just open it as an svg in Fusion then you have to mess with figuring out the scale. If you have a Fusion (Autodesk) account then you can just log into Tinkercad with that to get the dimensions. That is what I did. It was my first visit ever to Tinkercad and I was happy I did not have to create a new account.
     
  20. Gilsegev

    Gilsegev Well-Known
    Builder

    Joined:
    Feb 28, 2018
    Messages:
    48
    Likes Received:
    27
    I got Tinkercad to measure the width and length of the model so I scaled the imported SVG to match so I think I got it right now.
    For now I'm waiting to see what Troy Proffitt can do with his machine before I pull the trigger on buying any rails. Just wanted to see whether I could get the model into fusion.
     
  21. Troy Proffitt

    Troy Proffitt Journeyman
    Builder

    Joined:
    Oct 11, 2016
    Messages:
    126
    Likes Received:
    101
    Here are first movements since the upgrade. Still waiting on a z axis belt and a more robust coupler for the y axis (one of the holes where the ballscrew attaches to the stepper is slightly too small so the nut is rubbing causing that clicking)

     
    CNCMD likes this.
  22. Gilsegev

    Gilsegev Well-Known
    Builder

    Joined:
    Feb 28, 2018
    Messages:
    48
    Likes Received:
    27
    Very cool!

    Did you make the X/Y motor mounts and the part that connects the left and right arms to the linear rail carriages (L shaped) as well?
     
  23. LuMMuX

    LuMMuX New
    Builder

    Joined:
    Sep 12, 2018
    Messages:
    6
    Likes Received:
    7
    Nice.

    @Gilsegev - I think that is normal extruded aluminum angle
     
  24. Troy Proffitt

    Troy Proffitt Journeyman
    Builder

    Joined:
    Oct 11, 2016
    Messages:
    126
    Likes Received:
    101
    Correct, I bought some 3/8 angle. The motor mounts are just aluminum tube standoffs bought from openbuilds, and the holes are tapped to 5mm threads into the arms.
     
    #25 Troy Proffitt, Dec 17, 2018
    Last edited: Dec 17, 2018
  25. Troy Proffitt

    Troy Proffitt Journeyman
    Builder

    Joined:
    Oct 11, 2016
    Messages:
    126
    Likes Received:
    101
  26. Troy Proffitt

    Troy Proffitt Journeyman
    Builder

    Joined:
    Oct 11, 2016
    Messages:
    126
    Likes Received:
    101
    Final result
    20181219_232806.jpg
     
    MaryD and CNCMD like this.
  27. Gilsegev

    Gilsegev Well-Known
    Builder

    Joined:
    Feb 28, 2018
    Messages:
    48
    Likes Received:
    27
    Sweet! Are you seeing any notable performance or rigidity difference from the upgrade?
     
  28. Troy Proffitt

    Troy Proffitt Journeyman
    Builder

    Joined:
    Oct 11, 2016
    Messages:
    126
    Likes Received:
    101
    Yes, i was able to increase my rates, and i notice a lot more detail in the final cut. Also when surfacing my bed, i noticed the original setup bowed in the middle so there was a 2mm dip in the middle of the bed that was fixed
     
    Waste, GrayUK and Gilsegev like this.
  29. Gilsegev

    Gilsegev Well-Known
    Builder

    Joined:
    Feb 28, 2018
    Messages:
    48
    Likes Received:
    27
    Hi, I am thinking about starting this conversion on my 1000x500mm Sphinx. I have the aluminum and want to get the 40x40 V Slots for my X (what you call Y..) but dont have the linear guides yet.
    Is the C-Beam to 40x40 V Slot a direction conversion in terms of size? If I have a 998mm C-Beam on my X axis, do I buy 2x998mm V Slots or is there a difference in lengths I have to take into account?
     

Share This Page

  1. This site uses cookies to help personalise content, tailor your experience and to keep you logged in if you register.
    By continuing to use this site, you are consenting to our use of cookies.
    Dismiss Notice