Welcome to Our Community

Some features disabled for guests. Register Today.

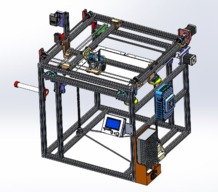
Dash-X 3D Printer: Innovative design

Discussion in '3D printers' started by Neil Rosenberg, May 21, 2019.

  1. Neil Rosenberg

    Neil Rosenberg Journeyman
    Builder

    Joined:
    Dec 29, 2013
    Messages:
    181
    Likes Received:
    179
    Neil Rosenberg published a new build:

    Read more about this build...
     
    smithnovel and MFCarew like this.
  2. Shortyski13

    Builder

    Joined:
    Mar 28, 2017
    Messages:
    40
    Likes Received:
    10
    What about CoreXY didn't you like? Asking because I'm building one (waiting for all the parts to come in).
     
  3. Neil Rosenberg

    Neil Rosenberg Journeyman
    Builder

    Joined:
    Dec 29, 2013
    Messages:
    181
    Likes Received:
    179
    Hi there and thanks for the message.

    I want to be careful not to criticize CoreXY, as there are some VERY fine printers of this type. Take for example the Fusion series (i.e. F306) -- their printers use string drive in a CoreXY configuration and put out truly amazing print quality very quickly. They also cost over $4k each.

    My comment is based on experiences with belt-driven printers. I have seen symptoms of unwanted flexing of the arms/carriages caused by (I think) interaction between the two axes. It was most pronounced in the H-Bot (a known issue), but I also saw it on CoreXY. In short, many of the movements exert unbalanced forces on the various bars and bearings and thus create the opportunity for positional errors. The Cross-Beam (and Prusa-style for that matter) does not have this issue. In fact the Dash-X Cross-beam goes one step further by having active synchronous drive on both ends of each beam.

    I'm talking about really fine distinctions. I was able to get good parts from CoreXY, but they didn't quite rise to the quality my newly acquired Creality Ender 3 and CR10s Pro. BTW, the main drawback of these two fairly inexpensive Creality printers is their speed, or lack thereof.

    Early results with this Cross-Arm system in Dash-X suggest that I'm getting quite close to Creality quality, while still keeping the speed up where I like it.

    Of course your mileage may vary.

    I'll report more as I dial it in and see how good it can get.

    Neil
     
    #3 Neil Rosenberg, May 25, 2019
    Last edited: Dec 4, 2019
  4. Shortyski13

    Builder

    Joined:
    Mar 28, 2017
    Messages:
    40
    Likes Received:
    10
    What's your build volume? I don't see it listed but maybe I'm just missing it.
    I decided against the dual gantries due to a bit higher cost (I'm already a little over budget) and it would be tougher making them thick to span the large gap on my design's large volume, without flexing. I could be wrong tho and a bltouch probably negates that last point. Maybe i should have gone that way haha.
    Im hoping i don't get too much ringing with 10mm belts, but ill find out! In the name of experimentation!
     
  5. Neil Rosenberg

    Neil Rosenberg Journeyman
    Builder

    Joined:
    Dec 29, 2013
    Messages:
    181
    Likes Received:
    179
    My build volume is 300mm cubed. Might be a few mm short of that in the z axis.

    Love to see what you're building, keep in touch!
     
  6. Shortyski13

    Builder

    Joined:
    Mar 28, 2017
    Messages:
    40
    Likes Received:
    10
    Mine is the Mushu Large CoreXY, if you scroll down a few through the 3d printers. It's not fully modelled but it has most of it. I do still need to add a few pics of the lift frame. It's around 20x26x28in build volume.
     
  7. Neil Rosenberg

    Neil Rosenberg Journeyman
    Builder

    Joined:
    Dec 29, 2013
    Messages:
    181
    Likes Received:
    179
    Very interesting!

    I designed/built a 24" cube printer a few years back, but when the reality of printing times became apparent I decided it wasn't really suitable for making parts in my lifetime. In that printer I used the Volcano hot end plus a .8mm dia nozzle. Even with that, very large parts took an eternity.

    Best of luck with your project.

    Neil
     
  8. Neil Rosenberg

    Neil Rosenberg Journeyman
    Builder

    Joined:
    Dec 29, 2013
    Messages:
    181
    Likes Received:
    179
  9. Mark Carew

    Mark Carew OpenBuilds Team
    Staff Member Moderator Builder Resident Builder

    Joined:
    Jun 28, 2013
    Messages:
    2,758
    Likes Received:
    2,440
    Hey guys just wanted to say that Neils book is fantastic and really goes in depth to help understanding all the fundamental design principles of 3D printers. We have a copy here at OpenBuilds HQ and the Team is enjoying and learning from it. If you are looking at building your own 3D printer please consider utilizing the research Neil has made available.
     
    thomas_w. and Peter Van Der Walt like this.
  10. Neil Rosenberg

    Neil Rosenberg Journeyman
    Builder

    Joined:
    Dec 29, 2013
    Messages:
    181
    Likes Received:
    179
    STLs, IGES and STEP files now uploaded and available. Thanks all for your interest.
     
    MaryD likes this.
  11. Neil Rosenberg

    Neil Rosenberg Journeyman
    Builder

    Joined:
    Dec 29, 2013
    Messages:
    181
    Likes Received:
    179
    I have updated the parts list
    1. A few item links needed refreshing, they are corrected now.
    2. 24v bed heaters are becoming scarce, everyone's using 120v with external relays. New links are provided to both in the list.
    3. I neglected to include the aluminum for the bed, it's in the list now.
    4. I also neglected to include the print surface. I am linking to my current favorite, the Anycubic Ultrabase.
    Neil
     
    Peter Van Der Walt likes this.
  12. Evan870314

    Builder

    Joined:
    Dec 26, 2019
    Messages:
    5
    Likes Received:
    1
    Any updates?
     
  13. Neil Rosenberg

    Neil Rosenberg Journeyman
    Builder

    Joined:
    Dec 29, 2013
    Messages:
    181
    Likes Received:
    179
    Not at this time. The design has been pretty stable for a while.
     
    Peter Van Der Walt likes this.
  14. Evan870314

    Builder

    Joined:
    Dec 26, 2019
    Messages:
    5
    Likes Received:
    1
    I was wondering, if you would be willing to make a build guide? I could pay you..not a lot but I could pay you lol.

    I have built a 3D printer before, The Reprap Wilson II Reprap Wilson II complete 3D printer kit by Marty Rice on Tindie using this video assembly series from the creator just give you an idea of my 3D printer building experience.
     
  15. Neil Rosenberg

    Neil Rosenberg Journeyman
    Builder

    Joined:
    Dec 29, 2013
    Messages:
    181
    Likes Received:
    179
    Hi there and thanks for the message/request. Looks like you're having fun with 3D printers!

    Unfortunately, I don't have the time just now to put further effort into the Dash-X printer, my teaching schedule is very heavy.

    If you have specific questions or concerns, please post them here -- I'll do my best to answer.

    Sorry
    Neil
     
  16. Neil Rosenberg

    Neil Rosenberg Journeyman
    Builder

    Joined:
    Dec 29, 2013
    Messages:
    181
    Likes Received:
    179
    Peter Van Der Walt likes this.
  17. Neil Hancock

    Builder

    Joined:
    Dec 20, 2019
    Messages:
    6
    Likes Received:
    0
    Hi Neil, love this design and I’ve got as far as installing x and y drive and the carriage. Just one question if I may, Why did you put the adjustable bearings on the same side as the motors on both x and y so that when you adjust the belt tension you have to loosen the motor off as well. I’m going to try and swap them. Thanks. Neil Hancock
     
  18. Neil Rosenberg

    Neil Rosenberg Journeyman
    Builder

    Joined:
    Dec 29, 2013
    Messages:
    181
    Likes Received:
    179
    Hi there, and thanks for the thoughtful comment.

    You are correct, in theory it would be fine to move the motors to the other ends of the respective drives, and yes this could make belt tensioning a bit simpler. In hindsight that might have made more sense, I suppose it's just how the design evolved. I do remember fussing quite a bit with location of components versus carriage movement and bed offsets, there's not a lot of symmetry. Among my other design constraints: I wanted to have the motors near each other and close to the controller (for wiring purposes), away from the operator, and out of the way of the filament spool and Bowden extruder.

    Looking at the current layout, you would probably have the least issues by moving the X-Axis motor to the rear-left and the Y-Axis motor to the front-right. The motor brackets may need some redesign. You may also have to relocate/redesign the limit switch brackets. If you have access to a cad package (i.e. Solidworks) I suggest you try swapping things in a test assembly to make sure everything clears.

    In practice, belt tension is a set-and-forget affair. Unless you were planning on making this in production, the current design really doesn't add significantly to the setup time, but perhaps I'm rationalizing it :)

    Good luck with the build, and do post photos once you've got it together please!
     
  19. Neil Hancock

    Builder

    Joined:
    Dec 20, 2019
    Messages:
    6
    Likes Received:
    0
    Hi Neil,
    Thanks for your reply.

    Yes you are right, it should only be a one off adjustment. I dont think its worth redesigning it. I'm waiting on quite a few parts from china which could be a while because of the corona virus. i'm trying to get my head around how the controller and display go together and how the firmware works etc. Sharp learning curve for me.

    Ive attached a photo of my efforts so far, gone for the colourful approach. i've been a bit slack not trimming the rods and the bolts are too long but I think it has potential. some of my 3d printed parts are a bit rough. poor old prusa clone struggles a bit. I've had to do a fair bit of post production grinding and drilling to make things fit. My old printer seems to make things a tad small! Better than too big I suppose.

    Cheers,

    Neil
     

    Attached Files:

  20. Neil Rosenberg

    Neil Rosenberg Journeyman
    Builder

    Joined:
    Dec 29, 2013
    Messages:
    181
    Likes Received:
    179
    Congrats on getting so far along, you're well on your way! I can't tell from your messages whether you have a copy of my book, if not you may find answers to a number of your questions in there plus links to other sites that describe things much better than I can. Also, a great source of info on Youtube is Michael Lawson, Teaching Tech.

    Before you know it you'll have the basis of a great working printer and then comes the "joy" of dialing it in: a years-long process of learning, printing and head-scratching. It's more fun than it sounds. If you're like many 3d printing enthusiasts, you'll start to appreciate much better print quality and wondering how you ever put up with such shabby looking parts in the past.

    Neil
     
  21. Mario Queiroga

    Builder

    Joined:
    Jan 21, 2018
    Messages:
    1
    Likes Received:
    0
    Hi,
    Have you tried to build this design with linear rails instead rods ?
     
  22. Neil Rosenberg

    Neil Rosenberg Journeyman
    Builder

    Joined:
    Dec 29, 2013
    Messages:
    181
    Likes Received:
    179
    All of my designs for the past few years have used the Openbuilds wheels wherever possible. They have MANY advantages over other linear bearing styles, particularly in light-duty applications like 3d printers. The biggest one is the ability to dial-in a perfect running fit (with the eccentrics), something no other type of bearing allows. That's very important to me.
     
    #22 Neil Rosenberg, Mar 5, 2020
    Last edited: Mar 6, 2020
  23. Neil Hancock

    Builder

    Joined:
    Dec 20, 2019
    Messages:
    6
    Likes Received:
    0
     
  24. Neil Hancock

    Builder

    Joined:
    Dec 20, 2019
    Messages:
    6
    Likes Received:
    0
    Thanks for the encouragement.i have another querie,
    I've just seen a YouTube video stating that the sdk v1.4 is a 32 bit processor and will not run on anything below marlin 2.0. I haven't got that far yet but you have supplied a modified version of 1.1.9. Have you modified it to run on 32 bit boards or is what I saw incorrect?
    thanks Neil
     
  25. Neil Rosenberg

    Neil Rosenberg Journeyman
    Builder

    Joined:
    Dec 29, 2013
    Messages:
    181
    Likes Received:
    179
    The 32 bit boards (SKR 1.3, 1.4...) do require the 2.x version of Marlin. It's not that different in terms of what it does (yet), but it is a learning curve getting it going. It's no longer on the Arduino IDE, the method of editing, building and transferring the firmware is quite different. And most troubling of all, some important settings and constants in the source code have changed names. Since many of the names were (and still are) fairly confusing, it took me a while to locate the various changes I wanted to make.

    At the end of it all, the benefits of going to 32 bit were minimal to non-existent for Dash and printers like it, where the processing overhead is not huge. If I was building a Delta, 32 bit is the way to go. For simple cartesian, the 8-bit boards are just fine. I'm leaving Dash at 8 bit for now.

    If you're considering changing for the learning, or adding some fancy new features (wifi, strange motor drivers, scara, other?) I say "go for it". If you're looking for performance improvement however, you may be disappointed.

    One last thing, the BLTouch has been updated (3.1) -- you'll need to be careful in any case to use the VERY latest version of Marlin or you may have trouble with it. You know engineers, they love to change things.

    Search in the YouTube archives, you'll find lots of great info on all of the above.
     
    #25 Neil Rosenberg, Mar 11, 2020
    Last edited: Mar 11, 2020
    Peter Van Der Walt likes this.
  26. Neil Hancock

    Builder

    Joined:
    Dec 20, 2019
    Messages:
    6
    Likes Received:
    0
    oops! I've just realised I bought the wrong board. I bought btt sdk 1.4 instead of the mks 1.4. that explains the confusion.
    Before I reinvent the wheel with the 32 bit board, I do have an 8 bit sdk v1.1 hanging around so I'll give that a try. It's loaded with smoothieware I think, I'll try loading it with marlin 1.1.9.
    I've got some t8 lead screw hanging around. Any reason why I shouldn't use that for the bed apart from the fact I have to reconfigure the steps/mm. l wouldn't think strength would be an issue, maybe the stability might suffer.
     
  27. Neil Rosenberg

    Neil Rosenberg Journeyman
    Builder

    Joined:
    Dec 29, 2013
    Messages:
    181
    Likes Received:
    179
    8mm leadscrews should be ok, as you say the loads (and speeds) are not huge.

    As re the controller, if you can afford it, you really owe it to yourself to get the latest version of whatever board. I would not hesitate to use the MKS Gen 1.4 or Gen L again. The price is pretty negligible, and you'll be assured of Marlin compatibility plus all of the necessary I/O.

    Neil
     
    #27 Neil Rosenberg, Mar 11, 2020
    Last edited: Mar 12, 2020
  28. Troy Proffitt

    Troy Proffitt Journeyman
    Builder

    Joined:
    Oct 11, 2016
    Messages:
    126
    Likes Received:
    101
    For $35, it's very hard to beat the SKR 1.3 Mini v1.2 board. With 32 bit cpu and 2209 stepper drivers (no special wiring for UART software stepper control..it's already built in ). As the poster above said, you have to compile the firmware.bin file and save it to the board memory card, but after you figure it out, it's not too bad. I'm using it on a home made cartesian printer with BlTouch sensor no problem. It does support sensorless homing, and I got it working, but I didn't trust it enough to use it fulltime.

    Here is a pic of my new printer:

    20200317_120407.jpg
     
    #28 Troy Proffitt, Mar 17, 2020
    Last edited: Mar 17, 2020
  29. Neil Rosenberg

    Neil Rosenberg Journeyman
    Builder

    Joined:
    Dec 29, 2013
    Messages:
    181
    Likes Received:
    179
    Really nice looking machine! I particularly like the synchronous top-drive Z-Axis, very innovative.

    One comment on that however, I usually like more wrap on drive or driven pulleys, at least 90 degrees. From the photo it looks like your Z-Axis motor only has a few teeth touching. Perhaps I'm missing something or the photo is misleading?

    As re the SKR Mini, looks like a really nice compact and inexpensive solution with lots of I/O. I may pick one up and try it.

    I agree with you on sensorless homing. I prefer actual switches, they're just not that hard to implement.

    Thanks for posting, have you thought about putting this build up here on Openbuilds?
    Neil
     
  30. Knute Bidne

    Builder

    Joined:
    Sep 28, 2019
    Messages:
    1
    Likes Received:
    0
    @Neil Rosenberg I have a need for a larger build volume and the Creality CR-10 Max looks promising with its 450x450x470mm capability.
    Do you have any experience or comment on their Max build?

    Second thing I wanted to ask you was wrt your 24" build, do you think the current frame and kinematics improvements in the Dash-X would scale to up to 24" ( or close ) and perform better than your first iteration of that size?

    Book is on order, looking forward to it! ~Knute
     

Share This Page

  1. This site uses cookies to help personalise content, tailor your experience and to keep you logged in if you register.
    By continuing to use this site, you are consenting to our use of cookies.
    Dismiss Notice