Welcome to Our Community

Some features disabled for guests. Register Today.

Sphinx Upgraded plates / ballscrews and linear rail

Discussion in 'CNC Mills/Routers' started by Troy Proffitt, Dec 11, 2018.

Tags:
  1. graham prinn

    Builder

    Joined:
    Jul 10, 2017
    Messages:
    9
    Likes Received:
    3
    Holy moly batman, just looked at your YT channel. that's one big *** 3d printer. How long did the Notre dame take? I have a creality ender3 pro which looks like a tiny baby next to that lol.
    So what does the Protoneer do exactly. By the way your machine looks beefy, You added those plates on the X axis after to raise your z depth?
     
  2. Troy Proffitt

    Troy Proffitt Journeyman
    Builder

    Joined:
    Oct 11, 2016
    Messages:
    126
    Likes Received:
    101
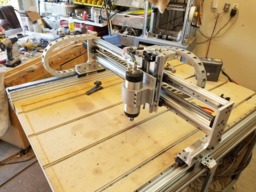
    The 3d printer has a 15x15x17 inch print area. It started out as a d-bot (search thingiverse), but I've changed it so much, it kind of a Frankenstein now. Notre dame took 72 hours. The protoneer board attaches to a raspberry pi3 board and does the same thing as the openbuilds black box does. I replaced most of the CNC plates with 3/8 thick aluminum and now it's super stiff. I am researching rack and pinion now to possibly replace the ball screws, but nothing in the near future.
     
  3. Troy Proffitt

    Troy Proffitt Journeyman
    Builder

    Joined:
    Oct 11, 2016
    Messages:
    126
    Likes Received:
    101
    Cutting out some railing for my parents house. 13 done and about 70 to go :) I can cut one about every 8 minutes

     
    Mark Carew and Giarc like this.
  4. Gilsegev

    Gilsegev Well-Known
    Builder

    Joined:
    Feb 28, 2018
    Messages:
    48
    Likes Received:
    27
    She's nowhere near complete but after two months at sea and three months of intermittent weekend work, I have first real movement!

     
    Peter Van Der Walt likes this.
  5. Troy Proffitt

    Troy Proffitt Journeyman
    Builder

    Joined:
    Oct 11, 2016
    Messages:
    126
    Likes Received:
    101
    I am so happy you were able to reuse the design! I looks great so far. Looking forward to seeing it cut.
     
    Peter Van Der Walt likes this.
  6. Waste

    Waste New
    Builder

    Joined:
    Dec 26, 2016
    Messages:
    4
    Likes Received:
    0
    sorry for the noob question, but I would like to ask what benefits do you get from the ball screws compared to our usual leadscrew??
    awesome upgrade by the way, Im also thinking of building a lead cnc and replacing z axis with linear rails (which is the cheapest lol).

    But I would really love to hear your opinion now that you have used both systems of linear motion

    thanks again for sharing
     
  7. Troy Proffitt

    Troy Proffitt Journeyman
    Builder

    Joined:
    Oct 11, 2016
    Messages:
    126
    Likes Received:
    101
    8mm Leadscrews are only good for 1000mm and one of my axis is 1500. Pretty simple
     
    #67 Troy Proffitt, Dec 28, 2019
    Last edited: Dec 28, 2019
  8. Clark222

    Clark222 New
    Builder

    Joined:
    Feb 17, 2016
    Messages:
    24
    Likes Received:
    4
    I really like how this build turned out. I have almost all of the parts needed to complete the build then I noticed that your drawings don't include the C-Beam end mounts for the stepper motors and ball screw end mounts. I was wondering if you still had them, and if so would you mind posting them?
     
  9. Troy Proffitt

    Troy Proffitt Journeyman
    Builder

    Joined:
    Oct 11, 2016
    Messages:
    126
    Likes Received:
    101
    I'm sorry, I didn't design those pieces. Maybe Gilsegev might still have the ones he made for his version?
     
  10. Troy Proffitt

    Troy Proffitt Journeyman
    Builder

    Joined:
    Oct 11, 2016
    Messages:
    126
    Likes Received:
    101
    I'm designing them now and will try to get them added here in the next day or so.
     
  11. Clark222

    Clark222 New
    Builder

    Joined:
    Feb 17, 2016
    Messages:
    24
    Likes Received:
    4
    Thanks and I'll reach out to him. Where did you get your plates from?
     
  12. Clark222

    Clark222 New
    Builder

    Joined:
    Feb 17, 2016
    Messages:
    24
    Likes Received:
    4
    I just saw your new post and thank you VERY much for re-designing them! I really appreciate it.
     
  13. Troy Proffitt

    Troy Proffitt Journeyman
    Builder

    Joined:
    Oct 11, 2016
    Messages:
    126
    Likes Received:
    101
    OK, here are the 2 panels. Should work for both front and back. I also added holes for the nut block into the main arm.

    pic4.png

    pic1.png pic2.png pic3.png
     

    Attached Files:

    #73 Troy Proffitt, Mar 10, 2020
    Last edited: Mar 10, 2020
  14. Clark222

    Clark222 New
    Builder

    Joined:
    Feb 17, 2016
    Messages:
    24
    Likes Received:
    4
    Wow - that was really quick and they look great! I really appreciate you doing this. It moves me a lot closer to the build.
     
  15. Gilsegev

    Gilsegev Well-Known
    Builder

    Joined:
    Feb 28, 2018
    Messages:
    48
    Likes Received:
    27
  16. Troy Proffitt

    Troy Proffitt Journeyman
    Builder

    Joined:
    Oct 11, 2016
    Messages:
    126
    Likes Received:
    101
    I can't tell you how wierd it is to see my cnc design, but not the one I built :) Thanks so much for posting this! You need to start cutting some aluminum now...
     
  17. Gilsegev

    Gilsegev Well-Known
    Builder

    Joined:
    Feb 28, 2018
    Messages:
    48
    Likes Received:
    27
    LOL thanks.. And thanks for the design!
    I'm still taking it slow. It's my baby!
     
  18. Troy Proffitt

    Troy Proffitt Journeyman
    Builder

    Joined:
    Oct 11, 2016
    Messages:
    126
    Likes Received:
    101
    And seeing it so clean is weird too :) here is what mine looks like now :
    20200416_231218.jpg
     
  19. Gilsegev

    Gilsegev Well-Known
    Builder

    Joined:
    Feb 28, 2018
    Messages:
    48
    Likes Received:
    27
    Hey CNCs should be dirty or they're not doing their job! :)
    To be honest, I made a huge mistake of going with the ball screw supports on the external side of the plate. It has been a really challenging job to install them. The first set I had did not have horizontal mounting holes so I manually drilled them and went way out of alignment so I had to pretty much butcher the holes in the plates to get them to align but this screwed the motor mounts I had to fabricate.
    I'm almost considering getting it running on aluminum and re-cutting several of the plates so everything works a little smoother and in tighter tolerances .

    Did you install end switches on yours? If not, how do you prevent it from going off the Y rails?
     
  20. Troy Proffitt

    Troy Proffitt Journeyman
    Builder

    Joined:
    Oct 11, 2016
    Messages:
    126
    Likes Received:
    101
    I don't use end switches at all. I've never had a case where I was worried about that. Most things I cut ate less than 24"x24", and my bed is much larger than that
     
  21. Gilsegev

    Gilsegev Well-Known
    Builder

    Joined:
    Feb 28, 2018
    Messages:
    48
    Likes Received:
    27
    Aluminum milling!

     
    Peter Van Der Walt likes this.
  22. Gilsegev

    Gilsegev Well-Known
    Builder

    Joined:
    Feb 28, 2018
    Messages:
    48
    Likes Received:
    27
    And one more. Aluminum slotting 0.7mm DOC.
    My Sphinx couldn't come even close to handling this before the upgrade.

     
    Mark Carew and Giarc like this.
  23. Gilsegev

    Gilsegev Well-Known
    Builder

    Joined:
    Feb 28, 2018
    Messages:
    48
    Likes Received:
    27
    Cutting an aluminium plate:

     
    Mark Carew and Giarc like this.
  24. Troy Proffitt

    Troy Proffitt Journeyman
    Builder

    Joined:
    Oct 11, 2016
    Messages:
    126
    Likes Received:
    101
    Wow, that is cutting good! Is that the corner piece I designed? I'm planning on replacing mine in the near future.
     
  25. Gilsegev

    Gilsegev Well-Known
    Builder

    Joined:
    Feb 28, 2018
    Messages:
    48
    Likes Received:
    27
    Thanks! I'm pretty happy with it. Of course the first thing I am going to cut are all the plates again so I can correct some misalignments I had to work around before :)

    The plates are based on your design but with slight modifications for how I am now planning to connect the arms to the Y axis carriages. The L shapes angle is a little inaccurate so I am thinking on moving to a plate as shown in the pic.
    upload_2020-4-26_14-1-46.png
    upload_2020-4-26_14-2-45.png
     

    Attached Files:

  26. Giarc

    Giarc OpenBuilds Team
    Staff Member Moderator Builder Resident Builder

    Joined:
    Jan 24, 2015
    Messages:
    3,015
    Likes Received:
    1,680
    I am curious about your linear rail bearings. do they run really smooth, or are they a little "tacky"? I am doing a similar conversion and even after cleaning the bearings with solvent they seem "tight." Did you use solvent? if so, what kind?
    Thanks!
     
  27. Gilsegev

    Gilsegev Well-Known
    Builder

    Joined:
    Feb 28, 2018
    Messages:
    48
    Likes Received:
    27
    Mine are pretty smooth. I can turn the X ball screw which moves the gantry with two fingers. Which brand did you buy?
     
  28. Troy Proffitt

    Troy Proffitt Journeyman
    Builder

    Joined:
    Oct 11, 2016
    Messages:
    126
    Likes Received:
    101
    If they're binding, chances are your geometry is off
     
  29. Giarc

    Giarc OpenBuilds Team
    Staff Member Moderator Builder Resident Builder

    Joined:
    Jan 24, 2015
    Messages:
    3,015
    Likes Received:
    1,680
    Brand? Random Chinaâ„¢. ;) The majority came with the rails which were from Amazon. They are the same ones Sharmster and Jacob Lotter used on their modified Workbees. Those are the "not so smooth bearings." I ordered others because I wanted 4 per axis. I was not in a hurry so those came on the slow boat from China and actually are smoother. I ordered two more 1500 mm linear rails and 2 500 mm rails and those both came with a bearing per rail. They were also smoother than the original Amazon purchase.

    They are not binding. I am talking about a lone one sliding on the rail by itself. Some slide well, some do not.

    Pro tip - don't drop one on the concrete floor unless you like crawling around looking for tiny BBs. Thankfully it is easy to get them back in.
     
  30. Gilsegev

    Gilsegev Well-Known
    Builder

    Joined:
    Feb 28, 2018
    Messages:
    48
    Likes Received:
    27
    LOL this happened to me with the bearings of the ball screw nut. I spent half a day trying to get them back in and ended up ordering a new one :)
     

Share This Page

  1. This site uses cookies to help personalise content, tailor your experience and to keep you logged in if you register.
    By continuing to use this site, you are consenting to our use of cookies.
    Dismiss Notice