Welcome to Our Community

Some features disabled for guests. Register Today.

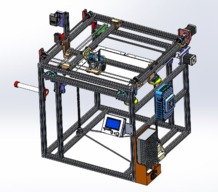
Dash-X 3D Printer: Innovative design

Discussion in '3D printers' started by Neil Rosenberg, May 21, 2019.

  1. Neil Rosenberg

    Neil Rosenberg Journeyman
    Builder

    Joined:
    Dec 29, 2013
    Messages:
    181
    Likes Received:
    179
    =====================================================

    Hi Knute and thanks for the message (and book order!). The limitations for these large machines is lack of rigidity and challenges pushing molten plastic quickly enough to speed up things. Some people use an E3D Volcano or even the Super Volcano, which certainly helps. Still slow with really big parts though.

    As to whether Dash can handle being larger, the answer is a qualified yes. The main issue is the very large bed and heater. Takes a pile of current to heat, is heavy to move, and most important, must be made more rigid than the current design, otherwise it will flex and sag. Can be done for sure, but it's not a cake-walk. I found that I needed four lead screws (instead of three) to keep things level and flat.

    I've never used the CR10 Max product, but Michael at Teaching Tech did a nice review.

    Wishing you well.
    Neil
     
  2. Neil Hancock

    Builder

    Joined:
    Dec 20, 2019
    Messages:
    6
    Likes Received:
    0
    2FD5A7AC-0AEC-423A-81E3-AD0B233DAD35.jpeg Hi Neil, just having a bit of trouble printing the lead screw brackets. As you can see in the photo, my support columns need support!! When they start to get thick at the top, the drag by the filament coming out of the nozzle pushes them over because there is not enough support at the base of the columns. I had to pause the print and drizzle hot glue around the base to support them. Are there any slicer settings to help this. Just as well I’m using maskin tape!
     
  3. Neil Rosenberg

    Neil Rosenberg Journeyman
    Builder

    Joined:
    Dec 29, 2013
    Messages:
    181
    Likes Received:
    179
    Hi Neil --
    Try printing them in this orientation. It will put the rough edge where you won't care, and the detail of important features will be good:
    upload_2020-4-19_7-26-29.png
     
    Shaun Visser and phuture3d like this.
  4. JustinTime

    JustinTime Veteran
    Builder

    Joined:
    Dec 18, 2013
    Messages:
    784
    Likes Received:
    259
    What slicer and support settings are you using?
     
  5. Neil Rosenberg

    Neil Rosenberg Journeyman
    Builder

    Joined:
    Dec 29, 2013
    Messages:
    181
    Likes Received:
    179
    I use Simplify3D. For this part it's 60 percent fill, .16mm layer, PLA. Support is turned on. Of course there are a LOT more settings, which ones are you interested in?
     
  6. JustinTime

    JustinTime Veteran
    Builder

    Joined:
    Dec 18, 2013
    Messages:
    784
    Likes Received:
    259
    It was the other Neil I was asking since he has some problems which I had never encountered when I use support.
     
  7. Joseph Davis

    Builder

    Joined:
    Sep 27, 2016
    Messages:
    1
    Likes Received:
    0
    This is an awesome build Neil! Thanks for sharing.

    Did you not list the parts used from OpenBuilds?
     
  8. Neil Rosenberg

    Neil Rosenberg Journeyman
    Builder

    Joined:
    Dec 29, 2013
    Messages:
    181
    Likes Received:
    179
    Hi Joseph, glad you like the build. Unfortunately the openbuilds parts are not yet detailed in the parts list, but they are all in the CAD files. I'd like to add that at some point, but I'm busy making face shields for various med facilities. Please check out the CAD models, and let me know if you have questions.
     
    #38 Neil Rosenberg, May 6, 2020
    Last edited: May 6, 2020
  9. Shane Reynolds

    Builder

    Joined:
    May 7, 2020
    Messages:
    5
    Likes Received:
    0
    Hi Neil,

    Looks very interesting. Do you have any photos of prints with this design? Also, have you tried printing with various materials? Flex, ABS, etc.?

    Thanks,
    Shane
     
  10. Neil Rosenberg

    Neil Rosenberg Journeyman
    Builder

    Joined:
    Dec 29, 2013
    Messages:
    181
    Likes Received:
    179
    Hi Shane -- Here is a link to a few photos of parts made on this machine.

    I generally use either PLA or PETG. The machine can handle ABS from a thermal point of view, but I think it would need an enclosure to prevent warping. I don't do much Flex, haven't tried it on this printer.

    Regards
    Neil

    Photos of samples - Google Drive
     
  11. Shane Reynolds

    Builder

    Joined:
    May 7, 2020
    Messages:
    5
    Likes Received:
    0
    Nice prints. I appreciate it.

    -Shane
     
  12. Shane Reynolds

    Builder

    Joined:
    May 7, 2020
    Messages:
    5
    Likes Received:
    0
    Hi Neil,

    One more question. You have mentioned speed as being an important factor. Do you know what speeds have you reached while still maintaining quality?

    -Shane
     
  13. Neil Rosenberg

    Neil Rosenberg Journeyman
    Builder

    Joined:
    Dec 29, 2013
    Messages:
    181
    Likes Received:
    179
    Here's a screenshot of the speeds page from Simplify3d.

    upload_2020-5-7_15-56-3.png
    The X/Y Axis Movement Speed pays big dividends in print time.

    Compared with my CR10s-Pro working about as fast as it can, I can print the same part on Dash-X two to three times as quickly with comparable quality. At .2mm layer height Dash-X makes a Benchy in about 1hr 23min, 40%fill. I've gone as high as 6000 mm/min (100mm/sec) printing speed, still looks quite good.

    A lot of the good times are from the fast X/Y movement setting. This thing really flies!

    Neil
     
    #43 Neil Rosenberg, May 7, 2020
    Last edited: May 7, 2020
    Mark Carew likes this.
  14. Shane Reynolds

    Builder

    Joined:
    May 7, 2020
    Messages:
    5
    Likes Received:
    0
    Impressive. Thanks.
     
  15. Neil Rosenberg

    Neil Rosenberg Journeyman
    Builder

    Joined:
    Dec 29, 2013
    Messages:
    181
    Likes Received:
    179
    Thanks Shane, and do let me know if you decide to build one.:)
     
  16. Shane Reynolds

    Builder

    Joined:
    May 7, 2020
    Messages:
    5
    Likes Received:
    0
    Hi Neil, I definitely will. I need to read your book first. I have not built a 3D printer like this from scratch. Only kits with detailed instructions.
     
  17. TheLoneJourney

    Builder

    Joined:
    Apr 25, 2020
    Messages:
    3
    Likes Received:
    2
    Just wanted to share that I'm currently in the process of building your Dash-X 3D printer. I'm going to take my time and build it right! All printed parts will be sanded, coated with XTC-3D and painted flat black. I'm kinda picky lol I'm pretty excited for this build as it will be my first custom built 3D printer, and I do feel highly confident I can accomplish this build. I may have some questions down the road when I get closer to completion. Thanks again for sharing this awesome design, will be purchasing your book soon as well.


    [​IMG]

    [​IMG]
     
    phuture3d likes this.
  18. Neil Rosenberg

    Neil Rosenberg Journeyman
    Builder

    Joined:
    Dec 29, 2013
    Messages:
    181
    Likes Received:
    179
    That is great! Yes, please feel free to reach out, I'll help as needed.

    Best of luck with the build. Chances are it'll be even better than mine :)
     
    TheLoneJourney likes this.
  19. Evan870314

    Builder

    Joined:
    Dec 26, 2019
    Messages:
    5
    Likes Received:
    1
    Hello everyone

    I have been working on a parts and cost list in Libre Office Calc. If anyone is interested in it maybe they could take a look over it and add anything that is missing. Also I have some images of dash-x from different views if anyone is interested the order is right, left, front, back, top, bottom.


    Dash X-right.png Dash X-left.png Dash X-front.png Dash X-back.png Dash X-top.png Dash X-bottom.png
     

    Attached Files:

    phuture3d likes this.
  20. Neil Rosenberg

    Neil Rosenberg Journeyman
    Builder

    Joined:
    Dec 29, 2013
    Messages:
    181
    Likes Received:
    179
    This is great, thanks for posting!
     
  21. Evan870314

    Builder

    Joined:
    Dec 26, 2019
    Messages:
    5
    Likes Received:
    1
    Hello Neil

    I was wondering if you could tell me if the v wheels used are the "Delrin Mini V Wheel Kit" Delrin Mini V Wheel Kit or the "Solid V Wheel Kit" Solid V Wheel Kit ?

    Also I dunno if I am right but this is a relatively expensive printer, costs 803.74 USD before adding all the printed parts. Does anyojne have a ballpark cost for the all printed parts?

    Also updated the parts & cost file, added the v-slot rails.
     

    Attached Files:

  22. Neil Rosenberg

    Neil Rosenberg Journeyman
    Builder

    Joined:
    Dec 29, 2013
    Messages:
    181
    Likes Received:
    179
    Hi there. I generally use the mini v wheels, they work great and they weigh less with bearings. The cost of 3d printed parts is probably $30 or less (material).

    Yes, this is not a cheap printer. For me it's about the journey, plus it's a great printer once it gets cooking. Not for everyone to be sure.

    Regards
    Neil
     
  23. TheLoneJourney

    Builder

    Joined:
    Apr 25, 2020
    Messages:
    3
    Likes Received:
    2
    Slowly making progress! I moved away from XTC-3D as it was becoming a pain with all the sanding so I would not recommend doing this lol. Now I'm printing all the parts with Proto-pasta carbon filament. In the next few weeks I plan to order the rest of the parts needed to finish most of this build. I'm probably going to have about $1,500 in this printer, but totally worth it. Not sure if you heard of McMaster Carr, but you can get a good amount of parts from them. They are expensive, but sell very high quality and industrial grade parts. Pretty excited for this build and it has also kept me pretty occupied during this quarantine.
     

    Attached Files:

    Shaun Visser likes this.
  24. Neil Rosenberg

    Neil Rosenberg Journeyman
    Builder

    Joined:
    Dec 29, 2013
    Messages:
    181
    Likes Received:
    179
    How exciting, your build is progressing really well!

    One comment...be careful with your shaft adapters not to introduce backlash. I usually prefer a more rigid coupler.

    Hope you get to squirt some plastic soon :)

    Neil
     
    #54 Neil Rosenberg, Jul 3, 2020
    Last edited: Jul 3, 2020
  25. TheLoneJourney

    Builder

    Joined:
    Apr 25, 2020
    Messages:
    3
    Likes Received:
    2
    Thanks and appreciate the advice, I have some rigid couplers on the way. Looking forward to getting this completed.
     
  26. Neil Rosenberg

    Neil Rosenberg Journeyman
    Builder

    Joined:
    Dec 29, 2013
    Messages:
    181
    Likes Received:
    179
    Sounds good, and yes McMaster is a bit pricey, but always good quality.

    Please check out my Facebook page, there are hints and tricks that didn't make it into my book, such as (1) an easy way to strengthen corners and (2) great stuff for attaching electronics, neither of which are in the files and info on openbuilds.

    In Facebook search on "Author: Designing 3D Printers: Essential Knowledge"

    Neil
     
    TheLoneJourney likes this.
  27. dprice

    dprice New
    Builder

    Joined:
    Oct 23, 2019
    Messages:
    24
    Likes Received:
    9
    After reading you book on DIY 3D printer design I am having a hard time not pulling the trigger to start this build. I just have to get around the chicken and egg problem on the printed parts since this would be my first printer and it doesn't look like many of the parts can be cut on my 2.5D CNC router. One thought was to get a relatively inexpensive "starter" unit and use it to print the needed pieces and learn the process. Any suggestions on what unit would good to start with? Same controller (software?) would be nice to minimize the learning curves. Secondarily it wouldn't hurt if the unit could be used as a source for spare parts...though my younger brother would disown me if I didn't pass it on to him intact.
     
  28. Neil Rosenberg

    Neil Rosenberg Journeyman
    Builder

    Joined:
    Dec 29, 2013
    Messages:
    181
    Likes Received:
    179
    Hi...
    You can make ALL of the parts on an Ender 3, and have a nice (slow) printer as a backup. It can be had for well less than $200, and puts out good quality parts. There are a few updates you'll want to do, check out thingiverse.com

    The most important one is "Ender-3 Z-Axis End Stop Adjustment"

    Enjoy!
    Neil
     
    dprice and phuture3d like this.
  29. arifhn

    arifhn New
    Builder

    Joined:
    Jul 29, 2020
    Messages:
    1
    Likes Received:
    0
    Hello just found your design. I like it and agree with you about corexy system

    I want to ask about the belt system for Z axis. Is it closed loop belt?

    Thank you
     
  30. Neil Rosenberg

    Neil Rosenberg Journeyman
    Builder

    Joined:
    Dec 29, 2013
    Messages:
    181
    Likes Received:
    179
    Hi there. Yes, it is a continuous belt, not cut.
     

Share This Page

  1. This site uses cookies to help personalise content, tailor your experience and to keep you logged in if you register.
    By continuing to use this site, you are consenting to our use of cookies.
    Dismiss Notice