Welcome to Our Community

Some features disabled for guests. Register Today.

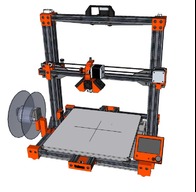
Vulcan MAX

Discussion in '3D printers' started by Keith Davis, Jul 3, 2020.

  1. Keith Davis

    Keith Davis Veteran
    Builder

    Joined:
    Dec 11, 2013
    Messages:
    507
    Likes Received:
    398
    Keith Davis published a new build:

    Read more about this build...
     
    Jeanmi33 likes this.
  2. JustinTime

    JustinTime Veteran
    Builder

    Joined:
    Dec 18, 2013
    Messages:
    784
    Likes Received:
    259
    Keith, clicking on any of the links in the build section downloads the same zip file. Is that by design?
     
  3. Keith Davis

    Keith Davis Veteran
    Builder

    Joined:
    Dec 11, 2013
    Messages:
    507
    Likes Received:
    398
    Certainly NOT by design! They've been fixed, journeyman. THANKS!
     
  4. Joseph Helmstetter Jr

    Builder

    Joined:
    Mar 5, 2015
    Messages:
    3
    Likes Received:
    1
  5. Keith Davis

    Keith Davis Veteran
    Builder

    Joined:
    Dec 11, 2013
    Messages:
    507
    Likes Received:
    398
  6. Joseph Helmstetter Jr

    Builder

    Joined:
    Mar 5, 2015
    Messages:
    3
    Likes Received:
    1
    Hey Keith, I noticed that the X axis pulley mount STL file is mirrored from the object in the SKP file. I tried exporting it to a STL from the SKP file and it came out reversed as well.

    [​IMG]
    [​IMG]
    [​IMG][​IMG]
     
  7. Joseph Helmstetter Jr

    Builder

    Joined:
    Mar 5, 2015
    Messages:
    3
    Likes Received:
    1
    I was able to correct the orientation.
     

    Attached Files:

    Jeanmi33 likes this.
  8. Keith Davis

    Keith Davis Veteran
    Builder

    Joined:
    Dec 11, 2013
    Messages:
    507
    Likes Received:
    398
  9. Samsamit

    Samsamit New
    Builder

    Joined:
    Aug 16, 2020
    Messages:
    15
    Likes Received:
    1
    I think there is some models missing? Hi, Im new to custom 3d printing and i decided to start with your model. I have ordered almost all parts and now i need to get thease printed parts. I dont have a program to open skp files so stl is all i have.
     
  10. JustinTime

    JustinTime Veteran
    Builder

    Joined:
    Dec 18, 2013
    Messages:
    784
    Likes Received:
    259
    The .skp files are SketchUp files. You can find SketchUp online for free. Get an older version, like 2017 or earlier. Google it.
     
  11. Peter Van Der Walt

    Peter Van Der Walt OpenBuilds Team
    Staff Member Moderator Builder Resident Builder

    Joined:
    Mar 1, 2017
    Messages:
    15,049
    Likes Received:
    4,313
    Newer versions of Fusion360 happily imports Sketchup files too
     
  12. JustinTime

    JustinTime Veteran
    Builder

    Joined:
    Dec 18, 2013
    Messages:
    784
    Likes Received:
    259
    I haven't tried it recently but the last time I tried it imported it like it does with imported .stl files. It imported it in triangles, which is a pain to work on subsequently.
     
  13. Samsamit

    Samsamit New
    Builder

    Joined:
    Aug 16, 2020
    Messages:
    15
    Likes Received:
    1
    Hi! Great job with the step by step quide! Im still having some issues regarding the .stl files. I think you are missing the Y axis top pieces that holds the screw.
     
  14. Keith Davis

    Keith Davis Veteran
    Builder

    Joined:
    Dec 11, 2013
    Messages:
    507
    Likes Received:
    398
    Which screw? Could you reference it by STEP in the assembly guide?

    I think you are referring to the 2 top Z axis brackets that hold the Z axis screws, i just added them to the x-axis-loom-anchors-zmotor-front-tops.stl file in the vulcan-max-stls.zip
     
    #14 Keith Davis, Aug 27, 2020
    Last edited: Aug 27, 2020
  15. Samsamit

    Samsamit New
    Builder

    Joined:
    Aug 16, 2020
    Messages:
    15
    Likes Received:
    1
    Yes Keith, im talking about the part in step 32, Z Screw Top Anchor. I have also noticed that some parts needs to be mirrored but when they come in same stl its not possible for example for cura to mirror them. What should i do for this? Also some of the slts are too big for my printer or i would like to print them separately for lower time.
     
  16. Keith Davis

    Keith Davis Veteran
    Builder

    Joined:
    Dec 11, 2013
    Messages:
    507
    Likes Received:
    398
    I plan on making a new set of STL files tomorrow. I use a 200x300 bed and try to fit enough for an overnight print - 12 to 16 hours worth. Slice3r allows you to split an stl into parts , then delete what you don't want and save to a new stl. I just figured all gcode generators had that capability, I'll instead make a set of each part (pairs).
     
  17. Samsamit

    Samsamit New
    Builder

    Joined:
    Aug 16, 2020
    Messages:
    15
    Likes Received:
    1
    Nice! Ill be waiting for that. I will have all the parts within two weeks and i need to design a frame holder for titan aero combo. After that hopefully i will be able to setup this whole thing and see what it is capable of. Im also thinking about recording this assembly and putting it to YouTube.
     
  18. Keith Davis

    Keith Davis Veteran
    Builder

    Joined:
    Dec 11, 2013
    Messages:
    507
    Likes Received:
    398
    That sounds nice. Let me know when you have that done and I'll add a like to it on the build page with credit to you.
     
  19. Keith Davis

    Keith Davis Veteran
    Builder

    Joined:
    Dec 11, 2013
    Messages:
    507
    Likes Received:
    398
  20. Samsamit

    Samsamit New
    Builder

    Joined:
    Aug 16, 2020
    Messages:
    15
    Likes Received:
    1
    Many thanks! Btw. amazing job Keith keep doing what you're doing.

    EDIT: EDIT: There is a skp zip which contains the separately but i cant print those.
     
    #20 Samsamit, Sep 1, 2020
    Last edited: Sep 1, 2020
  21. Keith Davis

    Keith Davis Veteran
    Builder

    Joined:
    Dec 11, 2013
    Messages:
    507
    Likes Received:
    398
    I always publish a separate zip containing the individual SKP files. plus another zip with the SKP assembled file just for those who may want to modify the design with Sketchup.Make.
     
  22. WilberMaker

    Builder

    Joined:
    Oct 10, 2015
    Messages:
    21
    Likes Received:
    1
    Samsamit, when you get a mount design for the titan aero I would like a copy if you would. Just starting a build and that would speed me up some. THX
     
  23. Samsamit

    Samsamit New
    Builder

    Joined:
    Aug 16, 2020
    Messages:
    15
    Likes Received:
    1
    Ohh i can do that but i have newer done any designing so im wont guarantee any good results :D I want to design a mount with two fans and a place for 3d touch. And about the video... I dont have the time to make it :s Sorry Keith
     
  24. Samsamit

    Samsamit New
    Builder

    Joined:
    Aug 16, 2020
    Messages:
    15
    Likes Received:
    1
    Ok so i bought a T8 lead screw for this project and the mounts didn't work with it so i made new ones. they can be found here if someone wants to use them -> T8 lead screw mounts by samsamit

    Alse for the TitanAero i came up with this type of mount. I ordered only big wheels for v-slot so this is what im using now. Titan Aero Mount by samsamit

    IM still desinging a working part cooling solution for titan aero but its pretty hard. I want to use 2x40mm noctua coolers so there isn't any ready solutions.
     
  25. WilberMaker

    Builder

    Joined:
    Oct 10, 2015
    Messages:
    21
    Likes Received:
    1
    Samsamit that it looking great can’t tell a lot on the phone but look forward to seeing more detail when I get home. Have you thought of any provisions for a inductive probe?

    Good work!
    Sam
     
  26. Samsamit

    Samsamit New
    Builder

    Joined:
    Aug 16, 2020
    Messages:
    15
    Likes Received:
    1
    Well im using blTouch and found a cool mount that goes between the hotend fan and cooling block. For inductive mount it should be fairly easy to add a slot to the whole mount. For my cooling solution i wanted to have the sides open. There is this filament quider i made in the mount. not sure if it helps but i should be able tto put this bowden tube connector there is i need to.
     
  27. Keith Davis

    Keith Davis Veteran
    Builder

    Joined:
    Dec 11, 2013
    Messages:
    507
    Likes Received:
    398
    I am curious about you guy's desire to use an inductive probe or blTouch. Perhaps you have missed the point of using a single Z axis motor and timing belt - bed leveling is something you do during construction. Once done, the bed and extruder will remain level for the life of the printer.
     
    Peter Van Der Walt likes this.
  28. Samsamit

    Samsamit New
    Builder

    Joined:
    Aug 16, 2020
    Messages:
    15
    Likes Received:
    1
    **** Keith, you are absolutely right :D i didnt even think about it. all the tutorials were talking about auto bed leveling and i was like "That's what i absolutely need in my printer". But now that i have one im going to use it and test it. im not trusting my construction work that mutch :D
     
  29. Keith Davis

    Keith Davis Veteran
    Builder

    Joined:
    Dec 11, 2013
    Messages:
    507
    Likes Received:
    398
    *****Using an auto-level will have NO leveling effect since both Z axis screws are locked in sync with each other.*****

    The only thing that can cause a printer to get out of level is two independent Z axis motors using microstepping. That is because microstepping was not developed for accuracy and is inherently up to 70% inaccurate. If you use an auto-level on a single motor Z axis it will force the printer to increase that inaccuracy exponentially, but instead of having an effect on leveling, it will show up in layer height inaccuracy, and decrease layer bonding on taller print objects.

    When you've finished construction, lower extruder nozzle down to the center of the build surface. Place a sheet of printer paper between the nozzle and build surface. Adjust Z axis height so paper barely slides under nozzle. Loosen the set screws on both Z axis screw pulleys. Move nozzle to let and right, rotating each Z screw to get equal drag on paper. Tighten set screws. Move nozzle to each corner and adjust corner screws to get equal drag on paper. The printer is then level and will remain so for the life of the printer.
     
    Samsamit likes this.
  30. JustinTime

    JustinTime Veteran
    Builder

    Joined:
    Dec 18, 2013
    Messages:
    784
    Likes Received:
    259
    That is correct but I think if you have only one 3d printer and you use different material for printing you can use the probe to adjust the extruder height from the bed. I use a different glass for ABS and a different for PLA. The ABS has Kapton tape on it and the PLA has blue painters masking. I have to adjust my Z height every time I change the material. With a probe it will be done automatically.
     

Share This Page

  1. This site uses cookies to help personalise content, tailor your experience and to keep you logged in if you register.
    By continuing to use this site, you are consenting to our use of cookies.
    Dismiss Notice