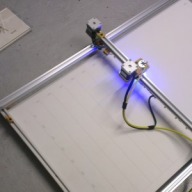
Hi @skarab, Sorry it is me that is dum, I don't have a 20x20 rail only bigger so I didn't realize that the 20x20 do not have the "large" hole but only a 5mm. hole in the middle Br., Allan
Looks great, want to try engraving anodized aluminum, and reporting back if you had any luck? @Robert Hummel ?
A lot depends on the wavelength of the laser being used but it needs very little power and anodized aluminum is capable of producing some excellent results when engraved. I know it’s a bit apples & oranges but this was done some time back with my CO2 laser on a scrap piece of anodized. Tweakie.
Cool I'm interested to see what you guys can come up with, especially w/ an inexpensive laser. This is what would get me interested in making one
Well hello there Angelina This looks pretty good, I'm more interested in bold simple designs w/ alot of contrast and if this is possible w/ low cost, low power lasers. Not necessarily bitmaps. From the little I've looked into CO2 lasers, they seem cost prohibitive to me. This is what keeps me from pursuing a laser build, as I don't typically work in wood, but mainly anodized aluminum.
Skarab, I noticed you posted the Sketchup files, but can you also post the .STL files please??? Thanks Rich
@Skarub , STL's missing the Y Belt Bridle back plates (or was that supposed to be the braces, because both Y belt bridle and Y belt braces look identical in slic3r).
Hi Skarab.. I really liked the simplicity and the elegance of your build. I am planning on making this design, however I have a couple of questions in the v rails can one use 6 MM timing belt or does it have to a 5mm belt as used in your build for the way you have used it? Also it have been a while since you made the build. How are the 3d printed parts holding up with the heat of the stepper motor and the laser module?
Hello @Ranvir Jatana, Tank you for your comment For the belt i use classic GT2 and it is 6mm width As I said in the comments, it is recommended to use a Aluminium carriage or else a very efficient cooling on the diod (Big heatsink + Big fan). Peace.
Skarab, i like a lot your project. Have a few questions: Surely you can engrave or many material and cut thin ones, but what would be the max cut possible? My understanding is that it dependes on the laser power, but how do you determine that? My other question would be on max size. Its seem this is very lightweight as the laser does not have any friction so it would depend only on the extrusion available? What about making it work verticaly? My objective would be to cut cardboard, leather, vinyl, fabric and similar without leaving behind thin wood or similar. Your thoughts would be appreciated
Tanks @Ariel Yahni, I think a vertical version is possible with a suction table or other holding system, the worry is that the cut pieces will fall and can tear apart the rest of the pieces, or get caught in the laser module. @Mark Carew as shared a picture on the Laser V build topic :
Hi Skarab, I love the simplicity of your design. I am planning to use it as a starting point for my first CNC build. One question: If I am going to control it with a Smoothieboard and say, a 2 watt laser, will a 20A 240 watt powersupply do? Or do I have to add converters?
My 2w laser instructions states to never exceed 12v. My guess is that if you want to operate at 24v, you'll need a second PS. Just my opinion here, but the smoothie board is overkill for this project if running NEMA 17's. An Uno board and shield will work great at a much lower cost. Also running the entire build with a 12v 30amp PS should give very good performance - just like all the 3d printers do.
Ok, thanks! I did not mention 24v though ;-) But I am better of with a 30A in stead of a 20A? I have a couple of Uno's lying around here. Can you do a suggestion for the shield I could use for this setup?
This is a type I use a lot. Engraver 3D Printer CNC Shield Expansion Board A4988 Driver for Arduino HPT - This was a random selection, I don't know this vendor at all, but these are the boards I and several others use. Here's a US vendor A4988 Driver CNC Shield Expansion Board for Arduino V3 Engraver 3D Printer Don't forget you'll need ramps drivers too. 8825's work great on the V3.0 boards but, I've used the 4988 driver's with lower amperage NEMA 23's.
@skarab, this is really cool! I'm getting started on these. Bought my parts so I'm committed to the build now Will come back and post queries if I have any.
Thanks Stargeezer! I did some reading today and ordered the bulk of the parts today. My build will be a 500x500 mm engraver. If necessary I can extend this easily. Ordered today: Printed parts printed and ready for pickup a few km's from here via 3dhubs, paid 34 euros for them. Black Vslot framing and some other v-slot parts at ratrig.com (Nice webshop! Also ordered a 2040 bundle for future builds ;-) ) Some other v-slot stuff like wheels and some spare parts at Aliexpress Raspberry based controller from protoneer 5 pololulu's from Ebay Nema 17's, wire extensions, endstop switches and 30a powersupply, pulleys, some small parts like screws and 3m belt at a local webshop in the Netherlands. Laser goggles at Ebay Yes I am committed! Despite the build is mostly a first experience at building a CNC laser (and building in general) I will also need a laser of course ;-) I am planning to buy a 445nm diode (2w), lens, analog TTL driver and a host/cooling block seperately to keep the costs down. Any suggestions for an affordable combination? I have to read a bit about the laser subject. Is it possible to feed this from the same powersupply?
@skarab I'm a little confused about the software and I was hoping you could help. I've flashed the Arduino with GRBL and though I've not tested it yet, I'm guessing these control the motors, right? How do I control the laser? Would it be possible to upload your code to control both?
Hi there, Very nice job. Do you have any documentation about wiring the axis end switches? I have a cheap chinese laser router, I like to add axis switches. thanks