Welcome to Our Community

Some features disabled for guests. Register Today.

openBuilds FreeBURN-2-Mini V-slot CO2 Laser (40-50w)

Discussion in 'Laser Cutters' started by openhardwarecoza, Jan 20, 2015.

  1. openhardwarecoza

    openhardwarecoza Journeyman
    Staff Member Builder

    Joined:
    Aug 9, 2014
    Messages:
    134
    Likes Received:
    138
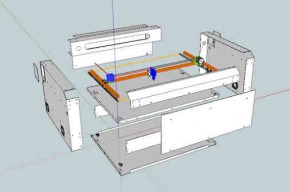
    Final mock-up freeze

    lasertubecover.PNG
     

    Attached Files:

    Mark Carew and Nick W like this.
  2. openhardwarecoza

    openhardwarecoza Journeyman
    Staff Member Builder

    Joined:
    Aug 9, 2014
    Messages:
    134
    Likes Received:
    138
    A big thanks to Anthony Webb for donating $20 towards the project!
     
  3. Anthony Webb

    Builder

    Joined:
    Dec 30, 2013
    Messages:
    23
    Likes Received:
    2
    Curious what your plans are for the electronics? Are you thinking of powering this with the TinyG?
     
  4. Anthony Webb

    Builder

    Joined:
    Dec 30, 2013
    Messages:
    23
    Likes Received:
    2
    NM, I downloaded and peeked around the sketchup file. I see you have some separate motor drivers.

    One question I had was related to the 4 motors in each corner. Even though they run through the bed, it seems like those rods and ball screws will need to be anchored on top somehow to keep from wobbling? Could be as easy as a printed bracket that mounted to the sidewalls?
     
  5. openhardwarecoza

    openhardwarecoza Journeyman
    Staff Member Builder

    Joined:
    Aug 9, 2014
    Messages:
    134
    Likes Received:
    138
    For electronics: I tried playing with TinyG (https://plus.google.com/104034368033227202956/posts/arZ9BXiYrYu) but thats still a no go...
    For now the controller I designed for FreeBurn 1 will do https://plus.google.com/104034368033227202956/posts/DNMmJaHxLun - still have some spare PCBs

    Between then and TinyG, the guys at the Lansing Maker Space also did some really cool work using an Arduino Mega, and a nice web interface for converting PDFs, DXFs etc to GCode (see http://laserbeta.lansingmakersnetwork.org/ ) - although I would not use a straight up Ramps for that... The current controller, working off work done by the Lasersaur team, has some hardwired logic with a 7410 and 7411 AND/NAND gate on the endstops, door switches and water cooler inputs - so that only if all the conditions are met, will it activate the laser. This is a critical safety feature that you'd lose if you use a Ramps as is. So perhaps if I like their workflow more than Lasaurapp I may be tempted to make another ramps1.5 fork (https://plus.google.com/104034368033227202956/posts/HCW8Vspcoye) and add the protection circuitry onboard.

    Regarding the Z axis - with the way the shafts pass through the top plate, to the bottom plate it means we have 150mm of the rod supported with 120+-mm poking out the top - unsupported. That will be PLENTY stiff - 8mm chromed rods does not bend that easily. Also, it's not really like a 3D printer moving up and down during the print - for the majority of non-experimental uses a motorised Z axis will actually be just to setup material (focus distance) once before starting a job...

     
  6. openhardwarecoza

    openhardwarecoza Journeyman
    Staff Member Builder

    Joined:
    Aug 9, 2014
    Messages:
    134
    Likes Received:
    138
    Set of parts ordered from the factory last night. ETA 3-5 working days.

    You may notice the mirror mount brackets, etc are not on the sheet yet - I am not cutting them until I have had a set of mirror mounts in hand (more donations needed. $20 down of $189 = $169 to go) - Aliexpress supply being what it is I'll CAD them up myself once I have them in hand and then make a bracket with proper height, forward spacing, etc to line up the beam...


    flattened.PNG
     

    Attached Files:

  7. Anthony Webb

    Builder

    Joined:
    Dec 30, 2013
    Messages:
    23
    Likes Received:
    2
    Curious if the guys cutting out your parts are also bending them? I figured I may as well start hunting around locally for someone to help me with mine. I have a shop here that I know has a water jet and will cut them for me, not so sure on the bends though?
     
    #37 Anthony Webb, Feb 11, 2015
    Last edited: Feb 12, 2015
  8. openhardwarecoza

    openhardwarecoza Journeyman
    Staff Member Builder

    Joined:
    Aug 9, 2014
    Messages:
    134
    Likes Received:
    138
    Waterjet is usually 3-5x as expensive as lasercutting (since its slower and most places charge machine time + material cost)

    Around Durban I have two places doing Lasercutting+Bending and one place who can do guillotine cut + Bending (not much use for straight cuts only here).
    In Johannesburg I had 2 big contractors who did our lasercutting+bending - so the pattern seems to be that most cutting shops also invests in a press...

    Most of these type of shops doesn't advertise online - I found these by word of mouth and by driving around the industrial areas looking for signs
     
    crispin likes this.
  9. openhardwarecoza

    openhardwarecoza Journeyman
    Staff Member Builder

    Joined:
    Aug 9, 2014
    Messages:
    134
    Likes Received:
    138
  10. Anthony Webb

    Builder

    Joined:
    Dec 30, 2013
    Messages:
    23
    Likes Received:
    2
  11. openhardwarecoza

    openhardwarecoza Journeyman
    Staff Member Builder

    Joined:
    Aug 9, 2014
    Messages:
    134
    Likes Received:
    138
    :) Just hold back a week until my parts get here - in case any adjustments need to be made (CAD is great but actually building it usually is a better test)
     
  12. Anthony Webb

    Builder

    Joined:
    Dec 30, 2013
    Messages:
    23
    Likes Received:
    2
    Haha, in a holding pattern waiting for your word :) I have been looking over some other plans out there, and see that some of them exhaust the fumes directly outside. Is that something that is wise?
     
  13. openhardwarecoza

    openhardwarecoza Journeyman
    Staff Member Builder

    Joined:
    Aug 9, 2014
    Messages:
    134
    Likes Received:
    138
    Right, so while we wait for the set of sheetmetal parts to be manufactured, time to dwelve into the software side of things.

    The previous laser ran LasaurApp - with LaserSaur firmware. Now the firmware is nothing but modified Grbl and it takes standard GCode.
    LasaurApp on the other hand is a python based serial sender + CAM software. It takes SVG and converts it to GCode. Now this is the part that's been bothering me most over the past year and a little since I started doing this. SVG is a Unitless format! So no mm/inch/px - instead it used DPI. Great for artwork, horrible for engineering precision.

    Luckilly seeing as Gcode is GCode that means I could easily abandon SVGs and use something else to generate GCode.

    Now, and this may be very selfish, I do all my CAD in sketchup... And exporting to DXF works, but then you need a CAM program like CamBam in between - and none of the cheap/free CAMs are really optimised for Lasercutting either...

    So last night, I pulled an all nighter and modified http://sketchucation.com/forums/viewtopic.php?t=45496 into a plugin for Sketchup 8, that does exactly what I need.... GCode for LASERCUTTING. The work http://sketchucation.com/forums/viewtopic.php?t=45496 helped a lot since it contained all the math to extract the path, offset by 'tool diameter /2' (yes the laser beam also has a kerf - compensating for it may be important if you want tight fitting parts) and write a GCode file. So my modifications was mostly UI based, as well as fixing the GCode exporter to write 'lasersaur gcode' (In progress)

    Here's some screenshots - I can't make it simpler :)


    1. Submenu under plugins
    Submenu.png

    2. Configure the Job
    settingsd.PNG

    3. Resultant GCode

    gcode.PNG
     
  14. openhardwarecoza

    openhardwarecoza Journeyman
    Staff Member Builder

    Joined:
    Aug 9, 2014
    Messages:
    134
    Likes Received:
    138
    Yes, that would be wise...

    The design here has the 4x120mm fans just to get some air flow over the bed to get the smoke out the beam path as soon as possible, but it shouldn't vent into the room. I will design a 'cowling' or a 'manifold' that screws onto the outside of the rear panel over the fans to collect the smoke and channel it into 120mm tubing - with a strong inline fan to push it outside...

     
  15. Anthony Webb

    Builder

    Joined:
    Dec 30, 2013
    Messages:
    23
    Likes Received:
    2
    Ha, that is awesome! I presume that lasers are more of a 2D thing, so how are you taking a 3D image and getting 2D data? Does it simply just ignore the Z axis? Bummer that sketchup isnt better on the text side of things, I plan on doing a lot of signs/plaques etc. I can probably get it done in Sketchup though.
     
  16. openhardwarecoza

    openhardwarecoza Journeyman
    Staff Member Builder

    Joined:
    Aug 9, 2014
    Messages:
    134
    Likes Received:
    138
  17. openhardwarecoza

    openhardwarecoza Journeyman
    Staff Member Builder

    Joined:
    Aug 9, 2014
    Messages:
    134
    Likes Received:
    138
    But back to your question... for Artsy work like signs, plaques, etc Inkscape + SVG + LasaurApp works great

     
  18. Mark Carew

    Mark Carew OpenBuilds Team
    Staff Member Moderator Builder Resident Builder

    Joined:
    Jun 28, 2013
    Messages:
    2,763
    Likes Received:
    2,448
    Mad props to you Peter! This is awesome work. When do we get to try it out? ;) Glad to see we are finally free from SVG
    This would be great!
    You can talk to @David the swarfer as he is the main contributor to SketchUcam and could help you get pointed in the right direction.
    Mark
     
  19. openhardwarecoza

    openhardwarecoza Journeyman
    Staff Member Builder

    Joined:
    Aug 9, 2014
    Messages:
    134
    Likes Received:
    138
    No I explicitly force the safe height to be 0 thickness objects to make sure it's a 2d object...

     
  20. openhardwarecoza

    openhardwarecoza Journeyman
    Staff Member Builder

    Joined:
    Aug 9, 2014
    Messages:
    134
    Likes Received:
    138

    Plugin is already on the Files tab of this build since yesterday - feel free to try it out

    I haven't fully made up my mind whether I am using LasaurGrbl, or the Lansing Makers Network Marlin for Lasers yet... So the gcode writer is writing rubbish (M03, M04, M05 and M06 which I used while reverse engineering the original 2.5d Profiler to determine what is exported as 'outside' and 'inside' - once I make my firmware choice final I just need to edit a few lines there to make working laser on/off/intensity M-Codes instead...

    I actually started by grabbing Sketchupcam - thinking it would be easy to strip it down to what I need - but I was mistaken! Thats a complex set of scripts :) - good thing!

    For the purpose of someone wanting to add a "laser mode" to sketchupcam: add a tickbox that strips out all the input fields and leaves you with:
    tool dimension: 0.1mm by default but leave it adjustable - so you can measure your actual kerf and thus compensate correctly
    Input fields for feed and seek speed
    Input for laser intensity (on my plugin now this is 0-255 - still need to play with the code a little to make it 0-100% as input, maybe in a dropdown - that then maps to a G1 S0-255 in the GCode writer)
    Default to +0.1mm and -0.1mm Z moves at a very fast plunge speed - some of the firmware (and the laser plugins for EMC2) work on "magic z" to turn laser on and off. So by going from 0 to -0.1 will turn the laser on and from -0.1 to 0 will turn it off. A high feedrate on that move makes sure theres no delay while it "waits" for this move (which is not a move in fact - intercepted as laser on/off)
    Single pass

    I'll be honest though - I tried Sketchupcam when I got my first CNC and even in its simplicity it was just too complicated and jscut.org won my favour instead (although again SVG being a frustration)

    Adding back tabs would be cool though - sometimes when cutting small parts they fall through your honeycomb/mesh bed - so that would be cool to have again...


    Feature requests (from me to me) on my plugin:
    - Ability to set different feed/intensity to different path
    - Tabs
     
  21. openhardwarecoza

    openhardwarecoza Journeyman
    Staff Member Builder

    Joined:
    Aug 9, 2014
    Messages:
    134
    Likes Received:
    138
    Fixed the error about safe height to actually tell you whats wrong:

    fixed-error.PNG

    However after clicking OK you can also continue with the export, and the resultant gcode does contain the correct outline. Haven't tested a more complex model since I dont care whether it works or not. I want it to fail :) - to force you to design 2d parts in 2d...

    still exports though.PNG


    Lets test a more complex part:

    Suppose I design a part to be cut from 3mm - so technically when viewed from the top down it is a 2d part (but still drawn in 3d)

    3mm thick 2d-3d design.PNG


    Lets run it through the plugin, ignore the warning and check the resultant gcode:

    correct.PNG

    Looks good to me :) - still a 2d path
     
  22. Anthony Webb

    Builder

    Joined:
    Dec 30, 2013
    Messages:
    23
    Likes Received:
    2
    We could probably leverage some of the chilipeppr work to come up with a nice interface/sender. I have been using it with my shapeoko/tinyg and it is superb. Very modular too so adding things specific to laser would be pretty simple: http://chilipeppr.com
     
  23. openhardwarecoza

    openhardwarecoza Journeyman
    Staff Member Builder

    Joined:
    Aug 9, 2014
    Messages:
    134
    Likes Received:
    138
    Looks like tomorrow would be a fun day :)

    Panels are cut, and at the benders.

    laser.PNG
     
  24. openhardwarecoza

    openhardwarecoza Journeyman
    Staff Member Builder

    Joined:
    Aug 9, 2014
    Messages:
    134
    Likes Received:
    138
    Frame parts arrived:

    2015 - 1.jpg
     
    Nick W likes this.
  25. Anthony Webb

    Builder

    Joined:
    Dec 30, 2013
    Messages:
    23
    Likes Received:
    2
    Oh boy, she's a real beauty! Lets get her assembled!!!
     
  26. openhardwarecoza

    openhardwarecoza Journeyman
    Staff Member Builder

    Joined:
    Aug 9, 2014
    Messages:
    134
    Likes Received:
    138
  27. openhardwarecoza

    openhardwarecoza Journeyman
    Staff Member Builder

    Joined:
    Aug 9, 2014
    Messages:
    134
    Likes Received:
    138
    Right, early adopters willing to take a risk: here's a set of DXFs that is a) based off the set I had cut and assembled over the last two days with b) tweaks to fit / screw hole positions and sizes according to my experience while building, shall we call it FreeBurn2-Alpha.

    So consider http://openbuilds.com/attachments/v4laser_flatpack-after-beta1-dxf.7106/ = still BETA status - i.e. good enough that it won't leave you down and out with useless parts (just make sure the scaling is correct = millimeters) but since only one has been partly built (waiting for v wheels to get the rails installed etc) there is still always a small risk that you may need to drill a hole by hand or something DIY natured along those lines... Especially - I havent added mounting holes for power supplies, electronics, stepper drivers since almost none of us are going to use the exact same (i think) so hand drilling might be better than a tonne of holes to plug up to prevent laser soot coming into your electronics cabinet, right?

    The more important part is: FEEDBACK! If you make a set of parts - send feedback - different shops may have different tooling or different precision than my factory - which means we may need more tweaking to make it universally manufacturable

    PS: I didnt repost the build photos here - most of you liked it in the Google Plus posts anyway :) Just head over to the OpenBuilds Google Plus community if you havent seen it

    2015 - 12.jpg
     
    Nick W likes this.
  28. openhardwarecoza

    openhardwarecoza Journeyman
    Staff Member Builder

    Joined:
    Aug 9, 2014
    Messages:
    134
    Likes Received:
    138
    Thanks Donald D Parker for the $10 donation - couldn't find you in a google plus search - so please let me know which profile/website/etc I can link back to you?
     
  29. openhardwarecoza

    openhardwarecoza Journeyman
    Staff Member Builder

    Joined:
    Aug 9, 2014
    Messages:
    134
    Likes Received:
    138
    Right so for Dave and Anthony's sake who's currently trying to find people to cut it nearer their respective locations, I've uploaded the invoice of what I paid for the lasercut+bend:


    See: http://openbuilds.com/attachments/tax-invoice-in162909-pdf.7177/

    I paid ZAR 1724.35.

    1724.35 / 11.62 = $148.40. That's material, laser time, bending and tax included...

    ZAR to USD conversion rate at the moment:
    conversion rate.PNG


    I have some videos on my youtube channel https://www.youtube.com/channel/UCFjrrhjf8aUDfG1kPNSa4Jg/videos showing this factory in action

    for example:


    taken during the CNC project - this is the same factory that still cuts these for me.

    I don't think shipping them from here is viable (bulk = costly) but to give you an idea of why some shops might be expensive:

    1. This factory has a good Trulaser 4050 machine and a Trulaser 2000. Due to the size of their lasers they can load a full sheet at once. This optimises their labour efficiency
    2. They do a LOT of work - 5-7day leadtimes due to how busy they are. Using a standard thickness like 1.5mm or 3mm in my designs, means there are a lot of other jobs in their queue with the same thickness - offering me a better chance of ending up nested between other jobs on a large sheet. Nesting jobs means the sheet is optimally utilised = less scrap/waste = lower cost - smaller laser shops (like lasercore here in Durban) doesn't have enough work and sometimes bills a whole sheet even if you only used 60% of it... So watch out for factories that are too small... also small businesses usually have bigger markups due to their lack of turnover - to keep things running (I know, I was that guy before)
    3. Watch out for shops offering waterjet over laser. Machine time per minute is almost 10x more expensive on a waterjet machine. Laser is much cheaper. Sure in 6mm alu you get burrs with laser, and clean cuts with waterjet. But this is only 1.5mm alu so the laser leaves a clean edge too...
     
    JustinTime likes this.
  30. openhardwarecoza

    openhardwarecoza Journeyman
    Staff Member Builder

    Joined:
    Aug 9, 2014
    Messages:
    134
    Likes Received:
    138
    Two more donations came in over the weekend! :) thanks for the support guys - really motivating!

    Miquel LluĂ­s Domingo Roca: USD$20 - Thanks Miquel!
    Matthew Kusak: USD25 - Thanks Matthew!
     

Share This Page

  1. This site uses cookies to help personalise content, tailor your experience and to keep you logged in if you register.
    By continuing to use this site, you are consenting to our use of cookies.
    Dismiss Notice