Welcome to Our Community

Some features disabled for guests. Register Today.

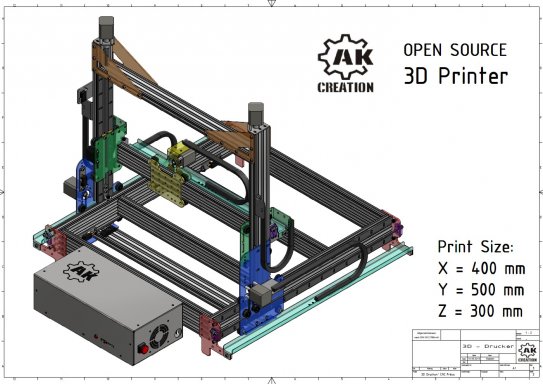
3D Printer - Big Size

Discussion in '3D printers' started by AK-Creation, Dec 4, 2013.

  1. AK-Creation

    AK-Creation Well-Known
    Builder

    Joined:
    Dec 2, 2013
    Messages:
    59
    Likes Received:
    77
    Hello belacesta,

    thank you very much, for sharing your knowing about a possible leveling to the Z axis with us. That is new for me! I can use it for my next mill, printer and Laser machine (all in one). I have some heads for leveling. Excellent!!!

    What I mean about "a simple and fast adjustment" at my last 3D Printer, is that I use a slot to move a switching cam to trigger the Switch. It is not easy to move switching cam only 0.1mm in a Slot and Fixing it. I think it is better to use a screw to move the switching cam and fix it behind - example: M6 screw move 1mm per one Rotation. I think it is exactly enough to adjust the head.
     
  2. belacesta

    belacesta New
    Builder

    Joined:
    Aug 12, 2014
    Messages:
    11
    Likes Received:
    1
    No problem! I think that will be a lot of small "problems" during building to solve. :)
    I agree with your M6 screw. Together with harder spring would be good idea.
     
  3. belacesta

    belacesta New
    Builder

    Joined:
    Aug 12, 2014
    Messages:
    11
    Likes Received:
    1
    Hi,
    my project is going further. I got screws and supports for Y axes and started building....
     

    Attached Files:

  4. AK-Creation

    AK-Creation Well-Known
    Builder

    Joined:
    Dec 2, 2013
    Messages:
    59
    Likes Received:
    77
    Thanks for posting your build - it´s look very professional!

    What kind of work will you do with your machine?
    - mill + 4th axis
    - print
    - laser??
     
  5. belacesta

    belacesta New
    Builder

    Joined:
    Aug 12, 2014
    Messages:
    11
    Likes Received:
    1
    For start it will be just a printer, but I will upgrade it to mill+ printer.
     
  6. Vill

    Vill New
    Builder

    Joined:
    Mar 3, 2015
    Messages:
    4
    Likes Received:
    0
    @AK-Creation.Hi,I am interested in the driving system and the control system.How do you choose your stepper motors and drivers for the driving system ?And how about the construction of the control system?Can you send me more details about the those information?Thank you!
     
  7. AK-Creation

    AK-Creation Well-Known
    Builder

    Joined:
    Dec 2, 2013
    Messages:
    59
    Likes Received:
    77
    Hi Vill,
    the Echinus controllerboard have six bipolar 1.5 A stepper motor drivers (http://echinus.org/). With this controllerboard you can powered a motor up to 1.5 A. A good chois is a Nema 17 motors (http://openbuildspartstore.com/nema-17-stepper-motor/) he operate with DC 1.68 A/Phase.
    For the Y and Z axis I use two motors per axis. I connect two motors on one driver output.

    Pic1.JPG

    I think for the use as a 3d printer or similarly, is the nema 17 motor a good choice. But if you, need a little bit more power (like a router/ mill), you should be use a motor with more power (Nema 23) and a controller with also more power.

    For my current project I use the Bam & Dice board (http://www.2printbeta.de/Electronics/Controller/BAM-DICE-Arduino-STK-kit::328.html?language=en). It´s based on a Arduino board and have enough power to 3D print and milling!

    Bild 1.JPG

    I hope the information is helpful for you!
     
  8. Vill

    Vill New
    Builder

    Joined:
    Mar 3, 2015
    Messages:
    4
    Likes Received:
    0
    Hello AK-Creations,Thank you for your help!
     
  9. Vill

    Vill New
    Builder

    Joined:
    Mar 3, 2015
    Messages:
    4
    Likes Received:
    0
    @AK-Creation:Hello AK,sorry to trouble you again!I have carefully read what you have told me last time,but I still have some questions.
    Q1:You said the Echinus controllerboard have six bipolar 1.5 A stepper motor drivers,does it mean that the controller board has combined the control board with the stepper motor drivers to make the special controller board?
    Q2:You said you have choose a Nema 17 stepper motor for your project.And I'm curious about that.how do you figure the load(it seemed to be unkown) in each axis to make sure your motor can match?
    Q3:I'm not good at the construct the control system,specially in connecting the two electronic part such as the controller board and the stepper motor and so on.And I have no idea about an Arduino board ,especial in the function of the port.the picture is my board.Would you mind telling me more about that?
     

    Attached Files:

  10. Rayminski

    Rayminski New
    Builder

    Joined:
    Feb 25, 2015
    Messages:
    1
    Likes Received:
    0
  11. AK-Creation

    AK-Creation Well-Known
    Builder

    Joined:
    Dec 2, 2013
    Messages:
    59
    Likes Received:
    77
    Hello Vill,
    I am glad if I can help!

    To Q1: Yes, the Ehinus board is two in one (contollerboard and stepper driver in one). To explain: (http://www.echinus.org/wp-content/uploads/Installation-instructions-Echinus-V1.7a-English-V0011.pdf)

    Echinus wiring example.JPG


    To Q2: At my beginning to build the 3D Printer, I search a controller board that can powered the Printer. The performance can powered 1,5 A per stepper motor. So I search a stepper motor what use 1,5 A. The Nema 17 take 1.68 A. So I decided to Nema 17 motor. For the 3D Print is it not so critical. You dont have so big shear forces.
    But the experience what I have done: If the build (3D Printer) greater, than is the print speed slower. If The "small" Nema 17 motor have a acceleration and a suddenly direction change, so have the "small" Nema 17 motor problems to stop the big mass. So it is better that the greater printer accelerate slower, than he can better slow down the speed.
    Whether a motor can manages the load, I have found the answer by testing. (example: by my milling tests with the Nema 17 motors is my result, that the motors are to weak. So I use Nema 23 by my next project. And test it again.)


    To Q3: Honestly, I also have the most difficulty with the electronics and software.
    Your board is a "Aruino uno". The Bam & Dice based on a "Arduino Mega 2560"!

    The handeling is easy:
    1.) Upload the rigth firmeware to the Arduino Mega 2560 (donwnload from Bam and Dice homepage) and make your setting whis the Arduino program.

    Arduino program.JPG


    2.) Conect all part with the Bam and Dice board. Website: http://www.2printbeta.de/Electronics/Controller/BAM-DICE-Arduino-STK-kit::328.html?language=en

    Bam and Dice.JPG


    3.) Run your CNC maschine (I use the Repetier Host program to send the G code to the board).

    Repetier.JPG

    The Rapetier Host program have also a manuel control panel.

    Controll.JPG


    What kind of machine do you plan to build, Vill?
     
  12. AK-Creation

    AK-Creation Well-Known
    Builder

    Joined:
    Dec 2, 2013
    Messages:
    59
    Likes Received:
    77

    Hi Rayminski,
    thank you very much for share the information with me. The head bed look good to use! When I will print bigger things, I will remember to this head bed.
    Thanks!!!!!
     
  13. Vill

    Vill New
    Builder

    Joined:
    Mar 3, 2015
    Messages:
    4
    Likes Received:
    0
    @AK-Creation:I just don't know to express my deep thanks to you.As you see,I'm a college student of mechanical engineering from China.Now I just have time to finish my schematic design.But I hope to apply for some money from the school to make a real one.For my future 3D printer ,I intend to use a closed-loop control in displacement to make a more accurate one. For me Now,I need to give an accurate calculations on the mechanical quantity.I need to use my numbers to ensure others!I'm looking forward to your next project!Best regards!
     
  14. AK-Creation

    AK-Creation Well-Known
    Builder

    Joined:
    Dec 2, 2013
    Messages:
    59
    Likes Received:
    77

    Hi Vill,
    sorry for this late reply, but I´m very busy at the last time!
    I wish you good succeed for your calculation and hope you get Money to build up your own 3D Printer.

    Best greeting to China!
     

Share This Page

  1. This site uses cookies to help personalise content, tailor your experience and to keep you logged in if you register.
    By continuing to use this site, you are consenting to our use of cookies.
    Dismiss Notice