Welcome to Our Community

Some features disabled for guests. Register Today.

Routy CNC Router (V-Slot Belt & Pinion)

Discussion in 'CNC Mills/Routers' started by Mark Carew, Nov 11, 2013.

  1. Chris Allen

    Builder

    Joined:
    Dec 2, 2013
    Messages:
    50
    Likes Received:
    7
    Why would you want to though? The lip is an effective way of stopping the bearings rubbing and it only contacts the non moving part of the bearing. It seems perfectly designed without the shim to me. I would have thought the wheel would wear out before the bearings.

    I suppose if you applied enough force tightening the wheel you could put the bearings out of true, but you'd have to be the hulk.
     
    #151 Chris Allen, Jan 23, 2014
    Last edited: Jan 23, 2014
  2. The Dude

    The Dude Well-Known
    Builder

    Joined:
    Jan 2, 2014
    Messages:
    243
    Likes Received:
    103
    Good question. Here's why: Since the outer race of the bearing contacts the wheel spacer and the inner race of the bearing contacts the axle spacer, it is critical that the relationship between these two spacers is correct. If the wheel spacer is wider than the axle spacer the bearings will bind when the axle bolt (or bolts) are tightened. This can be seen when installing the wheels: first ensure the bearings are fully seated in the wheel hubs, and that the wheels do not contact (rub) the frame. Install the wheels in the frame and tighten the axle just finger tight. Spin the wheel and then fully tighten the axle. If the wheel immediately slows down or stops, it is most likely because the axle spacer is narrower than the wheel hub spacer, and the bearing races are being bound up. If the wheel continues to spin freely, grab the wheel and push it back and forth along the axle axis. If it noticeably moves or "clicks" slightly, it means the axle spacer is wider than the hub spacer.
     
    Mark Carew likes this.
  3. bobt

    bobt Well-Known
    Builder

    Joined:
    Dec 4, 2013
    Messages:
    89
    Likes Received:
    38
    According to the parts store info. The rib in the center of the wheel is .8 mm is size and the precision shim is 1 mm. This will allow the bolt to hold the 2 center bearings in contact and allow just is little room for the outer races to fit to the wheel. Check out the specification drawings on the parts store site.

    Bob
     
  4. Chris Allen

    Builder

    Joined:
    Dec 2, 2013
    Messages:
    50
    Likes Received:
    7
    Ok, it certainly sounds like you have more experience than me :) In that case 16 more shims will be needed.

    I can't say I've noticed this binding in practice.
     
  5. Rick 2.0

    Rick 2.0 OpenBuilds Team
    Staff Member Moderator Builder Resident Builder

    Joined:
    Dec 20, 2013
    Messages:
    2,892
    Likes Received:
    1,551
    I've only used the Mini-V wheels so far but I can tell a big difference in the amount I can tighten the through bolt with the spacer in place. Without the spacer I found the bearings started binding long before I got the nut tight enough to keep the shaft from wobbling.
     
  6. Chris Allen

    Builder

    Joined:
    Dec 2, 2013
    Messages:
    50
    Likes Received:
    7
    I have ordered some more shims from amazon. :) Better to be safe than sorry for the princely sum of £1.69

    Hopefully going to have everything but the z axis together by the end of the weekend. I'll hopefully post a picture if I do.
     
    Robert Hummel likes this.
  7. The Dude

    The Dude Well-Known
    Builder

    Joined:
    Jan 2, 2014
    Messages:
    243
    Likes Received:
    103
    The wheel kits have precision shims. For the spacers used outside the wheel any washer will work but I think the shims and washers are the same price so no harm. You'll just have precision washers, hehe.
     
  8. Bryant

    Bryant New
    Builder

    Joined:
    Dec 6, 2013
    Messages:
    33
    Likes Received:
    7
    I'm out in the garage making long pieces of v-slot into shorter pieces :) Hopefully the right length. I'm expanding the width of the device by 100mm.

    I didn't end up using the 2080 vslot for the y axis as the belt would rub on the aluminum spacers. I suppose if I'm willing to turn them around so they stick out instead of in I wouldn't need the spacers.

    And now to reveal my ignorance on the subject of electronics...is it an issue that my drivers will supply around 2 amps are rated for a max of 1.68A? Am I correct in understanding the the motor will not pull more amps than it needs? I assume it is more of an issue to have a driver only able to support 2A and have a motor trying to pull 3A.

    I'm hoping to have the mechanics put together in the next couple of days in time for my electronics to arrive. I'm going to use a grbl shield that provides a 4th axis and polomu DRV8825 drivers. I've picked up 2 limit switches for each axis which should be supported by the board as well.
     
  9. Mark Carew

    Mark Carew OpenBuilds Team
    Staff Member Moderator Builder Resident Builder

    Joined:
    Jun 28, 2013
    Messages:
    2,758
    Likes Received:
    2,441
    lol I find myself doing the same thing :D
     
  10. Tweakie

    Tweakie OpenBuilds Team
    Moderator

    Joined:
    Jan 18, 2014
    Messages:
    784
    Likes Received:
    326
    Drivers limit the current that is supplied to the stepper motor. If, for example, a driver is set to provide 1.5Amp output then that is all it will output to a say a 3Amp rated stepper motor.
    A driver should never be set to provide a higher current than the stepper motor's rated current but the voltage used can be anywhere up to (typically) 25 times the stepper motors rated voltage (5 x the rated voltage is perhaps the most common).

    Tweakie.
     
    Mark Carew likes this.
  11. The Dude

    The Dude Well-Known
    Builder

    Joined:
    Jan 2, 2014
    Messages:
    243
    Likes Received:
    103
    I've heard of people frying their controller board by rotating the motor really fast. You're probably in that category. I hooked up a 3A motor to my 1.8A output and the thing was noisy and missing steps, sometimes didn't turn at all. You're probably going to have enough power to run your motor but you will be running the board at it's peak values. It would be wise to add a fan and fuses to protect the board.
     
  12. The Dude

    The Dude Well-Known
    Builder

    Joined:
    Jan 2, 2014
    Messages:
    243
    Likes Received:
    103
    So the v-slot in the first parts list is not the same as in the photos of the build of routy. Also, if you do the math you can see the cuts don't add up to the total length. I was able to use the leftover 20x80(200mm) for my z-axis and then I was able to cut the other dimensions out of the 20x60. It's enough to complete the build though if you don't want the mdf-support-braces along the bottom. I think the routy uses 20x40 for the bottom, sides, and gantry as well as the z-axis. Mine has 20x60 all around and 20x80 for the z-axis. Kinda looking like an OX.
     
  13. Bryant

    Bryant New
    Builder

    Joined:
    Dec 6, 2013
    Messages:
    33
    Likes Received:
    7
    It occurs to me that I didn't was not terribly clear in my post on electronics. Currently my issue is that my board is rated at 2A+ and my motors at only 1.68A. What I gather from the responses is that I'm going to need to tone down the board as to not over power the motors.

    In an unrelated note, I've discovered that I need a few 14mm M5 (or perhaps 15mm as there isn't anything between 10 and 15 available in the openbuilds part store) screws to connect the x axis gantry plate to the z axis v-slot. Unfortunately for me, I didn't realize I needed to make the connection until I had the x and y axis all hooked up. I suppose it will give me something to do until the rest of my electronics show up.
     
  14. Chris Allen

    Builder

    Joined:
    Dec 2, 2013
    Messages:
    50
    Likes Received:
    7
    I think you were using the DRV8825 drivers? In that case you will probably want to turn the current limiting pot to limit the current to just about what you need. Motors running above current will overheat and shutdown. You will probably also need heatsinks on your DRV8825s. How to adjust the current is covered in the link below.

    http://www.pololu.com/product/2133/
     
    Public Do Omens likes this.
  15. The Dude

    The Dude Well-Known
    Builder

    Joined:
    Jan 2, 2014
    Messages:
    243
    Likes Received:
    103
    I don't know if the board can send more power than the motor will use. I guess it depends on the board. Anyway, yeah you need a bunch of different length screws to complete the build. Turns out the M5x8mm worked on the thicker brackets and were too long for the short brackets so I used washers to shorten them. I used some 1.5" bolts to span the gantry(35mm?). I didn't have low enough profile screws so I had to put washers on every wheel so the screws don't scrape the v-slot. You might want self-tapping screws for the parts that fasten to the ends(rather than have to tap them). I reused 4 of the wheel screws from the wheel kit to make my custom z axis because the spacers don't work on 20x60, only for 20x40.
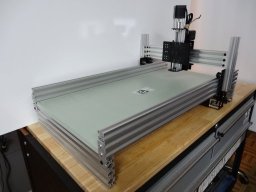
    First routy build.jpg
    FYI the z-travel on this beast is 90mm
     
    #165 The Dude, Jan 27, 2014
    Last edited: Jan 27, 2014
    Mark Carew and Chris Allen like this.
  16. Chris Allen

    Builder

    Joined:
    Dec 2, 2013
    Messages:
    50
    Likes Received:
    7
    Very cool. Life got in my way this weekend, so I couldn't get working on mine. Nice to see one one the way to being finished.
     
  17. SlowBipe

    SlowBipe New
    Builder

    Joined:
    Jan 28, 2014
    Messages:
    19
    Likes Received:
    14
    Does anyone know if this design could be expanded large enough to cut foam sheet 2 ft by 4 ft? Just wondering if it would still be rigid enough at that size?
     
  18. Chris Allen

    Builder

    Joined:
    Dec 2, 2013
    Messages:
    50
    Likes Received:
    7
    For cutting foam I doubt the stiffness would matter. I would think it would be fine.
     
    Mark Carew likes this.
  19. The Dude

    The Dude Well-Known
    Builder

    Joined:
    Jan 2, 2014
    Messages:
    243
    Likes Received:
    103
    Yeah the main thing is the weight of the z-axis assembly+spindle. My assembly is extremely heavy when you add up all the screws, gantry plates, washers, v-slot, 2 motors, brackets, leadscrew, bearings, etc. Thank goodness the spindle I'm building is only 420g.

    I've also noticed there is a slight wobble if you don't do it right. Meaning, get the gantry square and the sides fixed at multiple points.
     
  20. The Dude

    The Dude Well-Known
    Builder

    Joined:
    Jan 2, 2014
    Messages:
    243
    Likes Received:
    103
    Doood, it works good enough to draw. :)

    First Routy Drawing.jpg
     
    Chris Allen likes this.
  21. Chris Allen

    Builder

    Joined:
    Dec 2, 2013
    Messages:
    50
    Likes Received:
    7
  22. Public Do Omens

    Guest Builder

    I think the motor draws more amps the more work it has to do.

    So with no load, low amps.
    Heavy load, grinding granite very high load.

    It's all about how much work the tool is doing! :cool:
     
  23. Public Do Omens

    Guest Builder

    It's all about force here acting on the axis.

    Reduce the mass.
    Stiffen the frame.

    420g seems a little heavy for this small kit.
    :rolleyes: Mind you i have never got me scales out, i will now!
     
  24. Chris Allen

    Builder

    Joined:
    Dec 2, 2013
    Messages:
    50
    Likes Received:
    7
    Eeek. My spindle is 800g!

    I also think that any spindle worth it's salt is going to be at least 400g
     
  25. Public Do Omens

    Guest Builder

    I was not counting the tool in my shock! :D
    Just the Z-Axis part, seeing as the motor is the largest mass.

    Is it not?
    OK 300g for the motor.

    I stand corrected, AGAIN. :D
     
  26. Protodrake

    Builder

    Joined:
    Jan 9, 2014
    Messages:
    11
    Likes Received:
    10
  27. Chris Allen

    Builder

    Joined:
    Dec 2, 2013
    Messages:
    50
    Likes Received:
    7
    I have the same as you, but haven't busted out the soldering iron yet (got an unassembled board). Good to know it works fine.
     
  28. Cuse

    Cuse New
    Builder

    Joined:
    Jan 14, 2014
    Messages:
    5
    Likes Received:
    0
    Think my frame is finished. I might need to do a better job with the z-axis leadscrew, but i'll see how it goes. My driver board and power supply should be in on Friday so i can hook up all the stepper motors!
     

    Attached Files:

  29. The Dude

    The Dude Well-Known
    Builder

    Joined:
    Jan 2, 2014
    Messages:
    243
    Likes Received:
    103
    Hey man it works. Got the spindle going and all 3 axes :)

    It's kinda slow cause I have it all turned down for safety until I get the limit switches on. I tested it at 200mm/s and it does fine.
     
    Mark Carew and Chris Allen like this.
  30. Chris Allen

    Builder

    Joined:
    Dec 2, 2013
    Messages:
    50
    Likes Received:
    7
    Can you tell me what type of screws you used for the ends of the z-axis v slot? Did you tap them separately or use self tapping screws? If you use self tappers, does that make it a one time deal ( i.e. you can't undo it and do it back up again ) or does it make a reusable thread?
     

Share This Page

  1. This site uses cookies to help personalise content, tailor your experience and to keep you logged in if you register.
    By continuing to use this site, you are consenting to our use of cookies.
    Dismiss Notice