Welcome to Our Community

Some features disabled for guests. Register Today.

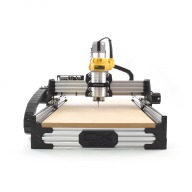
ooznest OX CNC Machine

Discussion in 'CNC Mills/Routers' started by Ryan Lock, Apr 28, 2015.

  1. Tim P

    Tim P New
    Builder

    Joined:
    May 12, 2015
    Messages:
    34
    Likes Received:
    17
    20150609_212108.jpg
    This is what I accomplished last night using a sharpie zip tied to the z extrusion. I'm pleased with the results.
     
  2. Ryan Lock

    Ryan Lock Veteran
    Builder

    Joined:
    Oct 12, 2014
    Messages:
    530
    Likes Received:
    294
    @Tim P looks like its coming along well!
     
  3. GrayUK

    GrayUK Openbuilds Team Elder
    Staff Member Moderator Builder

    Joined:
    May 5, 2014
    Messages:
    1,668
    Likes Received:
    627
    Looks like Mark!!!! :ROFL::ROFL:
     
    Tim P likes this.
  4. Tim P

    Tim P New
    Builder

    Joined:
    May 12, 2015
    Messages:
    34
    Likes Received:
    17
    I'll admit that was my facial expression when I first got it all moving.
     
    Mark Carew likes this.
  5. solarground

    Builder

    Joined:
    May 27, 2015
    Messages:
    61
    Likes Received:
    9
    hi! nice build Tim P! Is this the 1m x 1m kit? could you please tell me what controler/software you used? I search for a chain to work with from my idea to end product.
    I am waiting my kit and i feel very impatient to put my hands on :p
    I forget to order some endstops and mounts so i have to get them at localstore and made the mounts on my own. I have found some with 1A and some other with 5A. Are these apropriate? I am asking that because i see that the switces for this kit are 0.5A. Also i am trying to figure out how and where to mount them. I think that the right place is on the plates but it seems easier to mount them somewhere on the rails. :) .
     
  6. Tim P

    Tim P New
    Builder

    Joined:
    May 12, 2015
    Messages:
    34
    Likes Received:
    17
    It is 1m x 1m
    I went with the G540 controller and Mach3 for the software. Everything went smoothly with getting everything connected. The only time consuming part was all the soldering I did.

    I'm assuming you're asking about limit switches? I haven't gotten to those yet. I wasn't entirely sure how I wanted to run them or where the best place to mount would be without seeing the assembled kit. I'm still researching my options but I'm leaning toward optical limit switches.
     
  7. solarground

    Builder

    Joined:
    May 27, 2015
    Messages:
    61
    Likes Received:
    9
    Thank you Tim P! yes i am refering to mechanical limit switches. I have seen those optical limits seems better and i read is more accurate for homing process. A little more expensive but maybe it is worth the price. But i want them most for safety reasons i dont want to make mistake and crash the machine, and mechanical switches seems to work well for that.

    Thank you
     
  8. Tim P

    Tim P New
    Builder

    Joined:
    May 12, 2015
    Messages:
    34
    Likes Received:
    17
    From what I've read limit switches aren't as important on steppers because they'll just reach their max travel and stall out. There isn't enough torque to harm anything. Limit switches would be important with servo motors where there is more torque to cause harm. However, they can be very useful as home switches for repeatability. I had read optical was more accurate so that's my reason for looking into those as opposed to the mechanical switches.

    I'm not an expert by any means but this is what I've read. If I'm wrong someone please correct me.
     
    kev p likes this.
  9. Tim P

    Tim P New
    Builder

    Joined:
    May 12, 2015
    Messages:
    34
    Likes Received:
    17
    20150620_212807.jpg
    Here's a letter I cut out last night. I'm really impressed with how this machine cuts.
     
    mybuild14, Ryan Lock and Dave Lowry like this.
  10. Ryan Lock

    Ryan Lock Veteran
    Builder

    Joined:
    Oct 12, 2014
    Messages:
    530
    Likes Received:
    294
    Nice cut, looks really clean.
     
  11. solarground

    Builder

    Joined:
    May 27, 2015
    Messages:
    61
    Likes Received:
    9
    looks pretty good!
     
  12. davestrength

    Builder

    Joined:
    May 29, 2015
    Messages:
    18
    Likes Received:
    19
    Hey Tim P.: Your build looks great. What are you using as a spindle?

    I just got my Ooznest OX kit and am slowly getting started on a build. So far, the instruction manual and organization of the kit are incredible.
     
    Ryan Lock likes this.
  13. Tim P

    Tim P New
    Builder

    Joined:
    May 12, 2015
    Messages:
    34
    Likes Received:
    17
    Thanks Dave. I'm using the Dewalt 611 router with the openbuilds mount.
     
    Dave Landry likes this.
  14. cruz1445

    cruz1445 New
    Builder

    Joined:
    Mar 25, 2015
    Messages:
    23
    Likes Received:
    6
    My ooznest ox and first test cuts , besides some tearouts everything looks good.
     

    Attached Files:

    sigrx73, GrayUK and Tim P like this.
  15. Tim P

    Tim P New
    Builder

    Joined:
    May 12, 2015
    Messages:
    34
    Likes Received:
    17
    That looks awesome! I haven't tried any v carve stuff yet. What bit did you use for that?
     
  16. cruz1445

    cruz1445 New
    Builder

    Joined:
    Mar 25, 2015
    Messages:
    23
    Likes Received:
    6
    Its a 1/2 inch 60 degree Vbit I got off amazon.
     
  17. Ryan Lock

    Ryan Lock Veteran
    Builder

    Joined:
    Oct 12, 2014
    Messages:
    530
    Likes Received:
    294
    Looks Great! makes me want to make a similar sign for our office now.
     
  18. Ryan Lock

    Ryan Lock Veteran
    Builder

    Joined:
    Oct 12, 2014
    Messages:
    530
    Likes Received:
    294
    If anyone has any more pictures of their ooznest OX CNC Kit, send them our way if you would like them to be included in our new blog post showing some of our kits in the wild.
     
    sigrx73 likes this.
  19. solarground

    Builder

    Joined:
    May 27, 2015
    Messages:
    61
    Likes Received:
    9
    Hi! Finally i finished this build! My first ever build! Mechanically it seems pretty nice (i will post some pics later) and for first build i think its came out very good. But now i dont know what i have to do. I have connected the cnc x pro with the psu, the cnc motors and my computer (running xubuntu) and cant do anything. i tried universal gsender but it gives me some error, i think it cant view the machine connected.
    Please can you help?
     

    Attached Files:

    GrayUK likes this.
  20. solarground

    Builder

    Joined:
    May 27, 2015
    Messages:
    61
    Likes Received:
    9
    i have connected the motor wires with cnc xpro this way: yellow, green, red, blue. I dont know if its right i see this from pictures.
     
  21. Tim P

    Tim P New
    Builder

    Joined:
    May 12, 2015
    Messages:
    34
    Likes Received:
    17
    Nice build solar. I don't have experience with the xpro controller but you might try searching here.
     
  22. GrayUK

    GrayUK Openbuilds Team Elder
    Staff Member Moderator Builder

    Joined:
    May 5, 2014
    Messages:
    1,668
    Likes Received:
    627
    That's a hell of a nice workshop you have there. :)
    Gray
     
  23. Ryan Lock

    Ryan Lock Veteran
    Builder

    Joined:
    Oct 12, 2014
    Messages:
    530
    Likes Received:
    294
    Thanks for the pictures, nice build! The wire order is red, green, yellow, blue.

    What is the error the gcode sender is giving?
     
    #113 Ryan Lock, Jul 6, 2015
    Last edited: Jul 9, 2015
  24. solarground

    Builder

    Joined:
    May 27, 2015
    Messages:
    61
    Likes Received:
    9
    Thank you guys for your nice words and your help!

    I would like to make some conclusions. As i mention this is the first ever build i came across, i have no other experience with these machines, nor have seen any of these previously from close enough. Before starting building this kit, i have watched numerous videos on the internet and read some things, although i didnt understand everything. I watched the video from Mark building the ox and some videos from other builds like shapeoko etc. All these was very helpful for me to understand some basics things. Although when i started building this kit, the manual it came with, was the only reference i used. It was very nice and detailed enough for a total newbie like me. First impression when i see all the parts was like "sh*t someone is kidding me!". Actually i didnt find this hard to do but it could be very tricky when dint know things like how to set the eccentric spacers for the wheels or how tight they must be, etc. Actually i think this was the hardest thing for me. I build it two times. First time it taked me one full day. When i finished i mention that i havent squared it right and i have set the eccentric like a mess. So i decided to disassemble and build it again this time more careful. The second time it takes me only some hours and it came out even better. I corrected the wheels and i make the machine close to 100% square! I am more than happy with this kit, the only thing that remains now is the electronic setup to use with my computer. Thank you all and thank you Ryan for this great kit and manual!

    The error i get with universal gcode sender is that it cant find serial port. i will try to use a windows computer to see if anything will happen.
     
    #114 solarground, Jul 6, 2015
    Last edited: Jul 6, 2015
    Ryan Lock likes this.
  25. Ryan Lock

    Ryan Lock Veteran
    Builder

    Joined:
    Oct 12, 2014
    Messages:
    530
    Likes Received:
    294
    Great write up, thanks! Hope you can get it working soon
     
  26. Stigma

    Stigma New
    Builder

    Joined:
    Sep 30, 2015
    Messages:
    7
    Likes Received:
    1
    Hi!

    I'm planning the build of a CNC machine to build long and narrow panels on plastic, and sometimes to carve small pieces on wood. The panels may be longer than one meter, but just 30 or 40 cms wide.

    I'm a bit concerned about the rigidity of this built for a 1.5 m axis (the other may be just 50 cms). Will it flex too much the standard build? or should be reinforced in some way?

    thanks.
     
  27. Serge E.

    Serge E. Journeyman
    Builder

    Joined:
    May 6, 2014
    Messages:
    730
    Likes Received:
    252
    If you plan on not doing any larger parts, then I would suggest you make your X axis the shortest/narrowest by going with up to 750mm, using standard cut length. Going with 500mm might be tight to work 40cm pieces. I would go with 750mm - just never know when you will need the few extra cm of work width. The Y can be any length, with appropriate support. The two rails just need to be parallel, lengths don't have to be dead equal (but it makes squaring rest a lot easier). If working the long parts is rather rare, you can make it 1500mm or less. The long parts could be worked in sections ...

    Don't forget factory cuts of extrusion can be +4 mm off.

    Play with the OXcalculator - link in my signature, to get a fair idea of bill of material and possibly cost while paying with hour X, Y and Z work piece dimensions. It assumes a fairly standard OX design using V-slot.

    Have fun ...
     
    Stigma likes this.
  28. Ryan Lock

    Ryan Lock Veteran
    Builder

    Joined:
    Oct 12, 2014
    Messages:
    530
    Likes Received:
    294
    As Serge said a shorter x-axis is always better. If your planning to work on 400mm pieces then a 500mm x-axis won't be big enough. Therefore i would recommend going for a 750mm x-axis.

    If you are concerned about a 1500mm y-axis, the good thing about the Y-Axis on the OX, is you could get a shorter one, and then work on the panels in sections, just sliding them further down when your down with that section.
     
    Stigma likes this.
  29. Joe Santarsiero

    Joe Santarsiero OB addict
    Staff Member Moderator Builder

    Joined:
    Oct 30, 2014
    Messages:
    902
    Likes Received:
    196
    It's more nuanced then that. Soft limits are okay hard limits are ideal regardless of motor type.
     
  30. Stigma

    Stigma New
    Builder

    Joined:
    Sep 30, 2015
    Messages:
    7
    Likes Received:
    1
    I see this build is quite easy to extend. Maybe the best move would be to start with a smaller machine and grow as needed. :thumbsup:
     

Share This Page

  1. This site uses cookies to help personalise content, tailor your experience and to keep you logged in if you register.
    By continuing to use this site, you are consenting to our use of cookies.
    Dismiss Notice