Welcome to Our Community

Some features disabled for guests. Register Today.

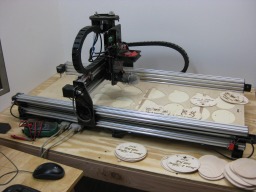
Mega-Maker Combo Machine

Discussion in 'Laser Cutters' started by Hytech2k, Jun 24, 2015.

  1. Hytech2k

    Hytech2k Veteran
    Builder

    Joined:
    May 6, 2014
    Messages:
    429
    Likes Received:
    331
    Hytech2k published a new build:

    Read more about this build...
     
  2. Mark Carew

    Mark Carew OpenBuilds Team
    Staff Member Moderator Builder Resident Builder

    Joined:
    Jun 28, 2013
    Messages:
    2,758
    Likes Received:
    2,441
    This looks really cool Gerald!:thumbsup:
    Looking forward to following along with your Build and thanks for sharing.
     
  3. Hytech2k

    Hytech2k Veteran
    Builder

    Joined:
    May 6, 2014
    Messages:
    429
    Likes Received:
    331
    Thanks Mark !

    Gerald
     
    Mark Carew likes this.
  4. Mark Carew

    Mark Carew OpenBuilds Team
    Staff Member Moderator Builder Resident Builder

    Joined:
    Jun 28, 2013
    Messages:
    2,758
    Likes Received:
    2,441
    Cool idea you have for these belt clamps Gerald its simple and looks like it will work great.
    Keep up the good work!
     
  5. Hytech2k

    Hytech2k Veteran
    Builder

    Joined:
    May 6, 2014
    Messages:
    429
    Likes Received:
    331
    Thanks Mark.. It's a tight fit in those little carriages, I tested one by installing it in a carriage and giving the belt a good pull. The stepper will skip steps or the belt will slip before these let go...
     
    #5 Hytech2k, Jul 7, 2015
    Last edited: Jul 8, 2015
  6. Hytech2k

    Hytech2k Veteran
    Builder

    Joined:
    May 6, 2014
    Messages:
    429
    Likes Received:
    331
    I have no problem posting the file, the issue is I can't design in Sketchup... :) I'll post the DXF I used to cut it, if someone could convert it into a STL or .skp model that would be great. I would like to get some of these 3D printed in the future for the "next" project with C-Beam... If your looking for a 3D printer solution I found these on Thingiverse just had to modify it a bit for my use....
     
  7. Hytech2k

    Hytech2k Veteran
    Builder

    Joined:
    May 6, 2014
    Messages:
    429
    Likes Received:
    331
    UPDATE 08/15/2015

    Alot going on right now, we're upgrading the laser to a 6 watt 445nm laser diode with a 3 element lens along with a analog/TTL driver capable of pushing over 6 amps of power. We're going to keep it throttled down to 4.5 amps though to increase the diodes life span, should give us just over 6 watts of beam. I just received the driver, just waiting on the diode and heatsink now.

    [​IMG][​IMG]

    We have decided to add on to my office/clean room to make a space for just the Triple Shot to occupy, so development has somewhat slowed. I received my G10 today so i'm cutting the final plates and the connector plates for the electronics boxes, i'll post photos of those as soon as I get them assembled and tested.
     
  8. Hytech2k

    Hytech2k Veteran
    Builder

    Joined:
    May 6, 2014
    Messages:
    429
    Likes Received:
    331
    UPDATE 08/26/2015

    Ok i've completed the power supply module finally, it consists of 2 - 24V 15A switching power supplies tied together to double the available current (30A) for the 2 MK2 heatbeds we're installing for the 3D printer setup, 1 - 12V 10A adjustable step down buck drive to provide power to the fans and the laser driver, and 1 - DC-DC SSR to turn the heatbeds off and on. This power module will be able to provide the power for the Laser, 3D printer, and CNC router with all the associated electronics.

    [​IMG][​IMG][​IMG][​IMG][​IMG]

    I have both a FlexMod P3 and a 6.2A adjustable driver for the 6W laser diode, and I just finished the custom heatsink host for this diode.

    [​IMG][​IMG][​IMG]

    I am now working on the CNC Router/Laser electronics module and hope to have that completed this afternoon. I will upload some photos and a breakdown of the components here when I get it together. Stay tuned !!
     
    Joe Santarsiero likes this.
  9. michel pet

    Builder

    Joined:
    Jan 9, 2014
    Messages:
    20
    Likes Received:
    3
    [​IMG] [​IMG] [​IMG]

    working on a water cooler but the copper laser house is not 100% inline so i cant get it into the cooler tube.
    i think i make a new one and cool the laser head not the rest of the copper tube.

    step up and down v control and amp control 10 amps max.


    [​IMG]
     
  10. Mark Carew

    Mark Carew OpenBuilds Team
    Staff Member Moderator Builder Resident Builder

    Joined:
    Jun 28, 2013
    Messages:
    2,758
    Likes Received:
    2,441
    Hey guys, not to familiar with these laser diodes but from looking at the size of these heat sinks and the idea of the water cooled option it looks like they must get pretty hot indeed!
    The build is looking great keep up the good work :thumbsup:
    Mark
     
  11. Hytech2k

    Hytech2k Veteran
    Builder

    Joined:
    May 6, 2014
    Messages:
    429
    Likes Received:
    331
    Thanks Mark ! From what I understand the 6 watt is about the strongest on the market right now, should be able to cut 1/8 ply with it fairly easily. Pushing 4-5 amps to the generates alot of heat so good cooling for the driver and diode is essential.

    What driver is that Michel and do you have a link to it? The water cooling option looks great, I was thinking of modifying a CPU water cooler setup with a custom CNC'd copper block to house the diode, should be able to keep the temps down..

    Gerald
     
  12. lord_drachenblut

    Builder

    Joined:
    Aug 26, 2015
    Messages:
    30
    Likes Received:
    19
    This is a fantastic looking build in progress. Liking forward to sting it finished
     
  13. michel pet

    Builder

    Joined:
    Jan 9, 2014
    Messages:
    20
    Likes Received:
    3
    http://www.ebay.com/itm/251768965445?_trksid=p2057872.m2749.l2649&ssPageName=STRK:MEBIDX:IT
    driver from ebay.
    i have no id how hot the laser can get i need a smaller cooler.
    i have cnc the center part of the cooler and the copper laser wil fit nise til the laser head needs to go in and it is not in line the hot end part i think the treed in the copper is the problem.
    do i need to cool the end part of the copper laser???.
    a pc cooler wil work fine and a mall pump.

    http://www.ebay.com/itm/80mm-Alumin...PU-heatsink-/281632626316?hash=item41929cd68c

    http://www.ebay.com/itm/DC-12V-Wate...ling-System-/171198653137?hash=item27dc3c22d1
     
  14. michel pet

    Builder

    Joined:
    Jan 9, 2014
    Messages:
    20
    Likes Received:
    3
    [​IMG]

    this new one fits ok now i need to make a cooler fore the drive to fid in the tube.
     
  15. michel pet

    Builder

    Joined:
    Jan 9, 2014
    Messages:
    20
    Likes Received:
    3
  16. michel pet

    Builder

    Joined:
    Jan 9, 2014
    Messages:
    20
    Likes Received:
    3
    after testing i think the controler burnd out 20 cesonde testing
    capton tape to insulate the controler from the cooling house.

    [​IMG] [​IMG]
     
  17. Hytech2k

    Hytech2k Veteran
    Builder

    Joined:
    May 6, 2014
    Messages:
    429
    Likes Received:
    331
    Yeah you might want to look into maybe encapsulating the driver in silicone but I believe that driver needs to be heatsinked as well, pretty easy to overheat them..
     
  18. michel pet

    Builder

    Joined:
    Jan 9, 2014
    Messages:
    20
    Likes Received:
    3
  19. Joe Santarsiero

    Joe Santarsiero OB addict
    Staff Member Moderator Builder

    Joined:
    Oct 30, 2014
    Messages:
    902
    Likes Received:
    196
    mmmm. Eye candy. Great work G!
     
  20. Hytech2k

    Hytech2k Veteran
    Builder

    Joined:
    May 6, 2014
    Messages:
    429
    Likes Received:
    331
    Thanks Joe !! I'm testing the 6 watt LD now, working pretty good, just need to get the feed rates dialed in... I'll be posting more vids and photos this weekend... I also modded my camera to do time lapse with what I like to refer to as the Magic Finger lol, found it in a instructable, i'll post a few photos of that as well...
     
  21. Bear

    Bear New
    Builder

    Joined:
    Aug 17, 2014
    Messages:
    17
    Likes Received:
    6
    Hey Great build Hyteck2k!

    Very inspiring! I was about to purchase the 2.8W laser from Jtech last month but the limits of its abilities had me holding back.
    http://jtechphotonics.com/?product_cat=laser-and-driver-combo-kits

    Your 6W laser sounds way more what I am looking for. Basically the ability to cut through 1/8th baltic ***** and door skin.

    I am pretty new to the whole laser situation, do you plan on posting a BOM for you laser at any point or would you mind sharing the info on what parts from where you found them? I would even be happy to purchase them through you (Area 51) if you were interested in putting a DIY kit together of the pieces. Looking to move ahead with the laser soon tho so let me know either way.

    I have been carving these 3D contour maps and need to be able to etch into them, shore lines, roads, place etc...
    The plan is that a laser will be able to do it without loosing the atheistic of the natural wood.
    12088052_10153037964375583_6181721585236815910_n.jpg
     
    Mopar32985 likes this.
  22. Bear

    Bear New
    Builder

    Joined:
    Aug 17, 2014
    Messages:
    17
    Likes Received:
    6
  23. michel pet

    Builder

    Joined:
    Jan 9, 2014
    Messages:
    20
    Likes Received:
    3
    i have the driver .
     
  24. Hytech2k

    Hytech2k Veteran
    Builder

    Joined:
    May 6, 2014
    Messages:
    429
    Likes Received:
    331
    Thanks !!

    The 6 watt isn't bad, in my opinion it's better to have more than what you "currently" need, you never know what you might like to try in the future.. Plus the 6 watt is throttled back with PWM so it can run from just barely on up to full power, works great for doing fast grayscale images..

    The 3D topo maps are great, love that idea... You might want to check out picengrave.com, they have a cnc/laser program that can carve the contour map then lay laser engraving right over it for shading and such without resetting the piece.. If you don't mind me asking, what software are you using for the relief? I have a couple but have yet had the chance to try them out...
     
  25. Joe Santarsiero

    Joe Santarsiero OB addict
    Staff Member Moderator Builder

    Joined:
    Oct 30, 2014
    Messages:
    902
    Likes Received:
    196
    These also look like Indian naan bread. :D
    Until I read your post I thought you were going to etch an image in your bread.
    Kinda like they do with toast.
    Joe
     
  26. Bear

    Bear New
    Builder

    Joined:
    Aug 17, 2014
    Messages:
    17
    Likes Received:
    6
    I am just using an old version of Aspire to make the maps with GIS data.
    picengrave.com is exactly the software I was looking for, thanks.

    Yeah I agree way better to have more power then you need.
     
  27. Hytech2k

    Hytech2k Veteran
    Builder

    Joined:
    May 6, 2014
    Messages:
    429
    Likes Received:
    331
    They look great !!

    Have you ever checked out this software :
    http://paulrowntree.weebly.com/topo.html

    I haven't gotten around to trying it yet but looks great for making topographical maps and such.

    Keep up the good work !

    Gerald
     
  28. George M

    George M New
    Builder

    Joined:
    Feb 22, 2015
    Messages:
    32
    Likes Received:
    4
    Gerald,
    Are you finding you can get a fine enough detail with the 6w laser as opposed to the 2.8w?
     
  29. Hytech2k

    Hytech2k Veteran
    Builder

    Joined:
    May 6, 2014
    Messages:
    429
    Likes Received:
    331
    I'll post a few photos and a video or two this afternoon with some of the things i've engraved with it. I have to still play with the power settings for grayscale images but for vector engraving I get great detail.
     
  30. Hytech2k

    Hytech2k Veteran
    Builder

    Joined:
    May 6, 2014
    Messages:
    429
    Likes Received:
    331
    Here are a couple photos and a video showing the Triple Shot in operation. These are centerpieces for a new product we're coming out with and only measure 4 inches at the widest point.


    IMG_2081[1].JPG IMG_2082[1].JPG IMG_2083[1].JPG IMG_2084[1].JPG IMG_2085[1].JPG
     
    Mark Carew likes this.

Share This Page

  1. This site uses cookies to help personalise content, tailor your experience and to keep you logged in if you register.
    By continuing to use this site, you are consenting to our use of cookies.
    Dismiss Notice