Welcome to Our Community

Some features disabled for guests. Register Today.

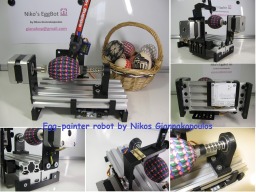
Niko’s EggBot (OpenBuilds)

Discussion in 'DrawBot' started by gianakop, Mar 29, 2015.

  1. gianakop

    gianakop New
    Builder

    Joined:
    Feb 27, 2015
    Messages:
    11
    Likes Received:
    20
    gianakop published a new build:

    Read more about this build...
     
  2. Mark Carew

    Mark Carew OpenBuilds Team
    Staff Member Moderator Builder Resident Builder

    Joined:
    Jun 28, 2013
    Messages:
    2,758
    Likes Received:
    2,440
    Awesome Build @gianakop Thanks for sharing
     
  3. Woodie49

    Woodie49 New
    Builder

    Joined:
    Feb 7, 2014
    Messages:
    61
    Likes Received:
    1
    Any more information on how you built it? What did you use for the head and tail stock?
    Thanks
     
  4. gianakop

    gianakop New
    Builder

    Joined:
    Feb 27, 2015
    Messages:
    11
    Likes Received:
    20
    Sorry for the delay response.....
    Does the next image answer your question?
     

    Attached Files:

  5. Woodie49

    Woodie49 New
    Builder

    Joined:
    Feb 7, 2014
    Messages:
    61
    Likes Received:
    1
  6. stargeezer

    stargeezer Journeyman
    Builder

    Joined:
    Feb 20, 2015
    Messages:
    328
    Likes Received:
    117
    I have considered building one of these, could you post a couple photos of the parts that hold the egg in place. Were they parts you made or purchased?

    Thanks,
    Larry
     
  7. stargeezer

    stargeezer Journeyman
    Builder

    Joined:
    Feb 20, 2015
    Messages:
    328
    Likes Received:
    117
    Sorry. Everything is in the files folder. Thanks
     
  8. Slobberknocker

    Builder

    Joined:
    Jul 5, 2015
    Messages:
    33
    Likes Received:
    16
    Thought Id give this build a shot myself. Glad I did, it was fun.
    Im going to start working on mounting other items such as wine glasses, light bulbs, and ornaments.

    Feel free to ask questions and I can answer them here. Ill include some detailed pictures to help folks out. I modified some various parts but the files gianakop included here, work very well.


    20151229_230855.jpg I 20151229_230855.jpg 20151229_230900.jpg 20151229_230924.jpg 20151229_230932.jpg 20151229_230948.jpg 20151229_230952.jpg 20151229_231012.jpg 20151229_231036.jpg 20151229_231047.jpg 20151229_231309.jpg 20151229_233145.jpg 20151229_233153.jpg 20151229_233201.jpg 20151229_233207.jpg 20151229_233215.jpg
     
    Balu, eddiejr, Heffa and 5 others like this.
  9. gianakop

    gianakop New
    Builder

    Joined:
    Feb 27, 2015
    Messages:
    11
    Likes Received:
    20
    Slobberknocker , you have done excellent work! Awesome!
     
  10. Heffa

    Heffa New
    Builder

    Joined:
    Apr 17, 2015
    Messages:
    8
    Likes Received:
    2
    I can't find the part opposite side from the [egg rotating] motor, the bracket that holds a bearing and a rod with spring...
    Anyone care to share it, or should I design it myself?
     
  11. Rick 2.0

    Rick 2.0 OpenBuilds Team
    Staff Member Moderator Builder Resident Builder

    Joined:
    Dec 20, 2013
    Messages:
    2,892
    Likes Received:
    1,551
  12. Heffa

    Heffa New
    Builder

    Joined:
    Apr 17, 2015
    Messages:
    8
    Likes Received:
    2
  13. gianakop

    gianakop New
    Builder

    Joined:
    Feb 27, 2015
    Messages:
    11
    Likes Received:
    20
    Ok guyes, Easter will comes soon and I'll return with more ideas about this Egg-painter!
    Till then keep the excelent work!
     
    Mark Carew likes this.
  14. Slobberknocker

    Builder

    Joined:
    Jul 5, 2015
    Messages:
    33
    Likes Received:
    16
    I know many folks have all the metal parts to build this fun little machine. If you are in need of the 3D printed parts used, them message me and I would love to help you get the parts needed.
    I dont print commercially, Im just offering to supply a few parts to help folks out.
     
    jasperjones, eddiejr and Mark Carew like this.
  15. Mark Carew

    Mark Carew OpenBuilds Team
    Staff Member Moderator Builder Resident Builder

    Joined:
    Jun 28, 2013
    Messages:
    2,758
    Likes Received:
    2,440
  16. BruceLunde

    Builder

    Joined:
    Dec 10, 2014
    Messages:
    4
    Likes Received:
    3
    What controller / motor driver is being used here? Are there plugins for Inkscape required?
     
  17. Mark Carew

    Mark Carew OpenBuilds Team
    Staff Member Moderator Builder Resident Builder

    Joined:
    Jun 28, 2013
    Messages:
    2,758
    Likes Received:
    2,440
    @BruceLunde have a look at the Files tab of the V-Slot SphereBot here: V-Slot SphereBot | OpenBuilds
    You can download All software needed for this build.zip in the Files and Drawings tab of the Build

    For a controller we used the simple EBB EiBotBoard Info - EBB (EiBotBoard)
    It controls 2 steppers (one for the pen and one for the egg rotation axis) and a simple RC servo to lift the pen up and down.

    Where to get the board?

    SparkFun - USA
    EiBotBoard - WIG-10025 - SparkFun Electronics

    Karlsson Robotics - USA
    EiBotBoard

    Evil Mad Scientist - USA
    EBB Driver Board

    Watterott - EUR
    EggBot EiBotBoard - Watterott electronic

    Hope this helps :)
    Mark
     
    eddiejr and BruceLunde like this.
  18. BruceLunde

    Builder

    Joined:
    Dec 10, 2014
    Messages:
    4
    Likes Received:
    3
    Thanks Mark!
     
    Mark Carew likes this.
  19. Balu

    Balu Well-Known
    Builder

    Joined:
    Apr 14, 2014
    Messages:
    81
    Likes Received:
    30
    After I somehow stumbled over the original and updated eggbots, spherebots and of course all of their clones a few weeks ago, Google somehow led me to this build. Probably because I'm hanging around here to look at all the nice machines you guys are building. As I do quite often with builds like this I really liked it, but hesitated if I should spend money on a project that's probably going to be used once a year... or worse - just once this year.

    So I put it into the back of my head as a cool idea and went on with my day to day life. But somehow my brain reminded me now and then of how much fun this would be. And just when I thought I finally was over it, @Mark Carew posts it to the OB Google+ group with easter being just three weeks away.

    And here I am, holding my receipt with a parts list from TronixMaker - an OpenBuilds distributor from Belgium... The first 3D printed parts also fell out of my Mini Fabrikator 3D printer already. Since I can only print 80 x ~74ish x 80 mm objects, some of the longer parts were close to being too big, but printing without a skirt and rotating them 45° helped.

    I also added two Openbuilds custom Nema 17 Stepper motors (missing on the projects's parts list) even though they are probably overkill with 76 oz of torque, but what are oz anyway? ;) I know I could've probably gotten cheaper ones, but it was easier to just add them to the basket then. I might replace them with smaller ones later and use them for a 3D printer...

    Finally I ordered an EiBotBoard clone (missing on the parts list) on ebay from a German company.

    According to the shop's tracking mails, both packages are on their way. I'll update with my build as soon as they are here.

    Attached is the STL file for nikosEB_4. After exporting it as STL from Sketchup, it had a hole on one side. I put it through Microsoft's Model Repair Service to get it fixed.
     

    Attached Files:

    Mark Carew likes this.
  20. eddiejr

    eddiejr New
    Builder

    Joined:
    Feb 15, 2016
    Messages:
    73
    Likes Received:
    9
    Slobberknocker, I'm not sure how to do a private message on this board, but I am very interested in doing this build. I dont have a 3D Printer yet (trying to figure out which good one to build), and was reluctantly thinking of possibly manually carving parts from wood... If you are willing to print a few parts, I'd be greatful. This would be my first build with Openbuilds stuff. Please let me know, thanks, -Eddie
     
  21. Rick 2.0

    Rick 2.0 OpenBuilds Team
    Staff Member Moderator Builder Resident Builder

    Joined:
    Dec 20, 2013
    Messages:
    2,892
    Likes Received:
    1,551
    @eddiejr, click on the person's avatar and when the black box pops up, click on "start a conversation".
     
  22. eddiejr

    eddiejr New
    Builder

    Joined:
    Feb 15, 2016
    Messages:
    73
    Likes Received:
    9
    Thanks. (Still getting a feel for things here.)
     
    #22 eddiejr, Mar 4, 2016
    Last edited: Mar 4, 2016
  23. Slobberknocker

    Builder

    Joined:
    Jul 5, 2015
    Messages:
    33
    Likes Received:
    16
    I got your message and sent a reply.:)
     
  24. Balu

    Balu Well-Known
    Builder

    Joined:
    Apr 14, 2014
    Messages:
    81
    Likes Received:
    30
  25. Slobberknocker

    Builder

    Joined:
    Jul 5, 2015
    Messages:
    33
    Likes Received:
    16
    I used a model airplane CA hinge and it only needs a gap of 1-2 mm.
     
    Balu likes this.
  26. JavaScriptMike

    Builder

    Joined:
    Mar 17, 2017
    Messages:
    1
    Likes Received:
    0
    Hey man! That looks awesome! Question of the day (I am asking because I have not built one of these and have no idea how it works yet)
    How did you get the pictures to put on those eggs? are they just regular pictures you got off the internet and in the software it wraps the picture onto the egg?
    Is it very difficult to get the picture to fit the egg?
    How does the "Changing color" work? how do you get it to stop so you can change markers and such?
     
  27. stargeezer

    stargeezer Journeyman
    Builder

    Joined:
    Feb 20, 2015
    Messages:
    328
    Likes Received:
    117
    I'm the wrong guy to answer any of your questions in detail, I'm more a hardware guy, but I'll share what Little I understand. :) Worth every penny I charge too. :)

    The link between the three software programs are the key. The CAD program allows you to draw the image, lines and such you mark on the egg. Some packages will allow you to import graphics at this stage, but I found handling graphics in the CAM package worked better for me. The output of your CAD package produces are essentially straight lines on a flat plane.

    Next up is the CAM software that takes the flat CAD generated object and figuratively wraps it around your egg, in a virtual wire form where lines of the 2d drawing form the 3d shape of the egg. Depending on the software you can drop images on the egg at this point. Truth is always the best policy, so I have to admit that this was where I seemed to have my problems. I know it works, I eventually got everything working, I just don't fully understand why it works. It just does, and it's pretty cool. My kids were amazed. Shoot, I was amazed!

    Lastly the firmware installed into the controller card take the output of the CAM software, reads limits to determine start points and follows the instructions it created. These are dependent on the controller board use, just like Apple software will not run on a PC.

    The short answer is that it's just magic.

    Have fun!
     
    #27 stargeezer, May 18, 2017
    Last edited: May 18, 2017
  28. Giarc

    Giarc OpenBuilds Team
    Staff Member Moderator Builder Resident Builder

    Joined:
    Jan 24, 2015
    Messages:
    3,015
    Likes Received:
    1,680
    I wish I had seen this sooner. I am glad Stargeezer commented or I wouldn't have noticed. Anyways, you use Inkscape software for the CAM and the "CAD." There is a whole bunch o' pictures on Thingiverse to download. Search 'eggbot' MakerBot Thingiverse. I have made a few of my own as well. Here is a tutorial: Making your first plot - Evil Mad Scientist Wiki I will throw this in the resources section if it isn't there already.
     
    stargeezer likes this.
  29. stargeezer

    stargeezer Journeyman
    Builder

    Joined:
    Feb 20, 2015
    Messages:
    328
    Likes Received:
    117
    Thank you Giarc, I didn't see any other posts so I thought I'd try. Glad you set us both straight.

    Larry
     
  30. stargeezer

    stargeezer Journeyman
    Builder

    Joined:
    Feb 20, 2015
    Messages:
    328
    Likes Received:
    117
    Wow that's MUCH simpler!
     
    Giarc likes this.

Share This Page

  1. This site uses cookies to help personalise content, tailor your experience and to keep you logged in if you register.
    By continuing to use this site, you are consenting to our use of cookies.
    Dismiss Notice