Welcome to Our Community

Some features disabled for guests. Register Today.

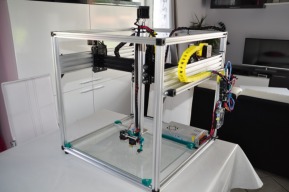
Maximus 3D Printer

Discussion in '3D printers' started by mytechno3d, Jul 16, 2014.

  1. Mauricio Solid

    Builder

    Joined:
    Feb 17, 2015
    Messages:
    30
    Likes Received:
    12
    Nice build and shop too. ;)
     
  2. Val Cocora

    Val Cocora Well-Known
    Builder

    Joined:
    May 19, 2014
    Messages:
    172
    Likes Received:
    28
    why am i not surprised? my main autocad file has passed 26 mb and counting.
     
  3. Mauricio Solid

    Builder

    Joined:
    Feb 17, 2015
    Messages:
    30
    Likes Received:
    12
    Yeah, they are more complex files and more detailed pieces, I'm really want to share my files and designs in Solidworks but the entire folder is like 600mb, the entire openbuilds catalogue is around 200mb.
     
  4. Val Cocora

    Val Cocora Well-Known
    Builder

    Joined:
    May 19, 2014
    Messages:
    172
    Likes Received:
    28
    then I should consider myself lucky...
     
  5. Val Cocora

    Val Cocora Well-Known
    Builder

    Joined:
    May 19, 2014
    Messages:
    172
    Likes Received:
    28
    Hi Arion,

    Just my two cents here, have you considered using a Flexdrive?
     
  6. brbubba

    brbubba New
    Builder

    Joined:
    Dec 2, 2014
    Messages:
    22
    Likes Received:
    5
    Did you use PFA or PTFE for the tube???
     
  7. Selvakumaran

    Builder

    Joined:
    Mar 22, 2015
    Messages:
    15
    Likes Received:
    0
    Why cant we use direct drive? With the rigid build, the weight of the motor maynot be an issue.. This will reduces the problem of lengthy bowden tube, also we can print flexible materials also.

    Am I right?
     
  8. Arion

    Arion New
    Builder

    Joined:
    Jul 2, 2015
    Messages:
    2
    Likes Received:
    0
    @valde not very familiar with the technicalities of flexdrive. Looks like a dremel flex shaft, buy how easy to implement on a printer, not my field.
    @brbubba using PTFE 2.0mm inner diameter.
    @Selvakumaran i've been thinking about this, probably lower the speeds of printing to obtain smoothness. Tomorrow the big decision with the client. Lets pray.
     
  9. nexttoone

    nexttoone New
    Builder

    Joined:
    Jul 24, 2015
    Messages:
    5
    Likes Received:
    0
    Hello everyone! After months of planning and build I finally have a functioning printer based off the Maximus. I still need to find a 35’’x35’’ sheet of metal to attach my silicone heater. I’m probably going to build a table for it as well, I’m tired of sitting on the floor to work on it. Feeding all of the wire through two cable chains each a meter long, was not fun.


    RAMBo control board
    E3D volcano
    X and Y should go up to 940mm build volume

    Any questions feel free to ask.
     

    Attached Files:

  10. Val Cocora

    Val Cocora Well-Known
    Builder

    Joined:
    May 19, 2014
    Messages:
    172
    Likes Received:
    28
    940 mm x 2 for x and y sounds great.
    how about z depth?
    judging from the pics, i'd say around 4-500 mm.
    please correct me if i'm wrong.
     
  11. nexttoone

    nexttoone New
    Builder

    Joined:
    Jul 24, 2015
    Messages:
    5
    Likes Received:
    0
    Yes, I used 500mm v-slot, but I can only use 250mm because of Y placement. I'm thinking of going even lower. :(

    I'm only printing at 30 mm/s but the hotend will get caught on the print and flex the Z axis while the carriage is moving causing the print to shift .

    Is anyone else having this problem? All of my belts and wheels are tight. I'm starting to think its just a design flaw.
     
  12. Val Cocora

    Val Cocora Well-Known
    Builder

    Joined:
    May 19, 2014
    Messages:
    172
    Likes Received:
    28
    that is why i asked the question.
    it seems the vertical (port extruder) z axis can only go so deep.
    it is hard to use a long pencil for writing when you hold it by the top end.
     
  13. nexttoone

    nexttoone New
    Builder

    Joined:
    Jul 24, 2015
    Messages:
    5
    Likes Received:
    0
    I figured that was the case. Lucky it’s easy to adjust and the reason I built the printer was to print something that is no higher than 9cm. So its not an issue.

    Thanks for the Help.
     
  14. Val Cocora

    Val Cocora Well-Known
    Builder

    Joined:
    May 19, 2014
    Messages:
    172
    Likes Received:
    28
    no problem, that's what this forum is for. i've been thinking, from the pictures, it looks like your z axis is a 20x60 v slot, with the 60 mm side against the horizontal cross rail.
    have you considered using a 40x40 v slot rail? the fact that its section is the same along x and y direction, greatly improves its behaviour while in motion, due to the inertia moments Ix and Iy being the same.
     
  15. Fixer

    Fixer New
    Builder

    Joined:
    Dec 29, 2015
    Messages:
    2
    Likes Received:
    0
    Do you have a dimensioned drawing of the hotend support?
     
  16. nexttoone

    nexttoone New
    Builder

    Joined:
    Jul 24, 2015
    Messages:
    5
    Likes Received:
    0
    No, it didn’t even occur to me that a 40x40 rail might help out. I have one on order now. All of my shifting was in the Y axis, so that should help greatly. Thanks for the suggestion.

    If you’re referring to mine, sorry I do not. I modeled it in Cinema 4D with polygons.
     
  17. Fixer

    Fixer New
    Builder

    Joined:
    Dec 29, 2015
    Messages:
    2
    Likes Received:
    0
    Sorry, no I was meaning OP/Author.
     
  18. Val Cocora

    Val Cocora Well-Known
    Builder

    Joined:
    May 19, 2014
    Messages:
    172
    Likes Received:
    28
    @ nexttoone:

    please be advised, there might be a trade off in terms of speed, since a 40x40 is somewhat heavier than a 20x40.
    also, from the looks of it, you will have to modify the extruder mounting at the bottom of the z bar, and rethink the lead screw end supports to accommodate the 40x40.
     
  19. nexttoone

    nexttoone New
    Builder

    Joined:
    Jul 24, 2015
    Messages:
    5
    Likes Received:
    0
    I was surprised, to see the 40x40 fit in without having to modify anything when I inserted it into the 3d model of my printer. It arrived, threw it on no problems, but that did not solve my Y axis shifting. I discovered that along with my travel speed, my acceleration settings in Marlin were too high. Too much weight to be throwing around.


    I’ll have to wait until spring to paint it but finally had the time to build a stand.
     

    Attached Files:

  20. Mariano79

    Mariano79 New
    Builder

    Joined:
    Oct 12, 2015
    Messages:
    9
    Likes Received:
    0
    Hello, Angelo.
    Im planning something similar, combine CNC router and 3d printer using a modified C-Beam. What are your ideas? Im interested.
    Thank you
     
  21. Val Cocora

    Val Cocora Well-Known
    Builder

    Joined:
    May 19, 2014
    Messages:
    172
    Likes Received:
    28
    you mention this y axis shifting. i assume your y axis would be the two perimeter rails where the two gantry plates roll, as seen in your last picture. if my assumption is correct, i believe i might have an explanation. please see attached picture called twisting at x axis , it might help explain the shifting momentum along the two parallel y axis, due to a small base stance of the gantry plates with respect to the length of the x axis, which, again, i assume would be the cross rail supporting the vertical, port extruder bar, which you replaced recently. if you look at the schematics attached (you might have to rotate the picture) you will understand why a narrow gantry plate will lead to a poor alignment, when used in conjunction with a long connecting rail. the solution would be increasing the 'sitting' of the wheel base along the y axis, so as to prevent this twisting momentum, or shifting, as you call it. i thought about the possibility of this happening during the design of my own printer, and the way i decided to counter it was by using an extra arm, parallel to the main y axis, which contains two wheels rolling on an additional rail. please have a look at the other file attached, carriage reinforcement, where the gantry plate is shown with the rail removed for clarity, but behind it you can see the extra arm mentioned above, and the adjacent reinforcing rail. the reason i went with this parallel solution is that, had i used the same spacing on the main y axis, the travel along said axis would have been drastically limited by the length of the extra arm, which is about one foot long from tip to tip. instead, by placing the extra arm parallel to the main y axis, i preserve the initial, intended travel distance along the y axis which translates into a larger printing area, and i get to reinforce it with a wheel system where the distance between the wheels is large enough so as to prevent the twisting and the loss of perpendicularity between the x axis and the y axis. back in the day, i hoped the steppers sync, one for each y axis, would be enough to keep the cross x axis perpendicular on the two perimeter y axis. i should have known better.
    again, i might be wrong in my initial assumption, in which case i will kindly ask you to disregard this post, but if i am right, from the looks of your picture, you could use something similar to counter this, because it seems to me you have enough room to add some reinforcing rails parallel to the two y axis in your machine.
     

    Attached Files:

  22. ErikBeck

    ErikBeck New
    Builder

    Joined:
    Dec 31, 2015
    Messages:
    5
    Likes Received:
    0
    Guys this is an awesome build! I'm thinking of using this as basis for a motion capture gantry I'm designing. Quick question: If I wanted to bump up to aNEMA 23 stepper to drive & acme screw for the Z axis (need more power as I'll have a small camera at the end of it) do you think a C-beam bundle would be better then the the V-slot nema 23 one? C-beam looks like it might weigh a bit less and is 20 bucks cheaper for the 1000mm. What do you guys think?
     
  23. Yaser MP. Feyli

    Builder

    Joined:
    Aug 4, 2016
    Messages:
    5
    Likes Received:
    0
    Hello,
    I have to say that you have done a awesome job, i give you that.
    Myself i a, looking to build a 3D printer with print area on 600X600X600, would you say i should get a BBP 1S board from Fastbot or do you recommend something ells? for this kind of big 3D printer do i need 4 pcs of heatbed as in the following link Silikon Heizmatte Heizbett – 12V - 300W - Heatbed 300 x 300mm - CNC / 3D Drucker
    may i ask how much money the frame kit costed you without the board and motors, PSU?
    Sincerly:
    Yaser MP. Feyli
     
  24. evilc66

    evilc66 Journeyman
    Builder

    Joined:
    Jan 9, 2015
    Messages:
    393
    Likes Received:
    154
    For the heater, I would talk to Keenovo. They make a ton of silicone heater mats of various sizes and will do custom orders too in whatever voltage you want (AC or DC). For the kind of power you are looking for, I would go with an AC heater with an SSR between it and the controller. Going 12v DC for something that powerful seems like a waste of time. 1200W (4 of the 300W mats) would require 100A at 12v DC (that's a big and expensive power supply). 1200W only requires 5.45A at 220V AC (no power supply required, just a simple solid state relay).
     
  25. Yaser MP. Feyli

    Builder

    Joined:
    Aug 4, 2016
    Messages:
    5
    Likes Received:
    0
    Thank you very much for your replay Sir/Ma'm!
    May i ask you, do you know if a Rambo Board is better or a BBP 1S? whitch is faster and reliable? and whitch extruder are durable and supports ABS / PLA / Flexible PLA /Wood / Nylon?
    P/S You guys are freaking awsome.
    Sincerly:
    Yaser MP. Feyli
     
  26. evilc66

    evilc66 Journeyman
    Builder

    Joined:
    Jan 9, 2015
    Messages:
    393
    Likes Received:
    154
    I don't have any direct experience with either board, but I would take a guess that the BBP 1S is leaps and bounds better due to the 32-bit ARM processor compared to the 8-bit AVR. The Rambo board is basically an Arduino Mega 2560 and a Ramps 1.4 board rolled into one, but without the removable drivers. Plus, the BBP 1S has more available stepper channels, and more expansion (if that's important to you). Now, the firmware for that board is an unknown, so that could make potentially good hardware terrible once put in use.

    As for extruders, I have been using a Bulldog XL from Reprap Discount, and it works really well. I haven't tried exotic filaments yet, but PLA and ABS work just fine. Never had any slipping issues, and it can be configured for direct drive or bowden. It's not light though, being all aluminum. If you are going to use flexible filaments, then direct drive is what you really should use.
     
  27. Yaser MP. Feyli

    Builder

    Joined:
    Aug 4, 2016
    Messages:
    5
    Likes Received:
    0
    Thanks alot for all the feedback,
    I am sorry but i really have to ask you, whitch Nema steper Motors would you recommend for large printer that has a heat pad that is Size: 990mm x 990mm?
    thought about ge a Keenovo Silicone Heater Size: 990mm x 990mm Power: 3500W@ 230V Accessories: 1) 2m power wire 2) 3M adhesive backing 3) Integrated Digital controller for 630U$D.
    best and kindest regards
     
  28. Yaser MP. Feyli

    Builder

    Joined:
    Aug 4, 2016
    Messages:
    5
    Likes Received:
    0
    how many pcs of NEMA 23 150 0z would you say that i need for my build? and how big power supply in 220 volt 50Hz is requierd for the BBP 1S and the Nema 23 + motors and the Keenovo Silicone Heater Size: 990mm x 990mm Power: 3500W@ 230V with Dual Bulldog XL extruder, some LED strip and webcam?
    P/S Got a link for a website that shipps this Nema 23 motors international?
    Sincerly:
    Yaser MP. Feyli
     
    #88 Yaser MP. Feyli, Aug 8, 2016
    Last edited: Aug 8, 2016
  29. Yaser MP. Feyli

    Builder

    Joined:
    Aug 4, 2016
    Messages:
    5
    Likes Received:
    0
    Thank you JustinTime, you have been very awsome.
     

Share This Page

  1. This site uses cookies to help personalise content, tailor your experience and to keep you logged in if you register.
    By continuing to use this site, you are consenting to our use of cookies.
    Dismiss Notice