Welcome to Our Community

Some features disabled for guests. Register Today.

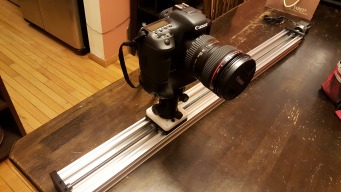
C-beam Camera slider

Discussion in 'Other Builds' started by snokid, Nov 15, 2015.

  1. snokid

    snokid Journeyman
    Builder

    Joined:
    Oct 11, 2014
    Messages:
    335
    Likes Received:
    104
    snokid published a new build:

    Read more about this build...
     
  2. snokid

    snokid Journeyman
    Builder

    Joined:
    Oct 11, 2014
    Messages:
    335
    Likes Received:
    104
    getting closer figured I would post my progress so far.
     
  3. snokid

    snokid Journeyman
    Builder

    Joined:
    Oct 11, 2014
    Messages:
    335
    Likes Received:
    104
    working, had to use a relay board to show camera firing, I don't have short enough bolts for the legs....

     
    #4 snokid, Nov 15, 2015
    Last edited: Dec 16, 2015
  4. Mark Carew

    Mark Carew OpenBuilds Team
    Staff Member Moderator Builder Resident Builder

    Joined:
    Jun 28, 2013
    Messages:
    2,758
    Likes Received:
    2,440
    Well done @snokid :thumbsup:
    Looking forward to how you interfaced the electronics.
    Thank you for sharing
     
  5. silopolis

    silopolis New
    Builder

    Joined:
    Jul 6, 2015
    Messages:
    20
    Likes Received:
    3
    Same as @Mark Carew , very nice one and hardly waiting to know more about the electronics/code !
    Thanks
     
  6. Marcel Valcarce

    Builder

    Joined:
    Jun 15, 2015
    Messages:
    12
    Likes Received:
    1
    Thanks for sharing your build. I am planning on building something very similar, but I want to use 1.5 meter C-Beam to get more travel distance. Sadly that is out of stock so I may have to wait for a while.
     
  7. snokid

    snokid Journeyman
    Builder

    Joined:
    Oct 11, 2014
    Messages:
    335
    Likes Received:
    104
    silopolis and Rick 2.0 like this.
  8. snokid

    snokid Journeyman
    Builder

    Joined:
    Oct 11, 2014
    Messages:
    335
    Likes Received:
    104
    how to wire the board.
    pretty standard....

    stepper and power easy...
    pin 53 is the pin that goes from 0v to +5v as the Arduino tells the camera to fire.

    so if you want to do a relay you need a 5v relay, black wire and white wire go to the coil side of the relay, then you connect the switch side of the relay to the plug that trips your camera

    if you want to do a npn transistor then the white wire goes thru a resistor to the b-pin black wire goes to the e-pin and also the gnd pin of your camera, then a wire from the shutter plug on camera goes to the c-pin on the transistor....
    pictures should help....
     

    Attached Files:

    #9 snokid, Dec 9, 2015
    Last edited: Dec 9, 2015
    silopolis likes this.
  9. snokid

    snokid Journeyman
    Builder

    Joined:
    Oct 11, 2014
    Messages:
    335
    Likes Received:
    104
    last way and the safest.
    opto-isolator there is no connection at all to your camera, so if something goes hair wire your camera survives....
    same as the transistor wiring but have to add +5v to the opto to power the led

    clear as mud huh?

    LOL
    Bob
     

    Attached Files:

    • opto.jpg
      opto.jpg
      File size:
      68.7 KB
      Views:
      106
    silopolis likes this.
  10. Marcel Valcarce

    Builder

    Joined:
    Jun 15, 2015
    Messages:
    12
    Likes Received:
    1
    Snokid, what kind of speed does the slider have if you are using it for video rather than time lapse. Wondering how long it takes to traverse the length of the slider at full speed?
     
  11. snokid

    snokid Journeyman
    Builder

    Joined:
    Oct 11, 2014
    Messages:
    335
    Likes Received:
    104
    Marcel, I haven't had a chance to try that, but that is going to depend on voltage and the motor controller.
    Give me a week or two and I will find out. I just got home from the hospital I had hernia surgery today. Doing good but camera slider isn't high on my list right now!!!

    I don't know if it's smooth enough for video, at 1 meter there will be some whip in the lead screw. If you are only looking for video I think running it off a belt would be better.
    I wanted the lead screw/stepper combo so that if the camera is traveling up hill it will move the same amount each time. Running it off a dc motor you get different speeds depending on how level the slider is.

    stay tuned more to come!!!
     
  12. Marcel Valcarce

    Builder

    Joined:
    Jun 15, 2015
    Messages:
    12
    Likes Received:
    1
    Snokid, sorry to hear about your surgery. I had hernia surgery when I was 3 years old (not sure how or why) but I don't remember any of it. I do remember the long scar across my abdomen although it faded away long ago. Anyway take your time to heal up. The store won't have 1000mm C-Beam for a week or two so I am in a holding pattern trying to plan out what I want.

    It does seem that belt is better for video use (faster smoother) and screw better for time-lapse or motion control (more exact). I am now imagining a C-Beam with a lead screw as usual, but also a belt system running down the other side. 2 motors and a carriage on either side. Perhaps the 2 carriages could even be run at the same time (not sure why though).

    Another consideration is where to place the motors and electronics. For now I will be going with the simple C-Beam with motor at one end setup from the kit. But there is something to be said for mounting it all to the carriage plate so that camera shutter activation can be be controlled from the same electronics (not as important for video use but very important for time lapse etc.). But the added components then require a larger plate and more weight
    to an already heavy load (running a 6D & 300mm lens).

    That is yet another consideration I have which how to add support for a long lens.

    Also considering going with 3 wheels per side for added lateral support (so I imagine) but I wonder if there is a downside to that eg. more friction requires more power to move the carriage.

    Sorry for the rambling post, maybe it will take your mind off other things!
     
  13. snokid

    snokid Journeyman
    Builder

    Joined:
    Oct 11, 2014
    Messages:
    335
    Likes Received:
    104
    thank you....
    I can tell you that the way it's set up now, it will lift the 7dmkii and the 24-105 plus grip batteries really right stuff bracket and strap. no problems seems the same level or straight up and down. That was running on a 13.8v power supply.
    I'm mounting the electronics in a box and plugging in the stepper with a 4 pin mic plug, small 1/8" phono jack for the camera trigger and the battery (small 12v gel cell)
    as soon as I'm able to I will run the stepper quicker and film and post it here.... I also want a video slider so I want it to work also....
    Bob
     
  14. Rob Taylor

    Rob Taylor Master
    Builder

    Joined:
    Dec 15, 2013
    Messages:
    1,470
    Likes Received:
    749
    You should be able to step the motor at 2ms pulses, which, assuming that's an 8x8 screw, should give 2.5rev/s or 20mm/s. That's not quick, given that with a belt you can do 100mm/s without too much issue. On the other hand, you generally don't want video motion to be all that rapid anyway, so it may do fine for some common slider purposes (like establishing shots).

    Edit: Also, I didn't look to see how much Mrinabh modified my code other than to switch from char display to TFT, but the list of improvements is on the original .ino here: SliderCam/SliderCam_v0_2.ino at master · RobTC/SliderCam · GitHub - With any luck, he already improved some of the math, but I'm not sure.
     
    #15 Rob Taylor, Dec 15, 2015
    Last edited: Dec 15, 2015
  15. snokid

    snokid Journeyman
    Builder

    Joined:
    Oct 11, 2014
    Messages:
    335
    Likes Received:
    104
    Thanks Rob.
    What I was thinking would be a better solution for video motion would be to replace the stepper with a dc motor with a quick change connection something like this.

    CNC Stepper Motor Lovejoy Coupling 5/16" X 1/2"+spider

    Still think the screw will give problems though.
     
  16. Rob Taylor

    Rob Taylor Master
    Builder

    Joined:
    Dec 15, 2013
    Messages:
    1,470
    Likes Received:
    749
    That and an H-bridge would be a better plan, yeah. But you're gonna run into whipping at higher feeds, for sure. Maybe add a removable support bushing at the halfway point and just have a "smaller" video slider?
     
  17. snokid

    snokid Journeyman
    Builder

    Joined:
    Oct 11, 2014
    Messages:
    335
    Likes Received:
    104

    Attached Files:

  18. snokid

    snokid Journeyman
    Builder

    Joined:
    Oct 11, 2014
    Messages:
    335
    Likes Received:
    104
    coverplate.jpg
    coverplatebare.jpg coverplate.jpg getting much closer
    cut the cover plate with my c-beam machine no problems
    should be done soon....
     

    Attached Files:

  19. snokid

    snokid Journeyman
    Builder

    Joined:
    Oct 11, 2014
    Messages:
    335
    Likes Received:
    104
    since my next post should be a all finished project, I figured I would post a parts list....on most of this stuff if you search ebay you will find what I bought...
    1000mm c-beam - C-Beam™ Linear Actuator Bundle with stepper motor
    Slider supports - 1ZAG8 Sheet, HDPE, White, 1/4 In T, 12 x 12 In
    Ball head mount - 1ZAG8 Sheet, HDPE, White, 1/4 In T, 12 x 12 In
    Ball head - BK-03 Camera Tripod Ball Head Ball head w/ Quick Release Plate 1/4" Screw US R4KT
    Battery - 12V 5AH Replaces Universal Battery UB1245 & UB1250
    Arduino 2560 board - ATMEGA16U2-MU Board for 2012 Arduino MEGA2560 R3 Development Board Module
    Arduino relay - DC 5V Relay Module 1-Channel Expansion Single Board for Arduino
    Camera trigger plug to camera body - 2.5mm Camera Remote Cable 3C for Canon DSLR Camera 7D 5D Mark III 5D
    Camera trigger cord - 6FT 2.5mm Stereo Extension Cable Cord Male Female Audio
    Camera trigger plug - 2.5mm Mini Female Headphone Jack Plug Stereo Audio Panel Mount
    Stepper plug - 4 Pin Round Microphone connector
    Stepper connector - 4 Pin Male Chassis Mount Mic
    Power switch - Sub-Miniature SPST Toggle Switches 2 Position ON-OFF
    Battery charge jack - DC Power Jack 2.1mm Panel Mount Bulkhead
    Stepper motor driver - SEEED STUDIO MOTOR SHIELD ADD ON FOR ARDUINO- 2760383
    TFT lcd Screen - SEEED STUDIO TFT TOUCH SHIELD V2.0 2.8 INCH ADD ON FOR ARDUINO-2760382
    arduino relay.jpg arduino.jpg ballhead.jpg battery.jpg camera trigger adaptor.jpg camera trigger cord.jpg Cbeam_Actuator__88133.1427316832.1280.1280.png charge jack.jpg stepper bulkhead.jpg stepper plug.jpg switch.jpg

    seeedstudio motor.jpg seeedstudio tft.jpg arduino relay.jpg arduino.jpg ballhead.jpg battery.jpg camera trigger adaptor.jpg camera trigger cord.jpg Cbeam_Actuator__88133.1427316832.1280.1280.png charge jack.jpg stepper bulkhead.jpg stepper plug.jpg switch.jpg
     
    #20 snokid, Jan 14, 2016
    Last edited: Jan 14, 2016

Share This Page

  1. This site uses cookies to help personalise content, tailor your experience and to keep you logged in if you register.
    By continuing to use this site, you are consenting to our use of cookies.
    Dismiss Notice