Welcome to Our Community

Some features disabled for guests. Register Today.

Moag's CNC Mill

Discussion in 'CNC Mills/Routers' started by Moag, May 9, 2016.

  1. Moag

    Moag Veteran
    Staff Member Builder Resident Builder

    Joined:
    Mar 16, 2016
    Messages:
    183
    Likes Received:
    295
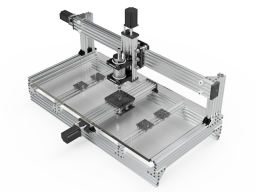
    Some more renders with all new design changes. Design@2 v4-1.png Design@2 v4.png Design@2 v5.png Design@2 v7.png Design@2 v9.png Design@2 v10.png Design@2 v11.png
     
    Paul Stoller and swohnrade like this.
  2. Rick 2.0

    Rick 2.0 OpenBuilds Team
    Staff Member Moderator Builder Resident Builder

    Joined:
    Dec 20, 2013
    Messages:
    2,892
    Likes Received:
    1,551
    Nice work. The only thing I can suggest would be moving the Y-axis rails inward 40-50 mm to reduce the span of the main plate. This will help reduce flex in the plate and make it a bit more balanced.
     
  3. GrayUK

    GrayUK Openbuilds Team Elder
    Staff Member Moderator Builder

    Joined:
    May 5, 2014
    Messages:
    1,668
    Likes Received:
    627
    Well that's about it then! :thumbsup:
    You've saved me hours of SketchUp torture!! I am very obliged. :)
    Well done. :thumbsup:
    Have you finished the BOM for this?

    Gray
     
    Paul Stoller likes this.
  4. Moag

    Moag Veteran
    Staff Member Builder Resident Builder

    Joined:
    Mar 16, 2016
    Messages:
    183
    Likes Received:
    295
    Thanks Rick. Y-axis rails moved 50mm towards the centre and is looking much more balanced and strong.

    Design@2 v15.png
     
  5. Moag

    Moag Veteran
    Staff Member Builder Resident Builder

    Joined:
    Mar 16, 2016
    Messages:
    183
    Likes Received:
    295
    Glad to help out Gray. I will revisit the BOM in the next couple of days and count up all the nuts and bolts. I will post it here when that's finished.

    Design isn't finished yet, well stage one is, I still need to design the improvements or more like the bits it's can make for it self.

    1. Side Guards / Braces, to keep some of the chips at bay and add strength. Move the two(4) 90 degree plates to the inside.
    2. New End Plates for the X&Y axis, to put the 8mm Acme Lead Screws under tension instead of compression, extra support for the Stepper Motors.
    3. New Top End Plate for Z, to fit a reduction belt and bring a bit of the weight towards to back.
    4. And no doubt some cable management stuff, switches, enclosures to contain the scary blue smoke.
     
    Lee Pinney and GrayUK like this.
  6. GrayUK

    GrayUK Openbuilds Team Elder
    Staff Member Moderator Builder

    Joined:
    May 5, 2014
    Messages:
    1,668
    Likes Received:
    627
    Excellent job. :thumbsup:
    I've Bookmarked this page, so there is no risk of losing it! :)
    Well Done
     
    Lee Pinney and Paul Stoller like this.
  7. Moag

    Moag Veteran
    Staff Member Builder Resident Builder

    Joined:
    Mar 16, 2016
    Messages:
    183
    Likes Received:
    295
    Cheers @GrayUK. Finished design for the Side Guards / Braces. Think I will use 6mm thick Perplex mounted with 10mm M5 low profile screws recessed down 2mm. Changed my mind from having them on the outside and brought them to the inside, so I don't have to move the 90 degree plates. Had to add some conical curves for looks;)

    Design@2 v17.png
     
  8. GrayUK

    GrayUK Openbuilds Team Elder
    Staff Member Moderator Builder

    Joined:
    May 5, 2014
    Messages:
    1,668
    Likes Received:
    627
    Is that thick piece of Perspex going to be your actual bed, or are you going to use the MDF as your replaceable bed?
    Personally I would use replaceable beds, because they are going to get chewed up quite a bit, certainly in the early trial days.
     
  9. Rick 2.0

    Rick 2.0 OpenBuilds Team
    Staff Member Moderator Builder Resident Builder

    Joined:
    Dec 20, 2013
    Messages:
    2,892
    Likes Received:
    1,551
    Elliptical maybe? Or even hyperbolic or logarithmic? ;) Those certainly are not conical.
     
  10. Moag

    Moag Veteran
    Staff Member Builder Resident Builder

    Joined:
    Mar 16, 2016
    Messages:
    183
    Likes Received:
    295
    Haha its a Fusion 360 thing. Just their name for one of the sketch buttons that makes the curve in their program;)
     
  11. Moag

    Moag Veteran
    Staff Member Builder Resident Builder

    Joined:
    Mar 16, 2016
    Messages:
    183
    Likes Received:
    295
    Don't know yet Gray. It would be a little cheaper then Aluminium. More then likely more stable then MDF, especially around coolants/lubricants from a mist system. So optional.
     
  12. Moag

    Moag Veteran
    Staff Member Builder Resident Builder

    Joined:
    Mar 16, 2016
    Messages:
    183
    Likes Received:
    295
  13. Paul Stoller

    Paul Stoller Journeyman
    Builder

    Joined:
    Feb 28, 2016
    Messages:
    157
    Likes Received:
    107
    Wow, that looks super solid with those new plates, nice job!!
     
  14. Moag

    Moag Veteran
    Staff Member Builder Resident Builder

    Joined:
    Mar 16, 2016
    Messages:
    183
    Likes Received:
    295
    Cheers Paul. It gives it a kind of "Bauhaus" feel to it.

    "Form Follows Function" or something like that..
     
  15. Moag

    Moag Veteran
    Staff Member Builder Resident Builder

    Joined:
    Mar 16, 2016
    Messages:
    183
    Likes Received:
    295
    Four more plates, two wheels and a 960mm length of 40x40mm V-Slot across the back, feeling happy how the design is coming along so far. Thank you all for the input with the design. :thumbsup: Design@2 v24-1.png Design@2 v27.png
     
    Lee Pinney and GrayUK like this.
  16. Bad Sequel

    Bad Sequel Well-Known
    Builder

    Joined:
    Aug 19, 2015
    Messages:
    83
    Likes Received:
    32
    Love the design!
     
    Moag and Paul Stoller like this.
  17. Badger

    Badger New
    Builder

    Joined:
    Sep 17, 2014
    Messages:
    5
    Likes Received:
    7
    This latest design with the improved brackets is possibly the best design I've ever seen. I'd love to see all the parts available in the part store or as a kit. I think the newer, bigger,thicker gantry plates are also a great addition and will take projects to the next level or strength and precision. Thanks for sharing.
     
    Moag, GrayUK and Paul Stoller like this.
  18. GrayUK

    GrayUK Openbuilds Team Elder
    Staff Member Moderator Builder

    Joined:
    May 5, 2014
    Messages:
    1,668
    Likes Received:
    627
    You have considered the fine art of lining up all those Bolts with the Tee Nuts I suppose? :rolleyes:

    There's an awful lot of them! :banghead:
     
    Metalguru likes this.
  19. Paul Stoller

    Paul Stoller Journeyman
    Builder

    Joined:
    Feb 28, 2016
    Messages:
    157
    Likes Received:
    107
    That's where some of these would come in handy. Perhaps not for all of them given the cost, but in the more difficult spots I bet they would come in handy.

    Spring Loaded Tee Nuts
     
  20. GrayUK

    GrayUK Openbuilds Team Elder
    Staff Member Moderator Builder

    Joined:
    May 5, 2014
    Messages:
    1,668
    Likes Received:
    627
    Gonna need loads!!! :jawdrop:
    And they ain't cheap! :banghead:
    Cost you more for the Tee Nuts, than your spindle! :D:D:D
     
    Metalguru and Paul Stoller like this.
  21. Paul Stoller

    Paul Stoller Journeyman
    Builder

    Joined:
    Feb 28, 2016
    Messages:
    157
    Likes Received:
    107
    I suppose I would try to put the bolts through the plates and put the t-nuts on first where possible, still not a walk in the park with so many, but easier that trying to line up the t-nuts in the slot accurately enough.
     
  22. GrayUK

    GrayUK Openbuilds Team Elder
    Staff Member Moderator Builder

    Joined:
    May 5, 2014
    Messages:
    1,668
    Likes Received:
    627
    Indeed. :)
     
    Paul Stoller likes this.
  23. Joe Santarsiero

    Joe Santarsiero OB addict
    Staff Member Moderator Builder

    Joined:
    Oct 30, 2014
    Messages:
    902
    Likes Received:
    196
    I'm confused about what's X an Y here! ;)
     
  24. Joe Santarsiero

    Joe Santarsiero OB addict
    Staff Member Moderator Builder

    Joined:
    Oct 30, 2014
    Messages:
    902
    Likes Received:
    196
    Put a shield in the back too.
    If you want to butt this up against a wall then return the motors to the front. Then maybe use the back wall as the back shield. :D
    Great build overall!

    Joe
     
  25. Rick 2.0

    Rick 2.0 OpenBuilds Team
    Staff Member Moderator Builder Resident Builder

    Joined:
    Dec 20, 2013
    Messages:
    2,892
    Likes Received:
    1,551
    David's comment referenced the first iteration of the design.

    [​IMG]
     
  26. Barry Danks

    Barry Danks Well-Known
    Builder

    Joined:
    Apr 21, 2016
    Messages:
    113
    Likes Received:
    36
    Exactly what I was going to comment on
     
  27. Barry Danks

    Barry Danks Well-Known
    Builder

    Joined:
    Apr 21, 2016
    Messages:
    113
    Likes Received:
    36
    Mark I'd stay with the same design as the original except make the Y out 750mm C Beam ;) ;just my .02
     
    Mark Carew likes this.
  28. Moag

    Moag Veteran
    Staff Member Builder Resident Builder

    Joined:
    Mar 16, 2016
    Messages:
    183
    Likes Received:
    295
    :ROFL:Yep, the stuff of nightmares! Thinking of using some thick aluminium wire with a small magnet stuck to the end:rolleyes:. Though there's a real danger of looking like a demented Chimp extracting termites with a grass stem and some spit!
     
  29. Moag

    Moag Veteran
    Staff Member Builder Resident Builder

    Joined:
    Mar 16, 2016
    Messages:
    183
    Likes Received:
    295
    @Joe Santarsiero , @Rick 2.0; Being a newbie to all this CNC stuff! Here's a picture of where I think home is on this machine.

    Design@2 v30.png
    Sorry about my limited understanding and please correct me if I'm wrong.

    X & Y positive, moves into the spoil board from this point.
    Positive Z goes up.
    X is the movement across the top beam.
    Y is the movement of the table back and forward.
    Z is the movement of the spindle, up and down.
     
    #59 Moag, May 14, 2016
    Last edited: May 14, 2016
    GrayUK and Joe Santarsiero like this.
  30. Moag

    Moag Veteran
    Staff Member Builder Resident Builder

    Joined:
    Mar 16, 2016
    Messages:
    183
    Likes Received:
    295
    @Joe Santarsiero, as to using the back wall as a shield, I guess you could, just as long as the movement of the table is taken into account. It moving about 155mm front and back.
    Here's a picture of a kind of idea to help contain the chips, using some heavy clear vinyl sheet (stuff they use for table cloth and tent windows) strung from some 16mm aluminium tubing, located in notches front and back of the perplex sides. the other ends clamped down under the marine sail track, front and back of the spoil board. Sorry can't work out a way to draw it with Fusion 360, so you will have to use your imagination a little. Design@2 v32.png
    Design@2 v32-01.png
     

Share This Page

  1. This site uses cookies to help personalise content, tailor your experience and to keep you logged in if you register.
    By continuing to use this site, you are consenting to our use of cookies.
    Dismiss Notice