Welcome to Our Community

Some features disabled for guests. Register Today.

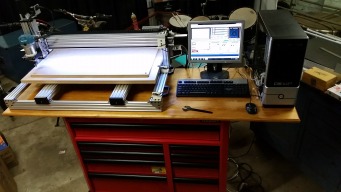
"The Moagie Mill" My C-Beam X Large

Discussion in 'CNC Mills/Routers' started by Glenn Weston, Aug 28, 2016.

  1. Glenn Weston

    Glenn Weston Journeyman
    Builder

    Joined:
    Aug 1, 2016
    Messages:
    91
    Likes Received:
    150
    Glenn Weston published a new build:

    Read more about this build...
     
    dreys and GrayUK like this.
  2. Moag

    Moag Veteran
    Staff Member Builder Resident Builder

    Joined:
    Mar 16, 2016
    Messages:
    183
    Likes Received:
    295
    Thanks, buddy... and some great advice mate. Hope it goes together well.;):thumbsup:
     
    Glenn Weston likes this.
  3. Glenn Weston

    Glenn Weston Journeyman
    Builder

    Joined:
    Aug 1, 2016
    Messages:
    91
    Likes Received:
    150
    Thanks Craig, thanks again for your excellent build instructions and all the effort you have put into your design for the community. I am having a lot of fun so far !!

    Glenn.
     
  4. MaryD

    MaryD OpenBuilds Team

    Joined:
    Apr 13, 2016
    Messages:
    649
    Likes Received:
    639
    Glenn, if you have a chance, you may want to tune into the C-Beam XLarge LIVE BUILD stream on your computer this week. Archive will also be available for a limited time after the show.


    KirkwoodWorking LIVE STREAM

    Live Build Begins Tuesday August 30 @ 8:30PM Eastern Time.
    Will run 2 - 3 hrs each night and continue the next night until complete.

    Link: Twitch

    Twitter: @kirkwoodworking
     
  5. GrayUK

    GrayUK Openbuilds Team Elder
    Staff Member Moderator Builder

    Joined:
    May 5, 2014
    Messages:
    1,668
    Likes Received:
    627
    Won't be able to get it live, but really hope I can download it later.
    Something for me to archive. :thumbsup:
    Gray
     
    MaryD likes this.
  6. Glenn Weston

    Glenn Weston Journeyman
    Builder

    Joined:
    Aug 1, 2016
    Messages:
    91
    Likes Received:
    150
    Thanks Mary , I am hoping to catch this for sure as it will sure help.

    Cheers Glenn.
     
  7. bnbellis3377

    Builder

    Joined:
    Apr 12, 2016
    Messages:
    31
    Likes Received:
    6
    Hi Glenn
    Nice build so far hope you keep posting on it,I built the cbeam and really enjoy using it. I'm currently gathering parts and pieces for another build somewhere in the 4'x6' cut area and maybe double as a plasma and router table. The fab was the easy part for me my computer skills are pretty limited but I'm learning on the cbeam, I'm currently using SketchUp and sketchucam but have been playing with artcam (free version). Again nice build and good luck with it Brian
     
  8. Glenn Weston

    Glenn Weston Journeyman
    Builder

    Joined:
    Aug 1, 2016
    Messages:
    91
    Likes Received:
    150
    Thankyou Brian.

    I am pretty much finished now with the mechanical build, I had three major set backs during the build.

    1) I only ordered 1 250mm C-Beams using the Bill of Materials and should have ordered 3.... I didnt triple check the order so my fault.

    2) I sourced the lead screws from a local supplier here in Australia but didnt realise their nominal supplied length is 20 ~ 30mm shorter than what openbuilds supllies, simply due to the fact they dont currently supply C-Beam or the thick C-Beam end plates so they don't account for it.
    This meant I had to cut my original 1010mm leadscrew to make 1 x 540mm and re-order a new 1040mm and another 540mm from openbuilds, the 300mm from the aussie supplier worked fine for the Z axes, as openbuilds would have been 290mm.
    I thought makerstore might offer a credit but they didnt, I didnt ask for one but did advise of my situation.... not to worry though this is how one learns to check and cross check things more thoroughly next time and it was certainly not makerstores fault either.
    It is something that as a first timer is very easy to overlook.

    3)In my second order with correct size lead screws and 250mm C- Beams I also ordered my 4 high torque Nema 23 motors but one of them was faulty from manufacture, the shaft was displaced by about 10mm and very hard to turn, it certainly wasnt damaged in transit either.
    But a quick PM to Mark to find out how to place a warranty claim and the parts team confirmed a new motor shipped out to me literally within 30Minutes of initial contact. The motor arrived here in Australia at my PO Box within 6 days of that email.

    I cannot speak more highly of openbuilds and the support they provide here and I am so happy I discovered this site only months ago. I can personally assure anyone contemplating ordering a kit or parts from this site that they have a commited team standing there ready to assist should they get stuck and can feel extremely confident when purchasing here.

    A very BIG Thankyou to Mark and the OpenBuilds Team, your support is outstanding, even from half way around the world.

    I have now got the new motor mounted and will be taking some more pictures, have been taking snaps along the way too and will update the build log when I get a moment.

    I purchased a Makita RT0700 today and have to make an adaptor to fit it the standard spindle mount. I will be using standard manual routing techiques to make an adaptor from MDF, then later I will make a new one from Aluminium on the XL once I have honed my CNC skills somewhat. I love they way these things can make parts for themselves..... A customer of mine who has a serious professional fully enclosed muti axes mill with coolant and all said to me once, "This machine here is the only thing in the world that can build itself".... I have never forgotton those words.

    I am expecting some electronics to arrive next week also.
    Then I will be jogging around for a few days until I get brave enough to cut something. For a newby I think jogging is a bit like an entree before the main course...LOL

    Anyhow will definately update the log with more pictures and hopefully some video.

    Cheers Glenn
     
    Dray oz, Synths, Aussie58 and 2 others like this.
  9. GrayUK

    GrayUK Openbuilds Team Elder
    Staff Member Moderator Builder

    Joined:
    May 5, 2014
    Messages:
    1,668
    Likes Received:
    627
    Glenn Weston.
    They are great words to read, for Mark and his Team. :D
    I'm sure they will be very grateful for such positive recommendations from yourself.
    Hope the next stage goes well for you, and soon the chips will fly! :)
    We shall all be waiting for your Update and Pictures.
    Full marks, and well done, to you too. :thumbsup::thumbsup:
    Gray
     
    Mark Carew likes this.
  10. Mark Carew

    Mark Carew OpenBuilds Team
    Staff Member Moderator Builder Resident Builder

    Joined:
    Jun 28, 2013
    Messages:
    2,758
    Likes Received:
    2,440
    Thank you so much for the kind words @Glenn Weston this means a so much to us. Its very uplifting to hear and makes us feel like we are doing the right thing. We will be sharing this positive feedback with the OpenBuilds Team at the next meeting :thumbsup:
    Keep up the great work my friend and thank you again
     
  11. Aussie58

    Aussie58 New
    Builder

    Joined:
    Aug 31, 2016
    Messages:
    10
    Likes Received:
    6
    Hey Glenn
    Keen to see your build make some mess. What electronics are you planning on using? I've gone with an Arduino package from an local supplier. Fingers crossed my XL 'kit' arrives in a day or so. Another Aussie builder from downunder takes on the challenge! Let's see how I go.
    cheers - Bill
     
    Dray oz and Moag like this.
  12. Glenn Weston

    Glenn Weston Journeyman
    Builder

    Joined:
    Aug 1, 2016
    Messages:
    91
    Likes Received:
    150
    Hi Bill,

    you will have a lot of fun and get some real satisfaction putting this kit together. Be sure things are squared up properly as you build and take your time.

    I didn't follow the build manual precisely as I was missing some bits here and there due to me mis ordering from the BOM but everything still came together really easilly so you shouldn't have any problems.

    I might suggest to file a flat spot on the lead screws so the grub screws on the collars screw in a bit further, I did have a little issue with them hitting the adjacent beams as they rotate, there is not much clearance there.... it will make more sense once you assemble yours, I recall Brady having the same issue during his live build but he didn't say what he did to fix the problem, I think he had an internet outage around that time of the build.

    I am going to give a GRBL shield a go with some DQ542's , so I will be using the shield as a breakout board to the DQ's....I was going to do the Gecko's but thought seeing as OB sell the DQ's they must be good, so am prepared to give them a go.

    If you are going GRBL with an Arduino solution you will need external drivers due to the fact the high torque motors need more current to run effeciently. Thats what I have read around the traps anyhow.

    Don't worry I will report how much mess I have made as soon as it happens !!
    Hopefully real soon as my electronics landed here this afternoon.

    Great to see another Aussie builder here too.
    Good Luck with it mate and be sure to post a build log so we can see your progress and help out if you have any questions.

    Cheers Glenn.
     
    #12 Glenn Weston, Oct 6, 2016
    Last edited: Oct 6, 2016
  13. Glenn Weston

    Glenn Weston Journeyman
    Builder

    Joined:
    Aug 1, 2016
    Messages:
    91
    Likes Received:
    150
    @Mark Carew, no problems Mark it is important to let others know when a business looks after their customers such as you have done... Cheers Glenn.
     
    Mark Carew likes this.
  14. Aussie58

    Aussie58 New
    Builder

    Joined:
    Aug 31, 2016
    Messages:
    10
    Likes Received:
    6
    Hey Glenn, I learn something every time I venture onto the forums. I now have to do some homework on using external drivers with the Arduino - first time I have heard this little snippet - many thanks. Cheers Bill (Sydney Region)
     
  15. Glenn Weston

    Glenn Weston Journeyman
    Builder

    Joined:
    Aug 1, 2016
    Messages:
    91
    Likes Received:
    150
    Hi Guys, just a quick check in to say my build took its first steps today..... I have been setting up the PC, wiring in the controllers and parallel breakout board (BOB). I got MACH3 up and running, and have been jogging all evening LOL.

    The grand finale ended in loading the "road runner" sample G-Code and doing a dummy job..... nothing less than spectacular.

    I did manage to crash the Y Axis once whilst setting up because I have not wired in limit switches just yet but I don't think any damage was done.

    I should have set the soft limits at the very start and it would not have happened.... but this is how you learn things.

    Have not had time to update the build but I will share all I can including MACH3 settings to help others.

    Cheers Glenn
     
    Mark Carew, Aussie58 and GrayUK like this.
  16. Mark Carew

    Mark Carew OpenBuilds Team
    Staff Member Moderator Builder Resident Builder

    Joined:
    Jun 28, 2013
    Messages:
    2,758
    Likes Received:
    2,440
    Congratulations on the first steps @Glenn Weston now the fun begins! :thumbsup:
     
  17. Glenn Weston

    Glenn Weston Journeyman
    Builder

    Joined:
    Aug 1, 2016
    Messages:
    91
    Likes Received:
    150
    Thanks Mark, it has been a really fun and satisfying project to build and looks like the fun just intensify's the further you move along.

    Next to do is build a simple pen adaptor and do some squigles and check/adjust calibration and accuracy.

    Cheers Glenn
     
  18. Moag

    Moag Veteran
    Staff Member Builder Resident Builder

    Joined:
    Mar 16, 2016
    Messages:
    183
    Likes Received:
    295
    G'Day Glenn, just checked how you're going with your build and it's looking great mate. Totally impressed with your ability to share your knowledge and tricks...:):thumbsup::thumbsup::thumbsup: Thanks mate.
     
  19. Glenn Weston

    Glenn Weston Journeyman
    Builder

    Joined:
    Aug 1, 2016
    Messages:
    91
    Likes Received:
    150
    Thanks @Moag,

    I Am currently fiddling and farting around with MACH3 on Windows 7 32Bit....I am really starting to feel, while MACH3 might have been the program to use in it's day back with Windows XP and is ETREMELY Versatile from a configuration/customisation perspective, I think there are better choices these days, but I did want to investigate MACH3 as I have mentioned elsewhere.

    I am having issues just trying to do a Pen Plot at the moment, I am getting plots OK but not perfect ones.
    Admittedly I am getting flex & movement in the pen holder, which I am finding difficult to perfect but I can also hear that the steppers are intermittently not running smoothly, I am 100% certain that MACH3 is being interfered with by background processes, I can also see this on the diagnostic screen. Just jogging, I can hear changes in the motor, sometimes even a consistent knocking like sound, that can be on all Axis too, so it's not the motors and not mechanical, other times it will jog smoothly.

    I have been reading many people actually go back to Windows XP and it works great. Although this is a step backwards I might do just that just to see if that really is the problem just out of curiosity.

    I am using Parallel as the BOB was thrown in with the Drivers as a freebee, Now I know why !!
    I believe purchasing an Ethernet Smooth Stepper will also fix the problem but I think I will try the XP route first and I still have the Arduino GRBL option sitting here untested.

    I am also waiting to see what OpenBuild's releases with this new Super Hyper Smoothie Controller that I might even WIN !!

    Anyhow I am not in any rush and the more I play, the more I learn... My Build log is a little behind but I will be keeping it updated, and will post all my thoughts on different things as I wade my way through all the hurdles.

    Cheers Glenn
     
  20. Moag

    Moag Veteran
    Staff Member Builder Resident Builder

    Joined:
    Mar 16, 2016
    Messages:
    183
    Likes Received:
    295
    Can't help you with anything Mach or Windows related as I went down a totally different path, Glenn. Though I think you will get there in the end mate, one step at a time.;)
    I'm using a Raspberry Pi 3 with a 7" touch screen running Jessie (Linux operating system) with bCNC controlling a smoothie board, which talks to the openbuilds external drivers running the high torque steppers. Nice neat little setup even if I'm a little biassed.
    Though the new Openbuilds controller sounds just like the ticket.;)

    Just added a little cheap USB bore camera which is way cool and are in the process of sorting out a touch probe.

    All I can suggest is RF interference for your stepper/window issues. Sorry I can't be of more help.

    Just added a edit with a couple of picks to tease you over to the "dark side";), where freedom is key.
     

    Attached Files:

    #20 Moag, Oct 30, 2016
    Last edited: Oct 31, 2016
    markinwi and Glenn Weston like this.
  21. Glenn Weston

    Glenn Weston Journeyman
    Builder

    Joined:
    Aug 1, 2016
    Messages:
    91
    Likes Received:
    150
    @Moag, Very Nice setup there... I like the camera Idea.

    I have Raspberry's here too, I am a PC Support Tech so I have lots of Technology surrounding me in the workshop and can experiment with different platforms at a whim, But I want to get something going rock solid first as I have not done this before.

    I am actually a Radio Tech by trade and fairly experienced with RF and interference problems, but have been involved with PC Technology since Mid 80's, yes IBM PC/AT era.

    I am running shielded cable from the BOB to the Drivers and have fitted RF Chokes to the Stepper Cables, I doubt that interference would be picked up on the driver output lines, I am running at 48V to the motors.
    The Most likely place any interference would take place is on the TTL (5V) lines on the driver input lines or in the drivers themselves on the low voltage side of things but they are fairly well shielded.

    I really think it's this clunky old MACH3, probably a bad choice to start off with but I have been learning a lot of CNC Jargon etc. by playing around with it and I am not the only one that has these issues, I have also read today that MACH3 and MACH4 round off square corners instead of actually following the cutting path, very much related to acceleration settings in the motor tuning area. I am feeling a little lost with it at the moment but I know it is all to do with settings/software and fine tuning and very much to be expected.

    As far as the actual table goes and the build, it seems pretty strong and rigid, I wouldn't like to get my arm or hand jammed between the table and the V-Slot base that's for sure.

    Cheers Glenn.
     
  22. Glenn Weston

    Glenn Weston Journeyman
    Builder

    Joined:
    Aug 1, 2016
    Messages:
    91
    Likes Received:
    150
    Here are some of my Pen Plots, Mostly dismal results but getting there.....

    I am not entirely sure of I can just rename .nc files to .tap files and load them up in MACH3 but it almost seems like if I take sample plots from the openbuilds forum like the Logo Attached here and rename them the results are worse. So I am not entirely sure if that is some of the source of my troubles too.

    20161031_224344.jpg

    You can see in the second plot here where I changed the motor acceleration and did a second plot where the outside corners of the plate are less rounded... Weird stuff this MACH3.. I thought it would just do what ever it is commanded to do by the G-Code... But not SO, it knows better !!

    20161031_224338.jpg


    This one is probably my best plot to date.....

    20161031_224416.jpg

    These ones were not too bad either, you would think that the Heart, being a sample file would have a symmetrical shape on both sides but it doesn't, it is flatter on the left side of the heart even on screen in the tool path window, what was the guy who supplied this as a sample thinking.

    20161031_224500.jpg

    This was my very first plot, I was pretty stoked to see this plot out.

    20161031_224526.jpg

    This was just last night and I was really disappointed, Something Very wrong here but I am not clear as to what it is on this one, it may be the acceleration issues in MACH3.
    This was one of the files I renamed from .nc to .tap


    20161031_224550.jpg

    You can also see that I moved from a Sharpie to a 0.7mm Ball Point Pen, the sharpie tip was starting to squash.

    Glenn.
     
    Aussie58 likes this.
  23. Glenn Weston

    Glenn Weston Journeyman
    Builder

    Joined:
    Aug 1, 2016
    Messages:
    91
    Likes Received:
    150
    I made a discovery playing around a bit last night.... MACH3/WIN7 with a Parallel port just SUCKS !!

    I had not really tried anything except fiddle with different settings in MACH3 and then try another run and just let the machine do its thing but what I discovered last night was that if I go to the tool path window and click around, zoom in and out I can hear the motors doing the clunk sounds as I am mousing around, so then I thought well what happens if I do something really stupid and open up Windows Control Panel while a Job is in progress.....

    Well that causes all sorts of Motor Sound changes, obviously the Pulse train is critically effected by even the slightest interruption to the program, and I don't care what anyone says, I reckon it is a poorly written program and not real good at all to be effected in such a way.

    Maybe the Author was utilising the Parallel port in such a way that was never intended using interrupts etc. and if these issues could not be overcome, then the program should never have been sold as a commercial piece of code due to it's inherent instability, anyhow that's my personal feelings and I am sure there are many people out there that will flame me for the above statement but if I were to produce a program with issues like that then I would not market it, if it is purely a printer port hardware issue/limitation, then drop the support for a printer port all together and only support what is stable.

    I am well aware of the Windows Guide to Optimisation of MACH3 but the lengths you have to go to are simply ridiculous in my opinion and you should not have to go to those lengths to make a program perform correctly for it's basic job.

    I suspect this would be causing lost steps and all sorts of problems.

    This means ANY background activity carried out by windows drivers or background processes will cause issues.
    This explains why I sometimes hear the motors run smooth and then not so smooth with funny little clunks, sometimes random and sometimes perfectly timed like a consistent knock, it actually sound like a mechanical fault at times, I also hear a different pitch/whine and then they come back to a nice steady correct sound again.

    I will give it one last chance and try a setup under XP, although this is going backwards as there is no XP support anymore, I would like to see if it has the same issues in XP just to satisfy myself.

    Glenn.
     
    Aussie58 likes this.
  24. Moag

    Moag Veteran
    Staff Member Builder Resident Builder

    Joined:
    Mar 16, 2016
    Messages:
    183
    Likes Received:
    295
    Wow that's some Weird Mach paths going on in those plotso_O...I think Machs drunk!
    Just for interest, what speed were they and what was your acceleration? if you don't mind me asking... oh to late I've already asked:rolleyes:

    I have no idea about mach, but I agree that they should be sorting out their bugs by now; they having been around long enough. At least some of the opensource stuff is looking ahead and evolving into some interesting directions. I'm interested to see how the next smoothieboard turns out, though I'm willing to wait for the moment while I get the basics under my belt with the more then capable first gen hackable board.;) You will get there Glen.

    Smoothieboard v2 progress update - Smoothie Project
     
  25. Glenn Weston

    Glenn Weston Journeyman
    Builder

    Joined:
    Aug 1, 2016
    Messages:
    91
    Likes Received:
    150
    Yes I could probably draw some of those plots better myself by hand after a few Bourbons.. LOL :ROFL:

    That new Smoothieboard sounds like the Duck's Nuts.

    I was playing around with all sorts of settings including scaling down the job too, So I cannot recall what settings I had, I feel like I am probably fiddling way too much and changing too many things at once but you have to try things or you don't learn.

    However today I got a pretty good plot of the OX Plate Pen example, as you can see I still have not perfected my pen holder and there is still some lateral movement causing the circles to look a little funny but good enough to see that things are working properly.
    I also did not have the pen down against the paper enough hence some missing lines but the plot looks like what it should this time.

    So yes I am getting there.

    This plot was Velocity 250mm/Min and Acceleration 6.25mm/sec/sec

    20161103_012817.jpg

    Here is my Pen holder that I am still trying to perfect, its just some 20mm and 16mm conduits, a spring and Electrical tape to jam the pen in snug, the 16mm conduit fits beautifully into the 20mm, some sanding was necessary and some talcon powder as a dry lube.

    20161103_014126.jpg

    20161103_015920.jpg

    The spring tension is something I am trying to get right.

    So the 16mm Conduit slides in and out of the 20mm conduit, the pen is jammed into the 16mm Conduit with electrical tape to make the pen just the right thickness to snug in there.
    There is a Spring inside the 20mm Joiner with the 20mm End cap at the top that works against the pen keeping it against the paper.

    I think I have too much spring tension and this caused the pen to really dig in and drag along causing deflection, a lighter touch would be better.... However I don't want to get too caught up on the pen holder, I am dying to try an actual cut with some MDF but this is all setup in my office at the moment and I will be sleeping with the Dogs if I run the cutting tool in here.

    Cheers Glenn.
     
    #25 Glenn Weston, Nov 2, 2016
    Last edited: Nov 2, 2016
  26. Glenn Weston

    Glenn Weston Journeyman
    Builder

    Joined:
    Aug 1, 2016
    Messages:
    91
    Likes Received:
    150
    Hi JustinTime, this machine is also dedicated, it wont be running anything else and actually is not running anything else except Win7 with Mach3. I was very concerned when I could see mouse activity clearly effecting the pulse train.

    I wanted to stick with Win7 due to XP's end of life, I will most likely load it up with XP tomorrow and see what gives.

    Cheers Glenn.
     
  27. Glenn Weston

    Glenn Weston Journeyman
    Builder

    Joined:
    Aug 1, 2016
    Messages:
    91
    Likes Received:
    150
    Hi @JustinTime, The black screws holding all the PVC Sensor mounting plates can be loosened off and I can slide them along the V-Slot rail, they are being held down by drop in T-Nuts.

    Sorry only the Y Sensors are actually mounted to the PVC plates in my build pictures at this point so it may be a little unclear as to how it will be adjusted. Here is two pictures of the Z Axis with both plates adjusted to almost extremities.

    I knew I would have to fine tune the exact positions so I kept that in mind when mounting the Magnets, so they are strategically positioned so the magnets will not have to be adjusted, then all I will need to do is actually move the sensors around to their trigger points and then lock them into position with the T-Nut Mounts.

    The White PVC plates are a bit odd looking and rough but they are for testing, I will most like come up with a nicer, lower profile and stronger mount that will offer some better protection for the sensors after proof of concept is achieved, but they will do for the moment.

    20161107_084610.jpg 20161107_084705.jpg


    Cheers Glenn.
     
  28. Brandoneous

    Builder

    Joined:
    Aug 17, 2016
    Messages:
    48
    Likes Received:
    4

    Moag,

    I am trying to build a very similar setup. Rasp Pi running Jessie. Same DQ542MA drivers on high-torque steppers and SmoothieBoard.
    I'm desperately hoping you can help me. I can't seem to make the jump from "its all wired together and should work" to "it works".
    I'm not an engineer, so I'm a mile or two out of my normal depths. I'm hoping you can help me understand the dip switch settings you are using on the high torque steppers and maybe how you configured bCNC to communicate with your smoothie. That seems to be where I'm stuck. Any help would be hugely appreciated.

    Thanks!
    Brandoneous
     
    #28 Brandoneous, Nov 6, 2016
    Last edited: Nov 7, 2016
  29. Glenn Weston

    Glenn Weston Journeyman
    Builder

    Joined:
    Aug 1, 2016
    Messages:
    91
    Likes Received:
    150
    @Brandoneous, it looks like you put your reply to @Moag inside the Quote.

    You might like to edit your post or if an Admin could edit it for him as it may not be ever be seen.

    Glenn.
     
    Brandoneous likes this.
  30. David the swarfer

    David the swarfer OpenBuilds Team
    Staff Member Moderator Builder Resident Builder

    Joined:
    Aug 6, 2013
    Messages:
    3,462
    Likes Received:
    1,915
    of course you can. The content is G-code, plain text, and the name.ext does not matter at all (except to windows that tries to identify files by the extension rather than content)
    go into MDI mode and issue the command 'G61'.
    those rounded corners are because Mach3 is running in G64 mode.

    G Codes
     

Share This Page

  1. This site uses cookies to help personalise content, tailor your experience and to keep you logged in if you register.
    By continuing to use this site, you are consenting to our use of cookies.
    Dismiss Notice