Welcome to Our Community

Some features disabled for guests. Register Today.

Triple C-Bot

Discussion in '3D printers' started by adamcooks, Feb 11, 2015.

  1. adamcooks

    adamcooks Well-Known
    Builder

    Joined:
    Nov 6, 2014
    Messages:
    244
    Likes Received:
    65
    I dont think that it really matters with a triple leadscrew setup. The keep the x short is a mantra of the cantilevered bed folks. Again, I'm a chef, who has just built his first printer. Using Vrail should keep the gantry flex to a minimum, and it should not matter which direction you stretch.
     
  2. Sniffle

    Sniffle New
    Builder

    Joined:
    May 23, 2016
    Messages:
    2
    Likes Received:
    0
    Which belt clamps did you end up using for the belts on the gantry? I've started modeling the printer and printing the parts and I noticed that was missing. are there parts from the C-bot that need to be printed for the triple C? Just curious due to the minimal documentation
     
  3. adamcooks

    adamcooks Well-Known
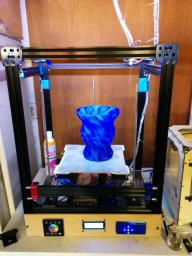
    Builder

    Joined:
    Nov 6, 2014
    Messages:
    244
    Likes Received:
    65
    The clamps for the belt are the same from the C-bot. This printer pretty much follows Carl's bot as far as assembly as well. You could use his new v2 top corners as well. One major difference is in the gantry slide cars. The V-rail cars on my bot are all the same size, and a little smaller then Carls.

    My current setup on the gantry, using the wanhao di3 extruder bracket, diii cooler and a flexion hot end system has been bullet-proof these days
     
  4. Sniffle

    Sniffle New
    Builder

    Joined:
    May 23, 2016
    Messages:
    2
    Likes Received:
    0

    Cool thanks, I'm more of a geared extruder person, I've just always had a preference for them. I'm planning to design a Titan mount for it.
     
  5. Tommy Blackburn

    Builder

    Joined:
    Jul 13, 2016
    Messages:
    2
    Likes Received:
    0
    Hi Adam,
    I'm currently working on z axis on my corexy (3x500mm lead screws) and I would use belt for leveling like your C-BOT.

    Since my lead screws don't turn down to 5mm I would use F608ZZ instead of F625ZZ and use 8mm bore 20 teeth pully as stopper. I hope it will work correctly :)
    Is your models are available somewhere ? I would do some modification to your bracket.

    BTW your printer is awesome.
     
  6. mwu

    mwu New
    Builder

    Joined:
    Jun 24, 2015
    Messages:
    4
    Likes Received:
    3
    I had the same issue, and ended up turning them down to 5mm myself. I didn't have a lathe, so I used a drill, a block of wood, some cutting fluid, and a file: https://goo.gl/photos/UnHz8dQgfhFFobmv6
     
  7. adamcooks

    adamcooks Well-Known
    Builder

    Joined:
    Nov 6, 2014
    Messages:
    244
    Likes Received:
    65
    I modeled all these in fusion360, let me figure out how to export them.
     
  8. adamcooks

    adamcooks Well-Known
    Builder

    Joined:
    Nov 6, 2014
    Messages:
    244
    Likes Received:
    65
    The "bench lathe" was kind of impressive

    Here are the leadscrew bases and the corresponding nut catch.
     

    Attached Files:

  9. Tommy Blackburn

    Builder

    Joined:
    Jul 13, 2016
    Messages:
    2
    Likes Received:
    0
    Adam,
    Thank for sharing this

    mwu,
    thanks for the hint. if I've trouble with what I plan to do i'll give it a try, the result as adam stated is impressive and looks good.

    Tommy
     
  10. adamcooks

    adamcooks Well-Known
    Builder

    Joined:
    Nov 6, 2014
    Messages:
    244
    Likes Received:
    65
    Should be fairly easy to adjust the hole for a different bearing. F360 is parametric, just select the hole and adjust the size.
     
  11. Zappo

    Zappo New
    Builder

    Joined:
    Nov 30, 2014
    Messages:
    16
    Likes Received:
    0
    Hi Adam,
    BOM is calling out 12x12x3/16 tempered glass. Interesting. How is that working out?
    How did you attach the PCB heater? clips or 3M?

    Anybody done an enclosure?
     
  12. adamcooks

    adamcooks Well-Known
    Builder

    Joined:
    Nov 6, 2014
    Messages:
    244
    Likes Received:
    65
    I need to remove that link for the tempered glass. DO NOT USE TEMPERED GLASS. That piece of glass worked out really well, until it actually exploded violently, sending glass shards flying out to a 10' diameter.

    I am currently using plain float glass cut from lowes, it was like 8$. The PCB is in a sandwich between the aluminum heat spreader and some 20x20 extrusion. I do believe that I used some gino pad between the PCB and the aluminum, its been a while and I don't recall ( it sounds like something that I would do ).

    As far as an enclosure, I just found out two days ago that my printer frame is exactly the same size as the small election campaign signs. That coroplast will make nice walls.

    IMG_20150529_155603.jpg ghost_redacted.jpg
     
  13. Mr.Hotwire

    Builder

    Joined:
    Oct 17, 2016
    Messages:
    2
    Likes Received:
    0
    Good afternoon,

    My first post here.. Iv been a creeper for a LONG TIME.. So, now that I'm awkward...

    Is there a calculator devised to give lengths for the frame and v-slot depending on the bed dimentions and travel?

    Im looking at building an 500 x 500 x 500 printer to do some automotive parts that will be used to cast parts in aluminum.
     
  14. adamcooks

    adamcooks Well-Known
    Builder

    Joined:
    Nov 6, 2014
    Messages:
    244
    Likes Received:
    65
    the calculator is on the second page of the BOM. I don't remember if mine has the formulas or not. The original c-bot BOM spreadsheet has a second tab where you can enter in pertinent information and it gives you rail sizes
     
  15. Mr.Hotwire

    Builder

    Joined:
    Oct 17, 2016
    Messages:
    2
    Likes Received:
    0
    Does This picture match the description of the extrusions?

    t-c-bot.PNG
     
  16. Joseph Ecker

    Builder

    Joined:
    Apr 5, 2015
    Messages:
    30
    Likes Received:
    3
    Yes, the extrusion calculator does a pretty good job. I use it to plan all my cuts and then modeled the whole thing in Blender. I should have added a good 150mm to the four legs. Otherwise, here are the measurements of my cuts, which gives plenty of room to fully address an 18x18x18in build volume with dual extruders:

    638mm front/back, top/bottom stationary
    624mm back/Z moving piece
    664mm top/XY moving piece
    590mm top sides
    570mm bottom sides
    570mm legs (too short)

    3 Bed support pieces (probably too small:
    2x 498.6mm
    1x 324.2mm
     
  17. WZ9V

    WZ9V New
    Builder

    Joined:
    Jan 9, 2015
    Messages:
    18
    Likes Received:
    1
    Most low cost DC-DC SSRs are crap with an on resistance of 0.1 ohm (10% loss to heat)

    This one works well and isn't too much more expensive it's on resistance is 0.006 ohm (0.6% loss to heat)
    100A SSR for DC (100V) [MGR-1DD80D100] - $19.95 : auberins.com, Temperature control solutions for home and industry

    In my informal experiments the cheap SSR can heat up to 70 to 80C with the massive heat sink at the currents typically used for a large heated bed. The Auber was barely warm at the same loads using the same heat sink.

    Going to an AC heater is even better since power is i(squared)*r but people seem to shy away from AC and should unless you know what you are doing.

     
  18. Dark-Noir

    Dark-Noir New
    Builder

    Joined:
    Apr 10, 2017
    Messages:
    3
    Likes Received:
    0
    Hey,

    good work! Thats look like a nice printer and i want to build this one for myself but a little bit modified, is there a assembled CAD file available and building instruction? So i can load it in my CAD program to edit it.
     
    #138 Dark-Noir, Apr 10, 2017
    Last edited: Apr 10, 2017
  19. ruggb

    ruggb Well-Known
    Builder

    Joined:
    Jan 11, 2015
    Messages:
    135
    Likes Received:
    16
    Great minds think alike. Adam and I made the same/similar modes to Carl's great work. I uploaded a few pic but never the whole thing. I did but together a complete assy in Sketchup to verify it would all go together without any interference since my main objective was to make it smaller and have a 3 point platform. My Z drive system is slightly different then Adam's. The motor assy is up against the screw assy and the idler only has one bearing. The belt then goes straight across between the 2 opposite screws. With the motor moved there is enough wrap on both those screws and it makes adjusting the belt tension very easy. Just move the idler plate. The hardest part is getting the screws perfectly aligned so the bed has full downward capability without jamming. I have full range and a rather heavy base. My frame is about 2" narrower than Carl's for the same size build area (12x12x12) which works fine with my 2 extruders and fans - but that was the reason I needed to do the full CAD to verify it. I am redoing some printed parts as there have been some good modes to them. I also repositioned Carl's endstops. I think Adam's X stop is like mine. I haven't studied the rest of them. My bed is attached at the same places (relative) as the screws. I found that a 4 point attachment just distorts the frame or bed, whichever is weaker. Since my bed is just aligned with and not attached to the rails (very simple) a 4 point adjustment twisted the bed frame easily, but will do it with an attached frame also. If you think about a 4 point adjustment on a rigid frame, the result will be a distorted bed. Some people don't believe this though. I guess there is enough dif that I should upload my make but I am too busy using and improving it. If I did, it would have to be "correct" and that takes a lot of effort. So my hat is off to CARL and ADAM. The extruder mountings have changed. The printed ones just didn't work for me. I got a couple simple cheap metal ones - with bracket. The bed base is 5/8 particle board with a 1/4 plate glass on top. It is heavy but rigid. The plate glass is actually not as flat as I would like. I am going to get a piece of boro. Not sure if it will be better but I currently have a 200x200mm on a hotbed which I use by removing the plate glass. So the large boro and a new hotbed will expand my ABS build size. I have also added LEDs all the way around - just finished that last night. They were thin enough that I didn't need to replace the gantry pieces for clearance. It is a great design and was love at first sight - AGAIN THANK YOU CARL.
    Here is my Sketchup file if you want to check it out.
     

    Attached Files:

    Dark-Noir likes this.
  20. Dark-Noir

    Dark-Noir New
    Builder

    Joined:
    Apr 10, 2017
    Messages:
    3
    Likes Received:
    0
    Very nice, thank you Ruggb and of course thank you Carl and Adam. I will look in to it later. When i have more question or my printer is ready i will reply ;)

    Edit: Unfortunately the "frame length" calculator in the BOM is not working. Ruggb are your Sketchup file dimensions correct?
     
    #140 Dark-Noir, Apr 10, 2017
    Last edited: Apr 10, 2017
  21. ruggb

    ruggb Well-Known
    Builder

    Joined:
    Jan 11, 2015
    Messages:
    135
    Likes Received:
    16
    I built it from that assy. As noted, those dimensions are for MY build, which is smaller than Carl's build. I think Adam's build reflects Carl's scaling. Mine is 12x12x12 build area but the external dimensions (specifically width) are smaller (about 20" vs 22"). I think the depth is the same. It has been a while since I built this. Also note that my front is Carl's rear. I didn't like the motors sticking out the front. I believe all of the plastic parts, including the new versions will fit, BUT I have only printed the new idler parts and not installed those yet. I uploaded bottom corner pieces (Carl's Thread) a long while back that I made. I noticed there is a version that is 3 separate pieces. I like mine better than the original or the separate.

    Cautions and tips: - caveat, things may have changed since my build.

    The lead screws from Openbuild are cheap and I used 1 cut into 3 equal parts, BUT, they only work with their nylon nut, unless you want to file the burrs off the screw faces - which I had to do using a brass nut. Test by insuring the nuts fall the length of the screw on their own weight.

    Depending on how you setup the base of the screws, those cuts may not be quite long enough. I changed that config and substituted a hardwood block instead of the plastic because the plastic flexed too much. I can post pics if you need. My base can be moved in 4 directions making it easier to line up the screw. That is one dimension that may not be perfect on that model. BTW, the assemblies in that file will explode to the individual part. You can select one and copy it to another file then explode to the part and create an STL file if you want to use it to print the part.

    I bought these motors - http://www.automationtechnologiesin...stepper-motor-kl17h247-150-4a-for-3d-printer/ - I see they are a few $$ more now. I bought for 2 extruders = 5 motors, but added 1 spare as it only cost me about $4.00 more because shipping went down. You should by the 8825 drivers as these motors are high current. You should also plan on a fan. I fried about 4 drivers b4 I put the fan on them.

    A lot, like most, of the parts came from AliExpress. CHEAP, but plan on 2-3 weeks delivery. I have never had a problem with replacement of shipping damaged parts. Don't remember any defective parts.

    Screw were obtained from Mr Metric (best prices, but you need to order all of them as shipping will eat you up) and I used pan head instead of cap head for exposed screws when available.

    If you thread both ends of the uprights you can place a plastic cap on top to dress it up a little. I missed one.

    I need to reprint a couple of braces that somehow got printed too narrow. The walls that are secured with 10mm screws must be at least 4-5mm. 3mm doesn't make it. The screws will bottom out.

    Openbuilds usually has great sales in the summer. I missed it unfortunately. Subscribe to them or visit regularly.

    Once built, expect to fiddle with Marlin, and slicers a lot before you get "in the grove". BTW, Marlin babystepping works just fine on CoreXY machines.
     
  22. Dark-Noir

    Dark-Noir New
    Builder

    Joined:
    Apr 10, 2017
    Messages:
    3
    Likes Received:
    0
    Thanks for the answer. I live in Germany so i order all stuff in the EU or China, the shipping cost from Openbuilds are to expensive in my case.

    Right now I'm about to export everything in *.stl files. My buddy builds a OneZ i3 and another has an Anet A8. I plan to use Simplify3D, OctoPrint, Marlin etc..
     
  23. Elmo Clarity

    Elmo Clarity Journeyman
    Builder

    Joined:
    Jan 17, 2015
    Messages:
    505
    Likes Received:
    149
    Question for those of you with the 3 screw setup. Do you find having the one screw up front in the middle getting in the way of accessing the build plate? Has anyone done a setup with that middle screw in the rear so there is nothing in the way of the plate from the front?

    I am looking at rebuilding my C-Bot to handle a larger plate and was looking at the 3 screw setup.
     
  24. ruggb

    ruggb Well-Known
    Builder

    Joined:
    Jan 11, 2015
    Messages:
    135
    Likes Received:
    16
    Hey Elmo - If you look at mine, you see they are on the sides. I just chose to have the front without motors sticking out and set the screws on the side. It will work either way, you just have to assy the parts where you want them. You can even turn it sideways if you want. But I would think the screws in the front would be a problem.
     
  25. Elmo Clarity

    Elmo Clarity Journeyman
    Builder

    Joined:
    Jan 17, 2015
    Messages:
    505
    Likes Received:
    149
    Do you have a link to some pictures? I have been going through the OpenBuilds stuff and things have changed so much from the original it's have to find any information now.
     
  26. adamcooks

    adamcooks Well-Known
    Builder

    Joined:
    Nov 6, 2014
    Messages:
    244
    Likes Received:
    65

    This is how my bot is set up, you can see in the photos. My single screw is in the rear along with the two xy steppers. I never did a fully assembled cad drawing of mine. I did model all the parts in fusion360, but now, f360 will import off of Carl's 123D files.
     
  27. ruggb

    ruggb Well-Known
    Builder

    Joined:
    Jan 11, 2015
    Messages:
    135
    Likes Received:
    16
    Here are a few key shots. I have started to clean it up, but it is still a WIP. I added lights all around and on the extruder. I am reprinting a few parts. This shot shows all 3 endstops.
    Picture 92s.jpg
    The X&Y endstop have their pushers on the carriage block. The red pieces. Right now it is a patchwork and I might add those to the part b4 I reprint it.

    These show the lead base mount
    Picture 88s.jpg

    The block of wood is cut out for the bearings and I have thrust bearings under the screw as well as a radial one on the screw under the pulley. It just rests on the red plastic brace so both parts can move side-to-side and the block can move in and out with slotted holes. If I lean on the bed they will lift out. Might not be so good if my bed were not so heavy. Those parts on top are because my available screws were too long.

    This is the drive and adjuster
    Picture 79s.jpg
    Being in the middle it provides enough wrap on the opposite gears. The only time I have had them skip is when my platform jammed b4 I got the screws aligned. Most of, no all of that adjustment assy was made from leftovers, though I did plan on having enough rail to patch together. It ain't pretty, but it works just fine.

    This is my bed guides and leveling screws built into the corner braces.

    Picture 83s.jpg

    The metal extruder with lights.
    Picture 86s.jpg
    It was only about $8 and more stable than the printed one. Some sell that bracket separately.


    and the big picture
    Picture 95s.jpg

    Those corner braces on the bottom are the ones I uploaded to Carl's thread a long while back. Very stable. I am about to buy a new boro glass bed and full heater. Right now my ABS build is limited to 200x200 in the center after removing that plate glass. But I really have not needed the larger area yet for ABS.
     

Share This Page

  1. This site uses cookies to help personalise content, tailor your experience and to keep you logged in if you register.
    By continuing to use this site, you are consenting to our use of cookies.
    Dismiss Notice