Welcome to Our Community

Some features disabled for guests. Register Today.

Kyoujin Mk1

Discussion in 'CNC Mills/Routers' started by ymilord, Jun 25, 2016.

  1. ymilord

    ymilord Journeyman
    Staff Member Builder Resident Builder

    Joined:
    Oct 2, 2014
    Messages:
    77
    Likes Received:
    160
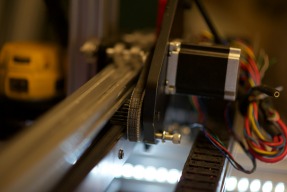
    Quick visual update. All of the encoders are mounted. All axis are calibrated. The closed-loop is setup up for velocity and torque mode. I've also added some brushes on top of the 4040 to help keep the the debris on the waste board.

    IMG_2061.JPG

    IMG_2059.JPG

    IMG_2060.JPG

    IMG_2051.JPG

    IMG_2057.jpg

    Next step is a gcode controlled dust collection and finalizing the Tool Offset probe routine.
     
    #31 ymilord, Sep 30, 2016
    Last edited: Sep 30, 2016
    Joe Santarsiero likes this.
  2. ymilord

    ymilord Journeyman
    Staff Member Builder Resident Builder

    Joined:
    Oct 2, 2014
    Messages:
    77
    Likes Received:
    160
    Next step in the evolution of this machine.

    IMG_2590.JPG
    IMG_2583.JPG
    IMG_2582.JPG

    The mount will be identical to the one used on the Hog. And the game plan is to use an encoder to see the RPMs in MachineKit.
     
    #32 ymilord, Apr 25, 2017
    Last edited: May 4, 2017
  3. Kevon Ritter

    Kevon Ritter Veteran
    Builder

    Joined:
    Apr 30, 2015
    Messages:
    597
    Likes Received:
    294
    I'm sure you've been making quite a few cuts with this. Can you comment on the rigidity of the single C-Beam X axis?
     
  4. ymilord

    ymilord Journeyman
    Staff Member Builder Resident Builder

    Joined:
    Oct 2, 2014
    Messages:
    77
    Likes Received:
    160
    Long overdue update.


    IMG_0659.jpg IMG_0660.jpg

    The changes since the last post. I've added a wireless touch probe. The one I made I ended up giving to a friend. Then pulled this one from the mill and got it a proper ETS that was coolant proof.

    Receiver.

    IMG_0574.jpg

    Transmitter.

    IMG_0662.jpg

    I wanted to unify the controllers (and touchscreens) I used between the two machines I have. Kyoujin was running LinuxCNC, I've decided to switch it over to PathPilot. This way I can use the same post processor in Fusion 360. Since they are both configured with the same G30 & G59.3 (over the probe and zeroed off the spindle nose) I can have Kyoujin do an offset check between tool changes.
    (Since I don't have a tool changer for it (Yet.)

    So on the Mill, PathPilot sees the tool change, Grabs the tool from the ATC and then checks the offset. On the mill its mostly for tool breakage detection. On Kyoujin, Its used to offset
    from the previous tool. I.e I have a 4 tool operation. And tool 1 is T7. When I zero the work surface off of it, On the next tool change and after I manually change the tool, It then checks the offset
    from the previous tool. Then adjusts Z for the new WC in G54 (55,56,57 etc...)

    IMG_0576.jpg

    I finally now have a proper E-Stop that trips a relay which then drops the enable pin on the driver to low and sets the alarm pin on the VFD invert to high. This stops the motion instantaneously and the VFD shuts down and 'brakes' the spindle to a halt. (The VFD has an option for a braking resistor. Handy later when I build a tool changer)

    The green button starts a job and the last button (mislabeled) turns the vacuum pump on & off.

    These are pictures of the other mill making the vacuum vises (aka pucks)

    IMG_0632.jpg

    That's after making 18 of them. The one in the vise was the last one.

    IMG_0633.jpg

    Speaking of the vacuum vises. I love them. If you have the option of use them, use them. You can machine/route around the part without worrying about clamps being in the way.
    The otherside effect is since this machine was completely designed in Fusion 360, In the CAM I can use the center of the puck as my origin. And on top of that, since the positions
    are known I can set each one it's own offset (if the part is small enough) Then set G54, G55 for side one and G56 & G57 as side two.

    Example of holding a large stock.

    IMG_0652.jpg

    Since I have a proper charge pump setup for active/e-stoped, i.e trigger the status LED to flash if a estop has occurred or an error like the gcode file is trying to extend beyond the limits of the machine.

    IMG_0665.jpg

    Pathpilot and the vacuum pump photobombing.

    IMG_0666.jpg
     
    #34 ymilord, Apr 25, 2018
    Last edited: Apr 25, 2018
    GrayUK likes this.
  5. ymilord

    ymilord Journeyman
    Staff Member Builder Resident Builder

    Joined:
    Oct 2, 2014
    Messages:
    77
    Likes Received:
    160
    Added logos to the machine.

    IMG_0673.jpg

    Electronics Enclosure.

    IMG_0675.jpg
     
    GrayUK likes this.

Share This Page

  1. This site uses cookies to help personalise content, tailor your experience and to keep you logged in if you register.
    By continuing to use this site, you are consenting to our use of cookies.
    Dismiss Notice