Welcome to Our Community

Some features disabled for guests. Register Today.

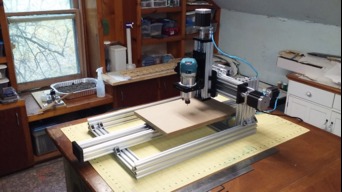
MMXL - A MiniMill Conversion

Discussion in 'CNC Mills/Routers' started by Scotty Orr, Oct 29, 2017.

  1. Scotty Orr

    Scotty Orr Journeyman
    Builder

    Joined:
    May 21, 2015
    Messages:
    315
    Likes Received:
    178
    Scotty Orr published a new build:

    Read more about this build...

    Here are the build videos for the MMXL Conversion.


    #1 Scotty Orr, Oct 29, 2017
    Last edited: Jan 9, 2018
  2. Anthony Bolgar

    Anthony Bolgar Journeyman
    Builder

    Joined:
    Jan 14, 2016
    Messages:
    354
    Likes Received:
    198
    Interesting. I have all the parts for a minimill, but I think I will copy your build idea instead. Thanks for sharing!
     
    Scotty Orr likes this.
  3. stargeezer

    stargeezer Journeyman
    Builder

    Joined:
    Feb 20, 2015
    Messages:
    328
    Likes Received:
    117
    Hi Scotty, Congrats on the new build!

    I wonder if you considered building an OX? This is just my opinion, but it looks to me that if you were to now cut the plates required to make an OX, add in a few more meters of timing belt, sprockets, and one more stepper motor, you could have an OX with more than double the cut area. If you don't want to cut the plates yourself, there's an Open Builds member on eBay that sells them and they are top notch.
     
    Scotty Orr likes this.
  4. Scotty Orr

    Scotty Orr Journeyman
    Builder

    Joined:
    May 21, 2015
    Messages:
    315
    Likes Received:
    178
    I haven't considered the OX. I hadn't thought about anything that big - yet! One nice thing about this rig is that I should be able to cut plates for most of the designs I've seen here. So when It's time to upgrade again, I'll be ready (and there are so many to choose from). I'll need a bigger shop though....
     
  5. Scotty Orr

    Scotty Orr Journeyman
    Builder

    Joined:
    May 21, 2015
    Messages:
    315
    Likes Received:
    178
    Just a couple of additional comments on the build:
    I accidentally left off the additional 6mm spacers needed from the parts list (1 regular, 1 eccentric).

    You will also need a 10.25" x 16" piece of MDF (I used 3/4") and eight sheet metal or wood screws to attach it to the build plate as shown (I used #2 x 7/16" servo screws).

    If you want the longer version build area, but don't want to cut the custom plate, you could use 2 Universal Build plates in tandem. In either case, you'll need (4) additional V-wheel kits, (4) more 25mm screws, (4) more 6mm spacers (2 of each type), and (1) lead screw nut block (w/screws, spacers, nuts). This would increase the maximum build length to about 20.5 inches.

    If you replace the C-Beam XL plate on the back of the Z-axis with a Universal V-Slot Gantry plate, you can increase the build width to about 11.75 inches (max travel would be ~300mm, and there is room between the columns).

    If you are happy with the 10x16 configuration, you could cut down the long C-Beam and lead screw to match. This might prevent needing the extra support under the tail, as well as allow the addition of a jog knob on the Y-axis.

    (Or you can mix/match to get your own custom size.)

    One additional note you may need if you build before I get more video posted: Mark the Y-axis C-Beam at 351mm from the tail. This will line up with the back of the rear cross brace of the frame. and puts the mill head centered at 500mm on the Y-axis.
     
    #5 Scotty Orr, Oct 30, 2017
    Last edited: Jan 7, 2018
    Archtop67 likes this.
  6. Julius

    Julius Well-Known
    Builder

    Joined:
    Nov 13, 2015
    Messages:
    193
    Likes Received:
    64
    Isnt a big mini mill just a CBeam machine?
     
  7. Scotty Orr

    Scotty Orr Journeyman
    Builder

    Joined:
    May 21, 2015
    Messages:
    315
    Likes Received:
    178
    No. (And what would be wrong with that anyway?) My upgrade was inspired by the C-Beam Machine (as I mentioned), but it's narrower and uses parts from the MiniMill. I certainly hope it works as well as the C-Beam Machine appears to. One more thing: This is an upgrade, not a fresh build. It's meant for people that already have a MiniMill and don't want to spend another $600 to have both a MiniMill and a C-Beam machine. (Like me.)
     
  8. Steveastbury

    Builder

    Joined:
    Jul 26, 2017
    Messages:
    5
    Likes Received:
    2
    Scotty how’s it worked out mate? Have you cut anything on it yet?
     
  9. Scotty Orr

    Scotty Orr Journeyman
    Builder

    Joined:
    May 21, 2015
    Messages:
    315
    Likes Received:
    178
    Oh, yes! It got quite a workout over the holidays!

    I used it to cut plates for a laser addition:
    Laser Adapter for OpenBuilds Spindle Mount (1/8" aluminum)
    Laser Shield Box for Spindle Adapter (3/16" acrylic)

    Then I used it with the laser attachment to make several Christmas gifts:
    Project - Laser Shield Box for Spindle Adapter (example raster engraving on maple)

    Also used the laser to engrave my spoil board:
    Laser Engraved Spoiler Grid (200x200)

    And here's a test raster image on denim that I finished just today:

    20171231_121547.jpg
     
  10. Steveastbury

    Builder

    Joined:
    Jul 26, 2017
    Messages:
    5
    Likes Received:
    2
    Thanks, I'm looking to upgrade my minimill to cut a set of ox plates.
    Is anything needed in your parts list?
     
  11. Scotty Orr

    Scotty Orr Journeyman
    Builder

    Joined:
    May 21, 2015
    Messages:
    315
    Likes Received:
    178
    Steveastbury likes this.
  12. Steveastbury

    Builder

    Joined:
    Jul 26, 2017
    Messages:
    5
    Likes Received:
    2
    Great, I’m going to order the parts as soon as ooznest opens in the new year and start on the overhaul. I’ll just need to shorten the c beam from a 1000mm as ooznest will only send out 1000mm long 8mm lead screws due to whipping over that length, but I can live with that. It should still give me a big enough work area to cut the OX plates
     
    Scotty Orr likes this.
  13. bubba

    bubba New
    Builder

    Joined:
    Jan 14, 2016
    Messages:
    24
    Likes Received:
    11
    Really like your build. Looking forward to more video's. I have a mini mill that I haven't put together yet and I'm really thinking of following your example.
    I have one question. From the pictures it looks like the router is sitting out there quite a bit and looks like it might exert some twisting or other movement to the Z axis. Have you noticed if this is an issue?
     
  14. Scotty Orr

    Scotty Orr Journeyman
    Builder

    Joined:
    May 21, 2015
    Messages:
    315
    Likes Received:
    178
    It hasn't been an issue for me. I haven't had any trouble milling aluminum with it. The conversion really makes it like a C-Beam machine which is a pretty popular build. I did make more videos of the build, but if you take a look at the build of the C-Beam machine, it really follows that pretty closely.
     
  15. Scotty Orr

    Scotty Orr Journeyman
    Builder

    Joined:
    May 21, 2015
    Messages:
    315
    Likes Received:
    178
    Since there has been some recent interest in this build, I have begun editing the several hours of build video I have. I will post each one as it becomes available in Post #1 of this discussion thread (above). I hope to have them all done in about a week.

    Thanks,
    Scotty
     
    GrayUK likes this.
  16. Scotty Orr

    Scotty Orr Journeyman
    Builder

    Joined:
    May 21, 2015
    Messages:
    315
    Likes Received:
    178
    All of the MMXL build videos have now been uploaded and are posted above: https://openbuilds.com/threads/mmxl-a-minimill-conversion.10593/

    It's about two and a half hours total (most around 15-20 minutes each). Sorry it took me this long to get to this. Hopefully, it will be helpful if you attempt this conversion.
    Thanks - Scotty
     
    GrayUK likes this.
  17. GrayUK

    GrayUK Openbuilds Team Elder
    Staff Member Moderator Builder

    Joined:
    May 5, 2014
    Messages:
    1,668
    Likes Received:
    627
    A big Thank You, :thumbsup: for going to all that trouble of making them, and then putting them on the Openbuild site.
    They are going to be a Great Resource for so many people in the future. :D
    Thanks for sharing. :thumbsup::thumbsup::thumbsup::thumbsup:
    Gray
     
    Scotty Orr likes this.
  18. Lindsey Lewis

    Builder

    Joined:
    May 21, 2015
    Messages:
    14
    Likes Received:
    16
    Nice build approach for getting the larger CNC area. I may have to do that with my mini mill:)
     
    Scotty Orr likes this.
  19. tisdal

    tisdal New
    Builder

    Joined:
    Oct 20, 2017
    Messages:
    1
    Likes Received:
    2
    What size is the build plate in the drawings and files? Fusion wants to make it over 8000 inches when I import it.
     
  20. Scotty Orr

    Scotty Orr Journeyman
    Builder

    Joined:
    May 21, 2015
    Messages:
    315
    Likes Received:
    178
    The plate in the drawing is 216 x 390. (Be sure your units are set to millimeters.)
     
  21. Bruce H

    Bruce H New
    Builder

    Joined:
    Jun 17, 2014
    Messages:
    8
    Likes Received:
    3
    Hi Scotty,

    I'm sure this is in the videos somewhere, but in your build list you show 2 additional Xtreme VWheel kits. Just curious where those extra wheels are needed and how they didn't exist in the original mini mill build?
     
  22. Scotty Orr

    Scotty Orr Journeyman
    Builder

    Joined:
    May 21, 2015
    Messages:
    315
    Likes Received:
    178
    The X-axis gantry plate uses 6 wheels instead of 4. (This makes it more like the C-Beam build.I believe I also removed the thin shims from all of those wheels. Explanation is in the Part 2 video above at about 3 or 4 minutes in.) I also left a couple of parts off of that main list (mentioned in the comments above). I accidentally left off the additional 6mm spacers needed (1 regular, 1 eccentric) for those wheels.
     
    #22 Scotty Orr, Nov 24, 2018
    Last edited: Nov 24, 2018
  23. Bruce H

    Bruce H New
    Builder

    Joined:
    Jun 17, 2014
    Messages:
    8
    Likes Received:
    3
    Thanks Scotty. I have a MiniMill machine still in the box that I've had for about a year. I think I got it during a Christmas special or something. I liked your modifications so much, I purchased the extra items during Black Friday so I can just build the MMXL right from the start. I'm finishing up a CoreXY 3d printer build shortly and then I'm going to get going on the mill. I'm really jazzed to get into the CNC part of things.
     

Share This Page

  1. This site uses cookies to help personalise content, tailor your experience and to keep you logged in if you register.
    By continuing to use this site, you are consenting to our use of cookies.
    Dismiss Notice