Welcome to Our Community

Some features disabled for guests. Register Today.

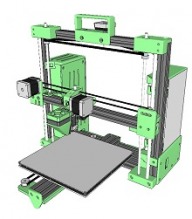
OneZ i3

Discussion in '3D printers' started by Keith Davis, Apr 17, 2016.

  1. Keith Davis

    Keith Davis Veteran
    Builder

    Joined:
    Dec 11, 2013
    Messages:
    507
    Likes Received:
    398
    Thanks, I'll be giving them a try
     
  2. Marco B

    Marco B New
    Builder

    Joined:
    Nov 5, 2017
    Messages:
    7
    Likes Received:
    0
    Merry Christmas to everyone!

    Today I thought I could finally build up my printer, but I had to find out, that there are several screws are missing in my workshop. So I build up a list of all screws.
    First I've count the per Page used on this whole-in-one assembly instruction: http://3dwrx.com/openbuilds/i3/OneZ-i3_OpenBuilds.pdf

    After this I have sum them up.
    So the first page contains the total an the following are per page
    Screws Onez i3.pdf

    So I think this would be very useful for everyone.
    Cause I will build my printer with other stepper drivers, PSU and with Arduino and RAMPS-Shield, I did not count the screws of this pages.
    @Keith Davis :
    You're welcome to use this pdf for your published BOM and assembly instructions.

    Cheers,
    Marco
     

    Attached Files:

  3. Marco B

    Marco B New
    Builder

    Joined:
    Nov 5, 2017
    Messages:
    7
    Likes Received:
    0
    I finished my build.
    Now its time for tweaking the software:
    DSC_20180107_185612_529.JPG IMG-20180118-WA0001.jpeg signal-2018-01-23-215431.jpeg signal-2018-01-23-223340.jpeg

    The calibration cube was printed with a initial layerheight of 0.3 and the rest with 0.4mm

    Im interested, what print and travelspeeds and accelerations you guys are using
     
  4. Keith Davis

    Keith Davis Veteran
    Builder

    Joined:
    Dec 11, 2013
    Messages:
    507
    Likes Received:
    398
    Something that size I print w/50mm/sec infill, 30 perimeters, 100 travel @ .2 layer

    I use 100/mm/sec infill, 70 perimeters, 100 travel @ .2 layer to print all the pieces of a OneZ and fill up the bed with as many pieces as will fit. I generally run .4 for first layer.

    No slicer settings for acceleration. Marlin:
    #define DEFAULT_MAX_FEEDRATE
    #define DEFAULT_MAX_ACCELERATION {1000,1000,5,1000}
    #define DEFAULT_ACCELERATION 500
    #define DEFAULT_RETRACT_ACCELERATION 500
    #define DEFAULT_TRAVEL_ACCELERATION 3000

    Set X & Y motors to remain enabled when not in use
    // Disables axis when it's not being used.
    #define DISABLE_X false
    #define DISABLE_Y false
     
  5. JustinTime

    JustinTime Veteran
    Builder

    Joined:
    Dec 18, 2013
    Messages:
    784
    Likes Received:
    259
    You are using 70 perimeters? Isn't that A LOT? The default in Slic3r is 3! Any reason you chose this high number?
     
  6. Keith Davis

    Keith Davis Veteran
    Builder

    Joined:
    Dec 11, 2013
    Messages:
    507
    Likes Received:
    398
    70 mm/sec on perimeters. Just 3 perimeters.
     
  7. Marco B

    Marco B New
    Builder

    Joined:
    Nov 5, 2017
    Messages:
    7
    Likes Received:
    0
    Im still having problems with the prints an now I think, I figured out, whats wrong:
    my Z Axis won't move correct below 0.5mm per command. Thats the Point why every print with a layer height under 0.4mm looks squeezed.
    If I issued the Command "G1 Z10" after homing the Axis moves exactly the 10mm so its not a problem with the Steps per mm.

    Is my stepper not strong enough?
    These are my stepper motors
    Nema 17 Bipolar 59Ncm (84oz.in) 2A 42x48mm 4 Wires w/ 1m Cable & Connector
    and these are my stepper drivers:
    Digital Stepper Driver 1.0-4.2A 20-50VDC for Nema 17, 23, 24 Stepper Motor

    I set the current to 2.03A RMS and reduced the microsteps to 4

    The z Axis is in level and moves very softly without the TR8 Rods;
    Any suggestions?
     
  8. Keith Davis

    Keith Davis Veteran
    Builder

    Joined:
    Dec 11, 2013
    Messages:
    507
    Likes Received:
    398
    Exactly which TR8 screws are you using? It sounds like your screw's lead is not divisible by .01. What are your pulleys? Both the one on the Z motor and the Z screws.
     
  9. Marco B

    Marco B New
    Builder

    Joined:
    Nov 5, 2017
    Messages:
    7
    Likes Received:
    0
    Im using the openbuilds tr8x8 so my lead is 8mm.
    My pulleys are 20teeths on the rods and 16teeths on the motor.
     
  10. Keith Davis

    Keith Davis Veteran
    Builder

    Joined:
    Dec 11, 2013
    Messages:
    507
    Likes Received:
    398
    Your pitch is 2mm per revolution with those screws. Change the motor pulley to a 20 tooth pulley as you do not need reduction (keep screw pulleys at 20T). That will give you even 0.01mm per step. You were getting 0.008mm per step with the reduction. I'd also increase to 1/8 microstep.
     
  11. Marco B

    Marco B New
    Builder

    Joined:
    Nov 5, 2017
    Messages:
    7
    Likes Received:
    0
    Im a bit confused, because i followed your advice and build it with 16:20;
    Also I think there is a typo in the prusa-calculator, because its written pitch but should be lead.
    Otherwise the "G1 Z10" command would not be executed correct.
     
  12. Keith Davis

    Keith Davis Veteran
    Builder

    Joined:
    Dec 11, 2013
    Messages:
    507
    Likes Received:
    398
    The advice to use 16:20 is for a M8 threaded rod. M8 threaded rods have a 1.25 pitch. A 16:20 reduction changes the threaded Z screw pitch to 1mm per revolution.

    You used Acme lead screws instead, which have a 2mm per revolution pitch. Therefore you do not need a gear reduction.

    The Prusa calculator does indeed incorrectly misuse the terms "pitch" and "lead". That is because threaded rods only have 1 start and hence pitch and lead are the same thing. Notice that the calculator does not have any presets for using Acme leadscrews (which have multiple starts so lead and pitch are not the same) because Acme screws do not contribute any value to the Z axis on a printer over using threaded rods.
     
    Kyo and GrayUK like this.
  13. JustinTime

    JustinTime Veteran
    Builder

    Joined:
    Dec 18, 2013
    Messages:
    784
    Likes Received:
    259
    As I've mentioned last year, I bought these. They are excellent quality. I bought the 2mm pitch ones. They are strait and gave me excellent results. I'm assembling my printer again and I'm sure they'll do a good job again.
     
  14. hpcre

    hpcre New
    Builder

    Joined:
    May 5, 2017
    Messages:
    1
    Likes Received:
    0
    Hello.

    I'm trying to access the posted files for the build but i get an error that they are all unavailable. have the links changed ?
     
  15. Keith Davis

    Keith Davis Veteran
    Builder

    Joined:
    Dec 11, 2013
    Messages:
    507
    Likes Received:
    398
    The links at the bottom of OneZ i3 download for me this morning
     
    hpcre likes this.
  16. Jason hsu

    Jason hsu New
    Builder

    Joined:
    Jul 30, 2023
    Messages:
    1
    Likes Received:
    0
    hello everyone

    I'm trying to access the published build files, but none of them are downloadable. Is the link dead?
    Can someone please share the file?
    Thanks
     
  17. Alex Chambers

    Alex Chambers Master
    Moderator Builder

    Joined:
    Nov 1, 2018
    Messages:
    2,784
    Likes Received:
    1,364
    This is quite an old thread (2017), so it's not very suprising if some links no longer work. I did manage to access the build manual, but my anti-virus software didn't like the other links.

    Alex.
     
  18. JustinTime

    JustinTime Veteran
    Builder

    Joined:
    Dec 18, 2013
    Messages:
    784
    Likes Received:
    259
    You can get the SKP zip file and get from SketchUp the .stl files. That file is OK, I checked it. Also the BOM link and the Assembly Instruction link are working fine.
     
    Peter Van Der Walt likes this.

Share This Page

  1. This site uses cookies to help personalise content, tailor your experience and to keep you logged in if you register.
    By continuing to use this site, you are consenting to our use of cookies.
    Dismiss Notice