Welcome to Our Community

Some features disabled for guests. Register Today.

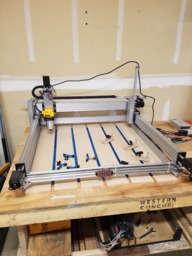
C-Beam 1M

Discussion in 'CNC Mills/Routers' started by Jim F, Jan 27, 2017.

  1. Jim F

    Jim F New
    Builder

    Joined:
    Jan 12, 2017
    Messages:
    6
    Likes Received:
    19
    Jim F published a new build:

    Read more about this build...
     
    amm ann likes this.
  2. jamesdjadams

    jamesdjadams Well-Known
    Builder

    Joined:
    Nov 1, 2016
    Messages:
    40
    Likes Received:
    48
    Awesome. Looking forward to seeing it progress. Cheers!
     
  3. PhotoSgt85

    PhotoSgt85 Well-Known
    Builder

    Joined:
    Jul 27, 2015
    Messages:
    54
    Likes Received:
    66
    This is sweet. Ill probably be following a similar path with my XL down the line. If I can help let me know.
     
  4. stargeezer

    stargeezer Journeyman
    Builder

    Joined:
    Feb 20, 2015
    Messages:
    328
    Likes Received:
    117
    That looks like a great build! Have fun and please keep us posted.

    BTW, with your future orders you can find your tracking number on your "Orders" page of the parts store.
    Goto;
    1. "My Account" tab of "Parts Store"
    2. Log in
    3. Select "View Orders Status" tab on right side.'
    4. Pick the order number that corresponds to your order and press "view order status" on right menu.
    5. Locate you tracking number near the bottom.

    They don't send them via email.
     
  5. snokid

    snokid Journeyman
    Builder

    Joined:
    Oct 11, 2014
    Messages:
    335
    Likes Received:
    104
    oh the fun starts now!!!
    just seeing that makes me want to build something!!! (don't let my wife know!!!!)
    Bob
     
    PhotoSgt85 likes this.
  6. Jim F

    Jim F New
    Builder

    Joined:
    Jan 12, 2017
    Messages:
    6
    Likes Received:
    19
    @stargeezer The store does send the tracking number via e-mail. That is what i was using to track my order. The fact that they only sent one tracking number, made me think there was only 1 box coming. Also had it held at the UPS shipping center, due to porch theft in our area. Was surprised when the big box arrived. (over 50lbs.) Glad i was at home when it did get here.
     
  7. Jim F

    Jim F New
    Builder

    Joined:
    Jan 12, 2017
    Messages:
    6
    Likes Received:
    19
    Found that the 55mm low profile M5's don't play nice with the high torque steppers. Changed to a M5 crown bolt from Home Depot. Fits like a glove. Much nicer fit and finish.
     
  8. eleethesontai

    Builder

    Joined:
    Jun 16, 2017
    Messages:
    33
    Likes Received:
    0
    I see how you attached the xaxis two the two cbeams but how did u attach the cbeams to the two y Axis plates?
     
  9. Jim F

    Jim F New
    Builder

    Joined:
    Jan 12, 2017
    Messages:
    6
    Likes Received:
    19
    I used 4 M5 x 8mm (maybe 10mm, i don't recall) into T-nuts. There are already holes in the large plates that align with the C-Beam arms.
     
  10. eleethesontai

    Builder

    Joined:
    Jun 16, 2017
    Messages:
    33
    Likes Received:
    0
    Thank you for the fast response. Loving this design! Out of curiosity what is your impression of the gradus with the big foot so far?
     
  11. mikework

    mikework New
    Builder

    Joined:
    Jul 19, 2017
    Messages:
    15
    Likes Received:
    9
    This version perfectly answers my concern about gantry weight causing deflection y axis. Simply add supporting rail underneath! Nice.

    And I think I can add it later.
     
  12. Jim F

    Jim F New
    Builder

    Joined:
    Jan 12, 2017
    Messages:
    6
    Likes Received:
    19
    I am quite a manual kind of person, so the Gradus fits very well with that. I don't have any accessories attached to the controller, but i think it does accept most common devices. (Displays etc.)
    It seems to have plenty of power to drive the NEMA 23's without getting warm.
     
  13. jackantubis

    Builder

    Joined:
    Jan 10, 2017
    Messages:
    9
    Likes Received:
    2
    Impressive :) what is the aproximative price ? I'm looking for CNC build ? thanks
     
  14. Jim F

    Jim F New
    Builder

    Joined:
    Jan 12, 2017
    Messages:
    6
    Likes Received:
    19
    I have roughly $1600 US into it at the moment.
     
  15. westers47

    westers47 New
    Builder

    Joined:
    Sep 8, 2017
    Messages:
    1
    Likes Received:
    0
    Very nice work. This is the kind of kit I have been looking for. Do you have a parts list available? I am trying to piece together a 1000mmx500mm version of this.
     
  16. Tet

    Tet New
    Builder

    Joined:
    Feb 7, 2017
    Messages:
    1
    Likes Received:
    1
    Why did you put the motors in the front like that instead of the back? I'd be afraid I would snag them while working or walking past.
     
    xacr21 likes this.
  17. xacr21

    xacr21 New
    Builder

    Joined:
    Jan 11, 2017
    Messages:
    1
    Likes Received:
    0
    I also would be very thankful about a parts list. Maybe you could post a screenshot of your order or something similar.
    Thx
     
  18. ali duman

    ali duman New
    Builder

    Joined:
    Dec 27, 2017
    Messages:
    1
    Likes Received:
    0
    Hi Everyone
    I need a cnc machine that it can carve a design on tile that already installed on floor. I saw some cnc router online but they said I need stronger router or special bids. or what would you recommend for me?
    Let me know if you can help me about it,please.
    Thanks
    Ali Duman
     
  19. Jon Norris

    Builder

    Joined:
    Feb 14, 2016
    Messages:
    27
    Likes Received:
    48
    Hi! I'm building a machine that's almost identical to this one and the Dollarz machine. Just got it running yesterday, and I noticed as I was drilling holes in my waste board that I'm getting deflection on plunges. If I grab the Z motor or the router collet, I can move the Z axis a little too much for my taste. Have you had this issue? Found any solution? I'm trying to decide if it would be worth the time to rework the Z, turn the C Beam around, bolt it to the X gantry plate so that the beam itself is fixed, and allow just the spindle to move up and down. Any thoughts?
     
  20. ChadRat6458

    Builder

    Joined:
    Dec 10, 2014
    Messages:
    93
    Likes Received:
    24
    So why is one pillar on the outside the rail and one on the inside? I see you did it for extra X travel. I think I would have flipped the X carriage for more travel. The ocd in me sez the pillars should be the same. :) Interesting machine.
     
  21. Kevon Ritter

    Kevon Ritter Veteran
    Builder

    Joined:
    Apr 30, 2015
    Messages:
    597
    Likes Received:
    294
    Because then he would need a length longer than 1m to put the other on the outside. Having them both on the inside cuts work area as well. The offset route he chose is probably the only solution that doe snot require extra length or modification.
     
  22. ChadRat6458

    Builder

    Joined:
    Dec 10, 2014
    Messages:
    93
    Likes Received:
    24
    You could put the both on the inside and put the Z axis on the other side of the X axis.
     
  23. Kevon Ritter

    Kevon Ritter Veteran
    Builder

    Joined:
    Apr 30, 2015
    Messages:
    597
    Likes Received:
    294
    You can, but you'll be increasing the leverage effect produced at the end mill. I'd rather give up that 30mm worth of travel.
     

Share This Page

  1. This site uses cookies to help personalise content, tailor your experience and to keep you logged in if you register.
    By continuing to use this site, you are consenting to our use of cookies.
    Dismiss Notice