Welcome to Our Community

Some features disabled for guests. Register Today.

CUT SMITH

Discussion in 'CNC Mills/Routers' started by Weldsmith, Feb 6, 2018.

  1. Weldsmith

    Weldsmith New
    Builder

    Joined:
    Nov 20, 2017
    Messages:
    22
    Likes Received:
    19
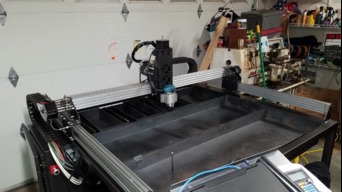
    Weldsmith published a new build:

    Read more about this build...
     
  2. stargeezer

    stargeezer Journeyman
    Builder

    Joined:
    Feb 20, 2015
    Messages:
    328
    Likes Received:
    117
    Awesome build Weldsmith!!!!!! Following this great build!!!!
     
  3. joe williams

    joe williams Well-Known
    Builder

    Joined:
    Nov 9, 2015
    Messages:
    100
    Likes Received:
    59
    Are your plates plasma cut 1/4" steel ?
     
  4. Mark Carew

    Mark Carew OpenBuilds Team
    Staff Member Moderator Builder Resident Builder

    Joined:
    Jun 28, 2013
    Messages:
    2,758
    Likes Received:
    2,441
    Great looking build Weldsmith, with lots of innovative features. Really like how you doubled up on the belt and pinion, I think this will go a long way in making the machine that much stronger.
    Really nice job and thanks for the share brother. Looking forward to seeing it plasma cutting. :thumbsup:
     
  5. Weldsmith

    Weldsmith New
    Builder

    Joined:
    Nov 20, 2017
    Messages:
    22
    Likes Received:
    19
    Joe, I used my CNC mill to machine aluminum plates. I sand blasted them and then painted them with wrinkle paint. That is why they look like steel.

    Stargeezer and Mark, thank you for your kind comments. I believe this build will be a handy tool when finished.
     
  6. Weldsmith

    Weldsmith New
    Builder

    Joined:
    Nov 20, 2017
    Messages:
    22
    Likes Received:
    19
    Joe, I just realized that I do have some steel plates down on the leveling feet. However, they were cut on my CNC Mill but, not how one might think. I have been wanting to build a gantry style cnc to cut sheet metal from the time I built my mill. Not having one, I figured out how to flame cut using the table of my milling machine. It has a 8" x 21" travel. Not bad for making brackets and what not. I will add a picture of the mill flame cutting the pieces.
     
  7. Weldsmith

    Weldsmith New
    Builder

    Joined:
    Nov 20, 2017
    Messages:
    22
    Likes Received:
    19
    I could not get the torch video to upload. However, I took a picture of the apparatus so people can see how I flame cut parts with my mill. thumbnail_20180211_171618.jpg
     
    Mark Carew and Rick 2.0 like this.
  8. joe williams

    joe williams Well-Known
    Builder

    Joined:
    Nov 9, 2015
    Messages:
    100
    Likes Received:
    59
    Looking Good!
     
  9. Gooshpoo

    Gooshpoo Well-Known
    Builder

    Joined:
    Jul 17, 2017
    Messages:
    52
    Likes Received:
    29
    Pretty cool project, Have you used an open electronic frame before? Im super paranoid about interferences and as a results im using multiple boxes. an open plate would be so much easier to deal with. how do you plan on midigating the emi ?
     
  10. Weldsmith

    Weldsmith New
    Builder

    Joined:
    Nov 20, 2017
    Messages:
    22
    Likes Received:
    19
    My electronics will be inside a box. If you follow my build you will see exactly how the electronics will come together. I think it is a much cleaner build when the electronics are in a box it keeps dirt, water, metal etc. out of the electronics. I will post picture of that in the next couple of days. I am using a pilot arc plasma vs a High freq plasma. I believe the EMF will be less of an issue. I have read there are ways to ground the tip of the plasma. I am not sure if this works or how it was executed.
     
  11. polemidis

    polemidis New
    Builder

    Joined:
    Aug 30, 2017
    Messages:
    10
    Likes Received:
    6
    if you need to make a 3D model I can help, I am designing in Freecad. Let me know :)
     
    Mark Carew likes this.
  12. Weldsmith

    Weldsmith New
    Builder

    Joined:
    Nov 20, 2017
    Messages:
    22
    Likes Received:
    19
    Polemidis, I have 3D models of the plates. I will post all my drawings here soon.
     
  13. Weldsmith

    Weldsmith New
    Builder

    Joined:
    Nov 20, 2017
    Messages:
    22
    Likes Received:
    19
    I have now uploaded my excel work sheet. and The DXF file for the 2D drawing that I used for Fusion 360. In the excel file you will find parts lists, Notes, and links to Fusion files and to purchases . I hope that some one can get some use out of them. This is not my first build by any means but it is my first post on a build. I am private in nature, not that I do not want to share. Quite frankly, I probably would not have posted this and would have been content watching everyone else build there projects. However, there was a contest involved. That would help me with a portable milling machine that I have been wanting to build. A little competition will always make you feel alive!!
     
    polemidis likes this.
  14. johnnycnc

    johnnycnc New
    Builder

    Joined:
    Sep 11, 2017
    Messages:
    31
    Likes Received:
    7
    Great looking build, Weldsmith. I am curious if you feel that the double belt will be stronger that a lead screw? Really impressed with your innovations on this build
     
    polemidis likes this.
  15. Weldsmith

    Weldsmith New
    Builder

    Joined:
    Nov 20, 2017
    Messages:
    22
    Likes Received:
    19
    No, I have no illusions that it will be stronger than a properly fit lead screw. My primary purpose for this machine is for plasma cutting and occasional oxy acetylene cutting for thicker plates. I of course will push the limits and put a router on it and see what it will do. I did do a little math and the calcs shows that the working load on X axis is around 45 lbs. of force. This is obviously with deflection of the belts. It may perform OK If I keep the speeds and feeds down.

    Thank you for your kind words!
     
  16. johnnycnc

    johnnycnc New
    Builder

    Joined:
    Sep 11, 2017
    Messages:
    31
    Likes Received:
    7
    I've noticed that some of the builds are using construction lumber for the table. Since I'm looking at building a 1500 x 1500 mm. unit my thoughts were that wood would move to much and that I would have to go to either welded steel or t-slot extruded aluminum? What are your thoughts?
     
  17. Weldsmith

    Weldsmith New
    Builder

    Joined:
    Nov 20, 2017
    Messages:
    22
    Likes Received:
    19
    I believe you can make a wood structure very stiff. It should be cross-braced or sheathed. The type of material depends on what your resources are and what you plan on building. I would never build a wooden Plasma cutter base, but I have seen some very nice wooden router bases. In all reality the stiffness needs to be in the machine tool. The base has to be mildly substantial . Most openbuild kits are made for a bench. Also wood is cheep, steel is moderate priced and extruded aluminum is kind of expensive. Keep in mind that these bigger hobby machines take up a lot of room. I have decided to create a lot of storage under mine so I can take back some of my garage.
     
    #17 Weldsmith, Feb 20, 2018
    Last edited: Feb 21, 2018
  18. Giarc

    Giarc OpenBuilds Team
    Staff Member Moderator Builder Resident Builder

    Joined:
    Jan 24, 2015
    Messages:
    3,017
    Likes Received:
    1,682
    I used this 2x4-Basics-Workbench, and made my own 2x4s by laminating 3 layers of 1/2 inch (or maybe it was 5/8"?) plywood. It seems to be nearly impossible to find dimensionally accurate and stable - not to mention 'uncrowned" - 2x4s. It works great. My base supports a heavy torsion box table top made of 1/2 inch particle board and the a 1500 x 850 CNC router. I amvery satisfied with its stability. You could make your "2x4s" whatever length you want, or if you are spanning a larger area, laminate them up to be actual 2" x 4" 2x4s (or thicker).
     
  19. Gooshpoo

    Gooshpoo Well-Known
    Builder

    Joined:
    Jul 17, 2017
    Messages:
    52
    Likes Received:
    29
    check out my build there i made a table with a 3d model and price list it is sturdy like a rock and its about 200 lbs at least it feels like it haha.
     
  20. Weldsmith

    Weldsmith New
    Builder

    Joined:
    Nov 20, 2017
    Messages:
    22
    Likes Received:
    19
    Gooshpoo, You are building a monster! It looks nice. Earlier you asked what I was going to do for the EMI I have outlined my plan below. I posted this in my build file as well.

    While wiring this machine I have learned a few things. If you are creating a CNC plasma, make sure you do your home work. There are many things to consider. Here is a short list of considerations. There are plenty more items out there I am sure.

    1. Purchase a Pilot arc plasma (NOT a HF plasma) there is a difference. The high frequency does cause noise issues in your electronics. the pilot arc grounds the tip to start the arc. The PWM of the inverter style units still create noise which is why you have to do all these other thing to make it write.
    2. Use a motion controller that is optically isolated. even the cheap ones come optically isolated.
    3. Run a ground rod and connect it to your table with in 20'
    4. Use foiled twisted wires with ground. (For everything.)always ground this in one spot back inside your cabinet.
    5. keep THC out of main cabinet. try to buy a unit that has an external voltage divider to keep plasma voltage away from other electronics.
    6. use a noise filter on the main power.
    7. do not run run the torch lead in with wires if you can help it. I am ignoring this one until it bites me in the butt. It is to nice and neat inside the wire track.
    I did not develop any of this. I found these items from many different sites on the Web, I just compiled them. If you have any suggestions I will add them to the build document.
     
  21. Gooshpoo

    Gooshpoo Well-Known
    Builder

    Joined:
    Jul 17, 2017
    Messages:
    52
    Likes Received:
    29
    Thanks for your input on my build. you look like your on track with the EMI Thanks for the 1. That is somthing that I never knew and will take into consideration if i explore plasma cutting. and also the within 20'. Your build is looking awesome. I want to know more about this flame cutting apparatous on your mill.
     
  22. Weldsmith

    Weldsmith New
    Builder

    Joined:
    Nov 20, 2017
    Messages:
    22
    Likes Received:
    19
    The flame cutting is nothing more than a piece of square tubing attached to the bed of my CNC mill bed. The only thing I would change there is the length of the tube steel. It is a little short. I program it like any other 2D part. I have to manually turn on the torch but, that is not a big deal.
     
  23. Weldsmith

    Weldsmith New
    Builder

    Joined:
    Nov 20, 2017
    Messages:
    22
    Likes Received:
    19
    Well I finally had enough time to work on my project this weekend. It is alive. I got it to jog. I will add some pictures to some of the new additions. The water beds are in and the plasma shelf is in place. I finished the wiring awhile back and have not posted those pictures either.
     
  24. johnnycnc

    johnnycnc New
    Builder

    Joined:
    Sep 11, 2017
    Messages:
    31
    Likes Received:
    7
    I have a simple question for you Weldsmith. I am only a farmer welder and would like to know how you weld up the table without causing any distortion to the table? I know that if you don't build it properly then it will distort.
     
  25. Weldsmith

    Weldsmith New
    Builder

    Joined:
    Nov 20, 2017
    Messages:
    22
    Likes Received:
    19
    That is a good question. I have been welding for many years and have realized that the distortion you are referring to can be used in your favor. So for every reaction there is an equal and opposite reaction. Ok, so it is not that scientific. I simply make sure and tack the metal frames together very well before I weld-out the work piece. Then when I start the weld-out process I pay attention to the order in which I weld the joints. If you do this each weld will cancel out the distortion from the last weld. On the two end frames I welded the inside joints first, outside next and then the sides last alternating each side as I proceeded. I constantly cross measured the frame to see how it was doing. I then assembled the sub assemblies in to a frame, using a level, alternating welds and cross measuring as I go. I also have a bunch of squaring clamps that helps me with the initial tacking of the weldments. Using tube steel rather than angle iron is another trick,angle is a bare. I hope that helped. There are many different techniques that I did not mention like welding all of the welds in the same direction, making your fit and gaps perfect, etc.
     
    GeoffH and GrayUK like this.
  26. HulkSmash

    HulkSmash New
    Builder

    Joined:
    Apr 14, 2018
    Messages:
    8
    Likes Received:
    0
    Great build Weldsmith, I'm designing something similar and yours is the first hybrid type plasma / router build that I have seen.

    .... why did you choose belts over rack and pinion ?

    Is there any chance you could upload the fusion 360 / cad drawing from your computer rather than linking it. I'm from, and registered to the UK and it wont let me log into the site.

    really looking forward to see how it turns out and functions.

    many thanks
     
  27. Weldsmith

    Weldsmith New
    Builder

    Joined:
    Nov 20, 2017
    Messages:
    22
    Likes Received:
    19
    HulkSmash, I primarily am using this as a plasma cutter and had no real expectations of making a great router. With that being said, I now wish I had gone with rack and pinions. Having double belts does give the machine ample rigidity. The belts do fray some and I am concerned it will be a maintenance issue. Yes they are aligned.

    If I was to do it again there are many thing I would do differently. However, this all depends on many variables, expectations of performance, budget, personal preference, versatility, etc. for one I would not use the open build system. I am not in any way bashing this system. It definitely has its place in the hobby arena. If you want a robust plasma and router I would suggest a few items. 1600 oz in nema 36 motors on x and y and 570 oz in nema 23 on the Z. Rack and pinion. and Linear bearings of some sort. I would definitely use a steel gantry if you are going to have a travel over 24". There is no substitute of steel square tube. I have double C-beams and I have too much flex. that is the mechanical side.

    For software and electronics. I would use the ethernet Smooth Stepper for the cnc controller with Mach 3, I would use DM860A Stepper-drivers. These units all have good documentation. There is nothing more frustrating than trying to make something work with bad or no documentation. Hope this helps.

    Dave Smith.
     
  28. HulkSmash

    HulkSmash New
    Builder

    Joined:
    Apr 14, 2018
    Messages:
    8
    Likes Received:
    0
    Thanks Dave for all that info.. really helpful.

    I am gonna probably go the lead screw way. I have read so many articles now re how to avoid whip by using a 1/2 screw with a 5 to 1 ratio. I probably will go with 566oz nema 23's on all axis.

    Was gonna use steel for the frame and then have linear guides the travel, not 100% on this yet.

    Are you able to upload the cad files for me dave. It would be really useful if you could.
    Or pop them on dropbox with a link.

    Many thanks

    Mike
     
  29. Weldsmith

    Weldsmith New
    Builder

    Joined:
    Nov 20, 2017
    Messages:
    22
    Likes Received:
    19
    send me your email and I will invite you to my drawings pages. it is a real pain to upload all of the files.
     
  30. HulkSmash

    HulkSmash New
    Builder

    Joined:
    Apr 14, 2018
    Messages:
    8
    Likes Received:
    0
    Sent you a private message. Many thanks
     

Share This Page

  1. This site uses cookies to help personalise content, tailor your experience and to keep you logged in if you register.
    By continuing to use this site, you are consenting to our use of cookies.
    Dismiss Notice