Welcome to Our Community

Some features disabled for guests. Register Today.

+Laser

Discussion in 'Laser Cutters' started by BNMaker, May 3, 2018.

  1. BNMaker

    BNMaker Well-Known
    Builder

    Joined:
    Jul 13, 2017
    Messages:
    62
    Likes Received:
    38
    BNMaker published a new build:

    Read more about this build...
     
  2. BNMaker

    BNMaker Well-Known
    Builder

    Joined:
    Jul 13, 2017
    Messages:
    62
    Likes Received:
    38
    As I was looking round my play room I realised I had about 35M of various sizes of v-slot extrusion, another 20m of 2020 extrusion, a bunch of NEMA 17s and 23s, dozens and dozens of micro controllers, stepper drivers, odds and sods of fixings, screws, plates, switches, etc. and needed to make something.\

    I have been laser cutting for a while now, courtesy of my mate's laser bureau, but often I would hold off on a job because it was too small to send for commercial cutting.

    I make things from paper, card, foam board, corflute, balsa, thin ply, thin MDF, etc. and can be found of an evening with an Xacto knife in my hand. So,. what better than a small laser diode to cut stuff with?

    I looked at the ACRO and thought it was just the job - even if it was going to end up being bigger than my Ox.

    I make model planes, and using big sheets of A2 and A1 foamboard means you can make bigger, stronger wings and fuselage, without compromising structure. I also make pop-up cards, pop-up architecture, 3d 'shadow box' articles and foam-board architecture for modellers, so being able to cut a whole A2 sheet in one go was going to be a big bonus.

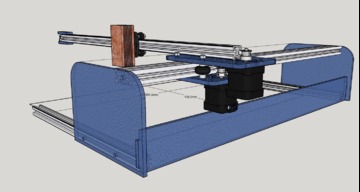
    As I was trolling the googles, I saw a cheap pressed-steel 3D printer for under $200 that used a 'cross' style of gantry that only used one motor for the X-axis.

    So, I set to to work out how I could make such a beast in an affordable way to carry a laser diode.

    After a few mock-ups of mdf and gaffer tape to get the weight sorted out, I was sure I could reliably and rigidly mount a laser diode on a cantilevered axis without bounce or jitter.

    So, that's what I've done.

    [​IMG]
     
  3. BNMaker

    BNMaker Well-Known
    Builder

    Joined:
    Jul 13, 2017
    Messages:
    62
    Likes Received:
    38
    What I didn’t have any of, and what I’ve been substituting ‘regular’ extrusion for is v-slot 2020.

    I ordered 5 600mm lengths and it arrived today, along with a bunch of mini-v gantry sets.

    So, tomorrow is ‘build a mock-up’ day, where I’m going to put together a working prototype using a cheap grbl shield ($5!!) and some spare Pololu drivers, a Due copy running G2Core (further development of TinyG) and all the final mechanicals, but without the diode, which is stuck in the post somewhere between Singapore and Borneo.
     
  4. BNMaker

    BNMaker Well-Known
    Builder

    Joined:
    Jul 13, 2017
    Messages:
    62
    Likes Received:
    38
    DE173B18-EDFC-40CB-8F52-3F9071C194F9.jpeg A40A268D-39AE-46DA-B769-96244C952EA2.jpeg Today did the first test build, just to decide on which extrusion to use, what final size to make it, checking up on the balance for the cantilever, etc.

    I tried 4020 and 8020, but 6020 is fine - gives enough of a spread to counteract most of the lever action from the cantilever. I will double up some sections of the y-axis acrylic plates to ensure it can take the weight. I was surprised how stable it was, just with a single stabiliser bar, but then the weight of 1500mm of 6020 v-rail is way more that the whole rest of the assembly. If I had access to a laser or waterjet that could cut 3mm alloy plate, I would make them from that, but TIB (this is Borneo) and there’s bugger-all in the way of precision engineering here. I can’t use the 150W CO2 laser as it’s strictly used for signage - acrylic, vinyl, poly, timber and I don’t think they would like me leaving aluminium residue all over the place. :(

    I’m conscious that the mass of the Y-axis includes both of the motors and the entire X-axis, so will have a look at what other steppers I have. I will be ‘double belting’ the 3mm GT2 and it is genuine Gates belt, not a Chinese knock-off. I bought a whole roll a few years ago. Comparing it to the bit of belt I got with my last 3D printer, it’s way more flexible, wider, better ‘teeth’ and the base layer is heavier. The Chinese belt feels very plasticky and slippery. I’ve used double-belting before and found it is far better and pretty much eliminated the bounce and chatter you can get from a heavy gantry starting and stopping.

    So tomorrow I will finalise the drawings and get the rest of the bits together (can’t find my spacers or eccentric nuts - may have to order more, which is a pita - 3-4 week ‘express’ shipping to here from anywhere, or $50 for seven day shipping, so no. And Ramadan started today, so everything is slower and less efficient than normal for the next lunar month...).

    Even with the weight of the Y-axis extrusion, it’s going to be a light machine and should be easy to stand against a wall when not in use.

    I’m trying to work out a minimalist way of setting up limit switches. In theory I should be able to get away with two, but right now trying to work out how to trigger a single switch at both ends of the limit of travel is going to hav3 to take second place to dinner prep.
     
    Mark Carew likes this.
  5. Mark Carew

    Mark Carew OpenBuilds Team
    Staff Member Moderator Builder Resident Builder

    Joined:
    Jun 28, 2013
    Messages:
    2,758
    Likes Received:
    2,440
    following! - Doing great @BNMaker keep up the good work :thumbsup:
     
    BNMaker likes this.
  6. BNMaker

    BNMaker Well-Known
    Builder

    Joined:
    Jul 13, 2017
    Messages:
    62
    Likes Received:
    38
  7. james poulton

    Builder

    Joined:
    May 18, 2018
    Messages:
    6
    Likes Received:
    0
    interesting build fella..
     
  8. BNMaker

    BNMaker Well-Known
    Builder

    Joined:
    Jul 13, 2017
    Messages:
    62
    Likes Received:
    38
    As in, ‘we live in interesting times’? :)

    Things have been slowed, somewhat, by by regular laser cutter going on holiday for a month, but I sent the job off to ponoko in NZ, where my wife’s currently on holiday - she brings them back on Sunday. One of the disadvantages of living in the third world is a shortage of service bureaux.

    My concerns are over possible oscillation when moving at the extent of the x-axis, even though my laser assembly is only about 70 grams. We won’t know until it’s together.

    I’ve added mounting holes for Smoothie, TinyG and UNO/Grbl. Next week should have a much better idea about how it’s going to fare.
     
    MaryD and Mark Carew like this.
  9. BNMaker

    BNMaker Well-Known
    Builder

    Joined:
    Jul 13, 2017
    Messages:
    62
    Likes Received:
    38
    I just completed the test assembly with some odds and ends of extrusion to prove my design files were OK - all fit, snug as a bug on the first go. Sometimes I surprise even myself! But... there were two errors: I forgot to add the holes for the toothed belt and its tie-down. I did draw it, but sent a previous ver to the laser bureau in my haste to get it cut in time for my wife to bring it on the plane. I'll do butchery with a drill and file for testing.

    And now I can do a full BOM! Yay!!! The mechanical parts list is looking very minimal - 4 wheel sets, 8 washers, 4x 45mm bolts and nuts, 20x 10mm bolts and t-nuts, 6x self-tapping steel bolts (for the 6020/side panel interface), 3x toothed belt pulleys, two NEMA 17 steppers, a few hardware odds and ends, depending on how 'full' you want the build (limit switches, power switch, PSU, etc.), and the length of alloy is dependent on the size you build it.

    The acrylic I used was 3mm cast acrylic, which is a little flimsy for the sides without some triangulation - sadly my courier wife left the large stabilising back piece sitting on the plane, but we should get it in a day or so. I would rather have used 5/6mm, but Ponoko doesn't offer it. I also specified 'orange tint', which would have given me a transparent, laser-safe (and cool!) look, but that isn't available in the NZ store, only the US.

    To beef up the gantry - especially the cantilevered Z-axis, I have used two 3mm plates. There's no appreciable flex, even with a 100gm weight hanging off the mini-V gantry assembly, but without the stiffening back panel, it wobbles around like me on a skateboard.

    In the spirit of minimalism, I cut a bunch of 3mm washer/spacers, rather than have to buy alloy ones and they seem to be working just fine. The y-axis is as smooth as butter.

    I went the ACRO route with sliding v-wheels, rather than eccentrics, again for minimalism.

    Now I've proven the design, I will get them remade in 6mm transparent orange.


    I just used an offcut of 6020 to prove motion - the finished one is ~1200mm.

    Yes, I know there's only one bolt/t-nut holding my end plate/X-axis idler on - I used two long t-nuts and they interfered with the idler pulley. I will put shorter ones on when I do the final fit.
    [​IMG]

    You can see the Arduino DUO mounted, but without the GRBL shield - I added mount holes for DUO/Mega, TinyG and Smoothieboard. You can mount inboard, like this, or swap the plate to the other side and have it mounted outboard.

    There are holes to put a piece of 2020 across the back to mount the back panel to, but I won't cut it until I am at final assembly. I used the offcuts of 2040, but will use 2020 in the final assembly.

    [​IMG]


    [​IMG]

    I used 't-insert nuts' for ease of initial assembly, then put in the correct 46mm bolt and nylock nut to check fit. This is all coming apart again, the t-nuts make it quick and easy to assemble and test.

    [​IMG]

    Note the additional two plates to beef up the Y-axiz and the 50 washer/spacers, which could be left out if you want to use alloy spacers and 6mm acrylic (or MDF/steel, etc.).
     
    #9 BNMaker, Jun 24, 2018
    Last edited: Aug 28, 2018
  10. BNMaker

    BNMaker Well-Known
    Builder

    Joined:
    Jul 13, 2017
    Messages:
    62
    Likes Received:
    38
    Well, the airline was fkn useless and the cleaners thought a 600mm long piece of plastic, wrapped, with multiple laser-cut holes in it was just rubbish and tossed it - this after my wife went straight from customs to the desk, before the cleaners got on the plane, and told them she had left it, what seat she was in, etc. Sometimes I really hate the totally crap customer service you get here - they just don't go the first step of the extra mile, let alone walk to the end. Grrrr.

    So, I needed to get another set - and, in the spirit of 'simplify', I replaced the 3mm acrylic with 6mm, and got rid of the two stiffening plates at the same time. I made a few changes - added more mounting holes for controller boards, power supplies and relocated the Y-Axis back a few mm, allowing me to put an almost-full-height back panel in.

    Cost to cut a set in transparent orange acrylic - US$90 for two sets, vs the $46 for a single set in 3mm from Ponoko. I wasn't happy with 3mm, it is just too wobbly, even with cross-bracing. Make your own back plate from ply, MDF, etc. and you don't need to get a 600x125mm piece cut and it would be half that price - but I wanted it to look pretty, for electrical mounting, emergency stop switch, etc. From a laser bureau perspective, pretty damned good pricing. I got them to cut a set of ACRO plates as well and chuck it in the parcel at $22 - shipping is always expensive here, so I wanted to make the most of it. Can't recommend the bureau enough - Hou of ChinaLaserCuttingServices.com made things very easy. I didn't have to create a cutting file, just sent him an AI and they took care of the rest. The file went to them on Friday, and he just contacted me with final shipping details today (Monday).

    Various bureaux were contacted and they were looking at $130 for two sets at a minimum, in some yucky opaque colour. Getting transparent coloured would add to the price.

    And - Hou can cut everything from cork to steel, so I'm sure I will be using his services in the future.

    Pics when the new plates arrive.

    Screen Shot 2018-07-02 at 12.19.59 PM.png
     
    #10 BNMaker, Jul 2, 2018
    Last edited: Jul 2, 2018
  11. BNMaker

    BNMaker Well-Known
    Builder

    Joined:
    Jul 13, 2017
    Messages:
    62
    Likes Received:
    38
    New 6mm plates arrived today -= less than seven days since I submitted the file to receiving them in my hands.

    Great job done by HEK - every part perfect, packed really well, size is spot-on. Colour wasn't exactly what I was after - more yellow than orange, but I will go through the acrylic vendors catalogue and find a better match (this was colour '212', but I can't find that on the Pantone chart :) )
    IMG_0478.JPG IMG_0479.JPG
    IMG_0481.JPG IMG_0480.JPG
     
    MaryD and Mark Carew like this.
  12. BNMaker

    BNMaker Well-Known
    Builder

    Joined:
    Jul 13, 2017
    Messages:
    62
    Likes Received:
    38
    Tomorrow I will size it all up properly, cut the extrusion, tap and screw it all together, wire up the electronics and see if we can't get some life into the thing.
     
  13. BNMaker

    BNMaker Well-Known
    Builder

    Joined:
    Jul 13, 2017
    Messages:
    62
    Likes Received:
    38
    Well, tomorrow came and went... life, a sick cat, a bike accident and a wedding got in the way...

    It's all assembled, all the components are in place (controller, PSU, limit switches, steppers, OrangePi for wireless, 12V>5V/USB adapter to handle the Pi and a future camera) and it all fits with tiny clearances - better than I thought.

    Now, just to solder all the limit switches, wire them, wire the steppers, tighten the belts and run some calibration, work out the PWM settings, work out my cutting area limits, finish soldering my new laser driver, test and mount it all.

    I've got three new laser modules arriving, but post to the third world is sloooooow, so I'm going with what I have on hand for setup and calibration.

    From my design files to a built unit there's been remarkably few errors: I made the kill switch hole too small - used radius instead of diameter. and my limit switch mounting holes on the Y carriage were too close to the X-axis extrusion, so I had to put them underneath the acrylic plate, rather than on top - actually looks tidier and keeps the wires out of sight.

    All in all - minor.

    Would I make changes?

    Yes
    • To account for different sized steppers, I would move the lower stepper mount a few mm back to prevent rubbing on the back panel
    • Put in more holes for various different power supplies. I'm using 3M VHB tape to mount it as the holes I made for my 24V PSUs don't fit my new 12V PSU
    • Add a cutout for a panel-mount USB power port to power a Pi or camera; add mirrored holes for power cable ingress - I flipped the back panel but it would have been easier to just make a second hole
    • Make a protective cover plate for the controller. Easy enough to make one plate to fit the TinyG, Smoothie and Mega/Uno/GRBLshield with easily snipped standoffs to make it fit whichever board you use (the TinyG and Smoothie are pretty close - so can do it with the same size.

    Until I start cutting in earnest, I guess I won't know - but am very happy that the only issues are cosmetic.

    Screen Shot 2018-07-27 at 1.13.56 PM.png
     
    GrayUK likes this.
  14. BNMaker

    BNMaker Well-Known
    Builder

    Joined:
    Jul 13, 2017
    Messages:
    62
    Likes Received:
    38
    59A23E38-7385-43AF-98BD-E249C72CE1C2.jpeg

    To ensure belt longevity, to avoid stretch and to reduce slippage, without needing to tighten TF out of them, I always double-belt (just like with paper bags and condoms o.0).

    This means glueing a length of Gates belt into the track before you assemble. It acts like a rack and pinion system, taking the load off the drive belt from its two attachment points at the end of the axis and spreading it across the whole length of the extrusion.

    Accuracy is better because: a 0.25% deflection of 1.5M of belt is 3.75mm, a .25% deflection of 70mm of belt (the length between one wheel, over the pulley to the next wheel) is .175mm. Acceleration/deceleration stretch and ‘belt bounce’ are almost entirely eliminated, for the cost of a few dollars of belt and some glue.

    I’ve tried a number of glues - hot glue, superglue, UHU, epoxy, silicone caulk. In order of ‘best’:

    Epoxy - hands-down the best, but a prick to install in a channel and messy as hell and hard to remove if you need to.
    Silicone caulk - the good stuff, not the water-based stuff. Clean your channel and your belt, put in a thin smear of caulk and run your finger (I have pianists hands, YMMV) along, then lay in the belt. Clean up using a craft knife. Easy to remove if you need to and you can reuse the belt.
    UHU - easy to use, holds well rubber to alu, available everywhere.
    Superglue (cyanoacrylate) - easy on, sticks well, goes brittle over time. Maybe one of the better brands used for aero modelling would be better long-term than the cheap crap I use. My Ox still has superglued tracks, but they are lifting at the ends and it is one of those jobs I need to attend to...
    Hot glue - nope. Again, maybe a better quality would work better than the generic sticks I have - Bosch make a ton of different types, but not available in Asia. It is too cool by the time you get the belt on it (like me - too cool for the belt, or so I tried to convince my father :) ).

    For the +Laser I’ve used UHU general purpose - easy on, you can move the belt around a bit to ensure even coverage, takes about ten minutes to set and cure over four to eight hours before you use it (I would leave it 12, to be sure).
     
    #14 BNMaker, Aug 1, 2018
    Last edited: Aug 28, 2018
    MaryD and GrayUK like this.
  15. BNMaker

    BNMaker Well-Known
    Builder

    Joined:
    Jul 13, 2017
    Messages:
    62
    Likes Received:
    38
    It never goes as quickly as you think it will...

    After many, many 'two steps forward, one step back' moments, IT LIVES!

    There's a few small jobs to do - add the last two right-angle brackets between the sides and back panel. Finalise the cable routing. Mount the TinyG to the side and add a shield and fan. Tune the TinyG. Add a spoil board. Add a laser module (all work so far has been 'bare') - I ordered three new laser modules but six weeks later, Borneo Orang Utan post is still sitting in a tree somewhere, eating bananas and scratching its nuts... 0.O


    The packs of bearings are there to give me a visual representation of the limit of travel. The gel is for our sick cat :)

    Once I've entered in the raw stepper/sprocket numbers, I fine-tune it using a digital calliper taped to the gantry. Open it up to full extent, jog the gantry till it is just touching, zero, move a known distance - like 100mm. Check the reading, adjust the TinyG settings and do over. Usually in three goes you can get it .01mm accurate.

    As it stands right now it is running via Chilipepper and Serial Port JSON Server, wirelessly on an Orange Pi Zero Plus2 H3 - it's been flawless, even with huge raster files thrown at it. I am using a 12V > USB converter which provides more than enough grunt to run the Pi. It's all built inside the Pi case, with just a power connector coming out which allows me to unplug it and reflash it or whatever I need to do.

    I received a stock of 1mm acrylic sheet today which I was going to use for clock faces, etc. but the packing was less than stellar and every single sheet has the corner broken off. So I now have plenty of 'test' pieces to tune my PWM/Laser settings on. :)

    There are still refinements I will make to the cutting files and will send off for a set of Mk III plates. For example - I want to be able to mount a case fan on the side so I can cool the TinyG. I want to add an Emergency Stop switch and a power switch, and I want more PSU options. After making sets of holes to suit my 3 types of PSU, I ended up sticking a completely different PSU on with 3M VHB tape (the stuff they use to stick on your rear-view mirror to your windscreen - permanent!). I also want to make a set of controller mounting holes for an Arduino Uno, as well as the Mega/Due I have now. I understand that a lot of people have GRBL running on a 328 processor board and it makes a lot of sense, financially.

    So, overall it's been a remarkable success. Very few problems, a couple of oversights, and the third time's the charm!

    If anyone wants the files in MK II condition, which is what you see here, just ask. I'm going to be busy with two other projects and its going to take me a few weeks to finalise the MK III changes.
     
    #15 BNMaker, Aug 28, 2018
    Last edited: Aug 28, 2018
  16. BNMaker

    BNMaker Well-Known
    Builder

    Joined:
    Jul 13, 2017
    Messages:
    62
    Likes Received:
    38
    Laser(s) arrived today - just working out the best routing for the power and PWM cables.

    Hopefully, cutting will commence shortly afterwards.
     
  17. Glenn West

    Builder

    Joined:
    Dec 5, 2013
    Messages:
    23
    Likes Received:
    7
    nice. Only thing I would look at different, was make it fully enclosed.
    Safer for eyes and others around.
    Second, is try to make it capatible with LightBurn, really great laser software.
     
  18. BNMaker

    BNMaker Well-Known
    Builder

    Joined:
    Jul 13, 2017
    Messages:
    62
    Likes Received:
    38
    It is minimalist, if I wanted it enclosed, I would have designed it to be enclosed. It's well within my capabilities. It would also completely negate the idea of having a cantilevered mechanism. Anyone can design a three-rail, two-axis machine. There's tons of them out there. I think you have missed the point entirely.

    As to Lightburn, you can use any controller you want with it - I don't need to 'make it compatible'. The TinyG it's built with is supported in Lightburn, as is the Smoothie and the Arduino mount points it is designed with allow the use of any number of compatible GRBL controllers..

    However, I have an essential disconnect with pay-for software for open-source projects. I don't think it's the hardware designers job to design to commercial software.

    And, I have an essential difference of opinion on wireless operation with the maker of Lightburn. He won't make software that allows someone to operate a machine over network, even though he already does with a number of the machines he supports, so **** that noise.
     
  19. hmark75

    hmark75 New
    Builder

    Joined:
    Jul 25, 2020
    Messages:
    1
    Likes Received:
    0
    Do you have any STL or STEP files of the plates, I would be very keen on trying this project as it was just what I was looking for!
     
  20. Errie Plantagie

    Builder

    Joined:
    Sep 14, 2021
    Messages:
    2
    Likes Received:
    0
    Great!
    I would like to build one, please help me to start and where to buy parts I need.

    Errie
     
  21. Peter Van Der Walt

    Peter Van Der Walt OpenBuilds Team
    Staff Member Moderator Builder Resident Builder

    Joined:
    Mar 1, 2017
    Messages:
    15,051
    Likes Received:
    4,313

Share This Page

  1. This site uses cookies to help personalise content, tailor your experience and to keep you logged in if you register.
    By continuing to use this site, you are consenting to our use of cookies.
    Dismiss Notice