Welcome to Our Community

Some features disabled for guests. Register Today.

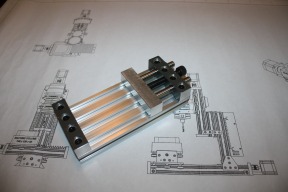
MakerSL MSL-8 OB Vise

Discussion in 'Other Builds' started by Sonny Lowe, Nov 2, 2016.

  1. Peter Grace

    Builder

    Joined:
    Nov 19, 2016
    Messages:
    2
    Likes Received:
    2
    I'm sorry to say that I also used another machine to make the vise -- I used my 6040 cnc to mill the aluminum bar stock holes. I cut the bar with a hacksaw, cut the holes on the 6040, then as the final operation I used the vise on the minimill and faced the edges.

    I feel your pain with workholding for the MiniMill; that was the reason I stumbled on the MSL-8, because I couldn't find a really good workholding solution for the MiniMill otherwise. I'd love to come up with some kind of mini-pallet with low profile clamping, but I think the MSL-8 will suffice for the time being.

    -Pete
     
  2. Darryl Hadfield

    Builder

    Joined:
    Dec 26, 2017
    Messages:
    10
    Likes Received:
    2
    It's been a few months since the last post - sorry for Zombie-ing this thread.

    I'm in a small home and without a sufficiently sized space to do industrial machining; I'm now tackling what I hope is the final stages of go from "drawing" to "g-code".... then it's final alignment time for my C-Beam build, and then I'm goign to mount up the stock I've purchased (THANK YOU for the BOM!), and hopefully... simple clamps will be enough to hold the work piece in place while I do the initial machining to use the c-beam... to make the MakerSL Vise... which I then hope to use as a foundational piece of tooling for subsequent efforts.

    Fingers crossed I can get this rolling by the end of the week; I have other projects I hope to use the c-beam and makerSL vise to complete!
     
    MaryD likes this.
  3. SCYBUCK

    SCYBUCK New
    Builder

    Joined:
    Sep 11, 2017
    Messages:
    36
    Likes Received:
    13
    Michael,
    You are in the same catch-22 that I am, sir! Which comes first? The chicken or the egg?
     
  4. Jim S

    Jim S Well-Known
    Builder

    Joined:
    Jan 2, 2016
    Messages:
    41
    Likes Received:
    37
    This gives me some ideas for an extra set of 1-2-3 blocks that I've got sitting around...
     
  5. Rob Taylor

    Rob Taylor Master
    Builder

    Joined:
    Dec 15, 2013
    Messages:
    1,470
    Likes Received:
    749
    If it helps anyone, if I was going to try to do this without a complete separate machine to make the parts on, I'd use the following sequence. I'm assuming you can at least make toe clamps for the V-slot table, since you can basically make them with a hand drill and a file, if necessary. They just transfer force.

    1. Make sure the mill head is perfectly trammed in nod (and tilt, too, but really focus on nod since the x-axis is the primary milling axis). Looking for about a thou, 0.001", in 4-5" if possible. A couple tenths if you're measuring over only a couple inches. The more precise you make it here, the better the vise will be (and it should be very good, if you're using it for repeatability).
    2. Rough-cut a short (say, 2mm or so) stand-off to go under your part. Cut it over-long to begin with, say, 5" long, from 1/8"/3mm material. Hold it down with toe or strap clamps on each end half an inch or less. Check that the bar isn't bowing up in the middle.- if it is, adjust the angle of your clamps and loosen them up as much as possible. Manually jog or program a surfacing over the middle 4", taking off a total of 0.2mm or thereabouts. Cutting near the center might get buzzy, so take the feed easy there. Might be best to rough and finish. Clean up all the extrusion lines.
    3. Cut off the outer half-inches where your toe clamps were, leaving you with a 4", 2.5mm thick bar perfectly flat on one side. File the edges to deburr before putting it back on the machine.
    4. Flip it over and repeat. Now you have a 3" parallel that you can hold your parts off the table with, milling the sides, while you hold them with toe clamps from the top.
    5. Now put your rough cut aluminum block on top of the stand-off, hanging over the edge very slightly, and toe clamp it at each end and on the middle (on the far side, Y+). Make sure your toe clamps are directly above your stand-off.
    6. Machine the nearest side to a good level of flatness and surface finish. Speeds & feeds kinda depend on your spindle/cutter/screws/etc.
    7. Rotate the part 90 degrees, shiny side down (so your precision surfaces are mating to get squareness), and repeat 3 more times. The last two sides you should also take to final dimension as well as squareness.
    8. Move your toe clamps into the middle, careful on the angle now that it's a finished surface, and square off the ends to dimension. Rotate the whole part about z first if you didn't focus much on tramming your head tilt.
    9. Now you have a square block, 1x1x3" or whatever you wanted. Lay out the rough position of your linear guide holes with Dykem, and then toe-clamp around them. Touch off as accurately as you can with a wiggler or a Haimer or something- do all four sides and use the 1/2 function if your controller software allows for it- at least that way if you're not perfectly accurate, you're at least symmetrical and your vise clamping force will be even.
    10. Drill and ream those holes, then drill and tap your tightening screw hole (adjusting toe clamps around if necessary- don't loosen them all at once!) in the center.
    11. Repeat for the top screw holes. Now you have your fixed block! Now just to repeat this whole thing for the fixed jaw, moving jaw, and probably base plate!
    Notice that this is all manual or near-manual machining. Until you have a reliable machine, reliable workholding, and known cutter dimensions, CNC isn't gonna produce useful, meaningful results. Old-school techniques are still the order of the day for the DIY world.
     
    Batcrave likes this.
  6. Michael.M

    Michael.M Veteran
    Staff Member Builder Resident Builder

    Joined:
    Jan 21, 2017
    Messages:
    432
    Likes Received:
    266
    Super glue and blue painters tape is a great way to hold stock until you can machine a fixture or clamps. I'm only suggesting this as I've read some comments regarding no way to get started on this vise build.
     
  7. Giarc

    Giarc OpenBuilds Team
    Staff Member Moderator Builder Resident Builder

    Joined:
    Jan 24, 2015
    Messages:
    3,016
    Likes Received:
    1,682
    I use this method a lot when cutting things out of plastic. It works great. What I like about it is that the two layers of tape are thick enough I can cut out the part and never touch the spoil board. I have used it for aluminum, too. But I usually do my drilling operations first and use screws to help hold it down. The nice thing I that I do not need tabs.
     
    Michael.M likes this.
  8. Rob Taylor

    Rob Taylor Master
    Builder

    Joined:
    Dec 15, 2013
    Messages:
    1,470
    Likes Received:
    749
    A decent idea for the base, perhaps, where the sheer surface area counters most other issues, but I wouldn't rely on that technique for perfect dimensional accuracy and squareness for something like a milling vise where the end product is going to be a fundamental link in the chain of your machine's ongoing usefulness. It's a pretty good method for lower-precision short-run/one-off parts that can be done in a single setup and won't endure too high machining forces, and can't be used with traditional methods of workholding.
     
  9. dddman

    dddman Journeyman
    Builder

    Joined:
    Mar 2, 2014
    Messages:
    468
    Likes Received:
    187
    How did you manage the joint between the screw and the middle block?
     
  10. Yanou Fishel

    Builder

    Joined:
    Dec 21, 2019
    Messages:
    35
    Likes Received:
    14
    Perhaps a stupid question, but any reason a (temporary) version couldn't be 3d printed with a captive nylock nut?
     
  11. Peter Van Der Walt

    Peter Van Der Walt OpenBuilds Team
    Staff Member Moderator Builder Resident Builder

    Joined:
    Mar 1, 2017
    Messages:
    15,051
    Likes Received:
    4,313
    Go for it, even if it just lasts long enough to cut its own replacements :)
     
    Yanou Fishel likes this.

Share This Page

  1. This site uses cookies to help personalise content, tailor your experience and to keep you logged in if you register.
    By continuing to use this site, you are consenting to our use of cookies.
    Dismiss Notice