Welcome to Our Community

Some features disabled for guests. Register Today.

GRANITE 1.0

Discussion in 'CNC Mills/Routers' started by Michael.M, Sep 29, 2018.

  1. Michael.M

    Michael.M Veteran
    Staff Member Builder Resident Builder

    Joined:
    Jan 21, 2017
    Messages:
    432
    Likes Received:
    266
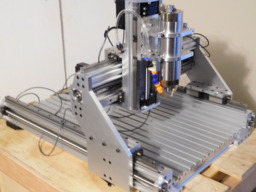
    Nope. It's almost the same. The gantry does lean back a little bit more so the orientation of the work area has shifted towards the back of the machine.
     
  2. NeeqOne

    NeeqOne Well-Known
    Builder

    Joined:
    Mar 3, 2018
    Messages:
    46
    Likes Received:
    27
    thanks, for the info.
     
  3. HuguesP

    HuguesP Well-Known
    Builder

    Joined:
    Jan 14, 2018
    Messages:
    30
    Likes Received:
    44
    Nice machine Michael
     
    Michael.M likes this.
  4. Michael.M

    Michael.M Veteran
    Staff Member Builder Resident Builder

    Joined:
    Jan 21, 2017
    Messages:
    432
    Likes Received:
    266
    Thanks buddy!
     
  5. Michael.M

    Michael.M Veteran
    Staff Member Builder Resident Builder

    Joined:
    Jan 21, 2017
    Messages:
    432
    Likes Received:
    266
    20181028_185258.jpg 20181028_185224.jpg
    Worked on the drag chains this weekend. The enclosure is probably next on the list. I'm just waiting on one more material. I say "probably" because it seems like I'll set plans to work on something specific but can easily get side tracked for hours.
     
  6. Michael.M

    Michael.M Veteran
    Staff Member Builder Resident Builder

    Joined:
    Jan 21, 2017
    Messages:
    432
    Likes Received:
    266
    I still need to settle on some sort of protection for the linear rails & carriages. I'm also waiting for the g1/4" bsp tap to mill a 2 position manifold for the dual coolant nozzles.
     
  7. GrayUK

    GrayUK Openbuilds Team Elder
    Staff Member Moderator Builder

    Joined:
    May 5, 2014
    Messages:
    1,668
    Likes Received:
    627
    The Linear Rail thing. The only thing that comes to mind immediately, is some sort of plastic expandible piping with a slot cut in the bottom of it. I'm trying to think where I've seen piping that you can pull longer and squash shorter. :rolleyes: It makes a distinctive cracking noise as you do so. Ah yes. :D They make 2" flexible pipe for joining waste shower pipes etc. If you had a piece either side of your carriages, so one would expand and one would collapse as the carriages move up and down. You may need to have small extensions each end to park it so to speak. :thumbsup:
     
    Michael.M likes this.
  8. HuguesP

    HuguesP Well-Known
    Builder

    Joined:
    Jan 14, 2018
    Messages:
    30
    Likes Received:
    44
    From what i see, a long bent shape screwed in the y axis extrusion with just a kink to let pass the carrier, would prevent the chips to load below the carrier, 99.9% of the chips would be block, anothwr option is the angle screwed on the gantry this time , would be the lenght of the gantry plates, some small dust on the rail have not been an issue for me to date. the carriers are pretry much well sealed on the rails.
     
    Michael.M likes this.
  9. Michael.M

    Michael.M Veteran
    Staff Member Builder Resident Builder

    Joined:
    Jan 21, 2017
    Messages:
    432
    Likes Received:
    266
    Really want to go the DIY route. I'm trying to think of a way to seal pieces of rubber together. I know you can cut and fold some materials to make bellows but I think that requires a stiffer material than rubber.
     
  10. HPB

    HPB Well-Known
    Builder

    Joined:
    Nov 28, 2015
    Messages:
    80
    Likes Received:
    52
    This is really a solid build! Kudos on an exceptional job. I was hearing some folks tell me that aluminium extrusions (Openbuilds or otherwise) do not make rigid machines and this definitely proves them wrong by a mile. Are those THK rails?
     
    Michael.M likes this.
  11. Michael.M

    Michael.M Veteran
    Staff Member Builder Resident Builder

    Joined:
    Jan 21, 2017
    Messages:
    432
    Likes Received:
    266
    Hey thank you! Yeah they are THK 20mm & 15mm rails. My first machine was an Open Builds Sphinx. That machine introduced me to the world of CNC routers and really got the ball rolling for this machine.
     
    HPB likes this.
  12. HPB

    HPB Well-Known
    Builder

    Joined:
    Nov 28, 2015
    Messages:
    80
    Likes Received:
    52
    It looks really nice. I'm in the process of building a fixed gantry router using linear rails and ball screws. I've never worked with them before so it will be an experience of its own. The idea is to increase rigidity (and hopefully keep costs down) to mill materials such as stainless steel etc.
     
    Michael.M likes this.
  13. Michael.M

    Michael.M Veteran
    Staff Member Builder Resident Builder

    Joined:
    Jan 21, 2017
    Messages:
    432
    Likes Received:
    266
    Thanks! It sounds like you're working on an awesome build. You should definitely start a build log. I considered a fixed gantry machine for the same reason (rigidity) but moving gantry style machines are just so cool. I'm excited to see what this Granite machine is capable of.
     
    HPB likes this.
  14. Michael.M

    Michael.M Veteran
    Staff Member Builder Resident Builder

    Joined:
    Jan 21, 2017
    Messages:
    432
    Likes Received:
    266
    DSCN2383.JPG
    Working on a more compact, dual nozzle solution. Each nozzle will have it's own flow valve and only one will have coolant for now.

    DSCN2392.JPG
    These Misumi extrusions are way thicker than I thought. Very heavy duty. Almost 1/4" thick! Awesome. Thanks to CNCMD for putting me on to these.
     
    #74 Michael.M, Nov 10, 2018
    Last edited: Nov 10, 2018
    CNCMD likes this.
  15. Michael.M

    Michael.M Veteran
    Staff Member Builder Resident Builder

    Joined:
    Jan 21, 2017
    Messages:
    432
    Likes Received:
    266
    DSCN2376.JPG DSCN2367.JPG I added o-ring grooves to make sure nothing leaks.

    DSCN2363.JPG
     
  16. joe williams

    joe williams Well-Known
    Builder

    Joined:
    Nov 9, 2015
    Messages:
    100
    Likes Received:
    59
    Looking good!
     
    Michael.M likes this.
  17. Michael.M

    Michael.M Veteran
    Staff Member Builder Resident Builder

    Joined:
    Jan 21, 2017
    Messages:
    432
    Likes Received:
    266
    DSCN2377.JPG
    Those pneumatic fittings will be replaced with 90 degree fittings and a hose will coonect each noozle to the valves behind the Z axis.
    DSCN2377.JPG 154186188777186524095709845663.jpg
     
  18. HuguesP

    HuguesP Well-Known
    Builder

    Joined:
    Jan 14, 2018
    Messages:
    30
    Likes Received:
    44
    This is becoming one of a kind Super Epic build! Keep up!
     
    Michael.M likes this.
  19. Michael.M

    Michael.M Veteran
    Staff Member Builder Resident Builder

    Joined:
    Jan 21, 2017
    Messages:
    432
    Likes Received:
    266
    Haha thanks buddy!
     
  20. Giarc

    Giarc OpenBuilds Team
    Staff Member Moderator Builder Resident Builder

    Joined:
    Jan 24, 2015
    Messages:
    3,017
    Likes Received:
    1,682
    I am curious how you are blowing air? Are you using a standard air compressor, or some other kind of pump? I have been using my air compressor, but it is sooooo noisy so I am looking at other options.
     
  21. Michael.M

    Michael.M Veteran
    Staff Member Builder Resident Builder

    Joined:
    Jan 21, 2017
    Messages:
    432
    Likes Received:
    266
    I am using a small oiless air compressor from California Air tools. It's not crazy powerfull but it is quiet.
     
    Giarc likes this.
  22. HPB

    HPB Well-Known
    Builder

    Joined:
    Nov 28, 2015
    Messages:
    80
    Likes Received:
    52
    I use a 35W aquarium pump on my setup and that does the job well. It’s not crazy air flow but it gets it done.
     
    Michael.M likes this.
  23. Giarc

    Giarc OpenBuilds Team
    Staff Member Moderator Builder Resident Builder

    Joined:
    Jan 24, 2015
    Messages:
    3,017
    Likes Received:
    1,682
    Thank you.
     
  24. GrayUK

    GrayUK Openbuilds Team Elder
    Staff Member Moderator Builder

    Joined:
    May 5, 2014
    Messages:
    1,668
    Likes Received:
    627
    Never thought to use something as small as a Pond Air Pump, but I see it is quite common on YouTube.
    They are certainly designed to run for long periods as well. I've seen a couple I like the look of. :thumbsup:
     
  25. Giarc

    Giarc OpenBuilds Team
    Staff Member Moderator Builder Resident Builder

    Joined:
    Jan 24, 2015
    Messages:
    3,017
    Likes Received:
    1,682
    The price is right too. I have always manually turned the air on with the compressor and not for all materials. The pump looks convenient and quiet enough that I may actually get around to automating it. I just bought some relays.
     
  26. Michael.M

    Michael.M Veteran
    Staff Member Builder Resident Builder

    Joined:
    Jan 21, 2017
    Messages:
    432
    Likes Received:
    266
    I've seen them used also. I like that they are designed with long duty cycles in mind. My small compressor is quiet but it is constantly running due to it's size.
     
  27. Michael.M

    Michael.M Veteran
    Staff Member Builder Resident Builder

    Joined:
    Jan 21, 2017
    Messages:
    432
    Likes Received:
    266
    20181124_174611.jpg Something fishy is going on. I removed the bottom frame and sub plate to attach the tslot table and things aren't going back together as expected. On a plus side, removing the base is a cake walk as it's the same as the Sphinx (thank's kyo)
     
  28. GrayUK

    GrayUK Openbuilds Team Elder
    Staff Member Moderator Builder

    Joined:
    May 5, 2014
    Messages:
    1,668
    Likes Received:
    627
    How so? What's happening? Is the framework settling so to speak?
     
  29. Michael.M

    Michael.M Veteran
    Staff Member Builder Resident Builder

    Joined:
    Jan 21, 2017
    Messages:
    432
    Likes Received:
    266
    So I assembled the machine in two halves (like the Sphinx) and before I installed the two 4040 X axis cbeams, I tried to make sure the Y axis gantry plates were in the exact same spot. I measured everything as best I can and actually it all seems to check out but that's where I am having issues. The bottom frame of the machine is not sliding back in correctly. Before all of of this, I was thinking I need to go back through the machine and square everything up before I run it for the first time. I really just tried to assembled it and didn't focus too much on making sure everything was square.
     
  30. Michael.M

    Michael.M Veteran
    Staff Member Builder Resident Builder

    Joined:
    Jan 21, 2017
    Messages:
    432
    Likes Received:
    266
    I also assembled the machine with the gantry plates in the middle of the machine (as you see in the pic) but this makes it difficult to reference their position in relation to anything else. Each side has to be in the exact location. Assembling the machine with the gantry plates all the forward or back against the end plates would have allowed for accurate reference with a micrometer. As it is now, I have to use a tape measure to postion them because I dont have a mic that big.
     

Share This Page

  1. This site uses cookies to help personalise content, tailor your experience and to keep you logged in if you register.
    By continuing to use this site, you are consenting to our use of cookies.
    Dismiss Notice