Welcome to Our Community

Some features disabled for guests. Register Today.

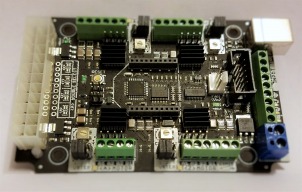
CNC xPRO Driver

Discussion in 'Other Builds' started by Spark Concepts, May 25, 2014.

  1. Rick 2.0

    Rick 2.0 OpenBuilds Team
    Staff Member Moderator Builder Resident Builder

    Joined:
    Dec 20, 2013
    Messages:
    2,892
    Likes Received:
    1,551
    @DiggerJ, did you read the reviews on the Newegg one you posted? 35% only gave it one egg???
     
  2. DiggerJ

    DiggerJ Journeyman
    Builder

    Joined:
    Sep 2, 2014
    Messages:
    412
    Likes Received:
    109
    I am not suggesting that anyone buy this PS, only quoting his reply. I did not buy the PS. I have several laying around, but most are smaller than suggested. I think I am buying a 500W+ modular PS, so that I can only plug in what is needed to keep things neat and tidy.
     
  3. Mark Carew

    Mark Carew OpenBuilds Team
    Staff Member Moderator Builder Resident Builder

    Joined:
    Jun 28, 2013
    Messages:
    2,758
    Likes Received:
    2,441
    [​IMG]

    OpenBuilds Part Store now has 600W ATX Power Supply's that will plug right in with more then plenty of power to go around.
    You can also use the 12V and 24V 2 wire Power Supply's to power these boards as well.
    Hope this helps, thanks guys
    Mark
     
  4. DiggerJ

    DiggerJ Journeyman
    Builder

    Joined:
    Sep 2, 2014
    Messages:
    412
    Likes Received:
    109
    Mark, the price and specs sure look good on that unit, but I only wish it was modular so I could leave out all of the unneeded wires. They are more spendy, but I would like a clean controls case.

    Decision, decisions........
     
  5. Mark Carew

    Mark Carew OpenBuilds Team
    Staff Member Moderator Builder Resident Builder

    Joined:
    Jun 28, 2013
    Messages:
    2,758
    Likes Received:
    2,441
    I agree Digger but for me my plan is to eliminate the most of the wires except for a few for leds, etc better yet now that I am talking it out loud, what about a box to mount everything in then I could just leave the wires and still have a nice look to the controller, it may just work.
    Also may go with the 24V supply its got the power and the lower profile look with fewer wires.
    So like you said decision, decisions lol have to make up my mind :)
     
  6. DiggerJ

    DiggerJ Journeyman
    Builder

    Joined:
    Sep 2, 2014
    Messages:
    412
    Likes Received:
    109
    Yup, they that's how it goes...first your money, then your clothes.....then your credit cards. LOL
    I am waiting for the slow boat from China (really) to deliver my laser stuff. I have time to figure out the power thing.
     
  7. Davis Composites

    Builder

    Joined:
    Oct 7, 2014
    Messages:
    5
    Likes Received:
    0
    Are these boards available? If so how can I order one.
    Bob Davis
     
  8. DiggerJ

    DiggerJ Journeyman
    Builder

    Joined:
    Sep 2, 2014
    Messages:
    412
    Likes Received:
    109
  9. Spark Concepts

    Spark Concepts Journeyman
    Builder

    Joined:
    Dec 17, 2013
    Messages:
    131
    Likes Received:
    107
    Hi guys,
    Sorry for the neglect, things got a little out of hand the last few weeks with getting our kits in order.

    Anywho, starting from the top:
    You definitely should not use the listed Newegg ATX supply for powering a computer - that would be bad. To run the xPRO the ATX supply has all you need, the OB listed item is much nicer though ;).

    DiggerJ - even smaller ATX supplies should work, just check that you have at least 12A on the 12V line (I believe the standard ATX spec is 17A on the 12V line... don't quote me on that as Im working from memory and am sleep deprived and heavily caffeinated)

    Davis Composites - believe we are sold out through the OB store front as well as our store front. We have opened up pre-orders for our November production run.

    Lastly, there have been some questions on running GRBL 0.9g and updating firmware. All this is covered in the CNC xPRO wiki.

    The November production run has been update to reflect pin changes from GRBL 0.8c while maintaining backwards compatibility.

    If I missed anything please ask again,
    Thanks guys,
    Mike
     
    Mark Carew likes this.
  10. Jim Shelton

    Builder

    Joined:
    Apr 8, 2014
    Messages:
    1
    Likes Received:
    0
    Ok new to this bit, what's the largest stepper motor you can use with this?

    Thank you,
    Jim
     
  11. Spark Concepts

    Spark Concepts Journeyman
    Builder

    Joined:
    Dec 17, 2013
    Messages:
    131
    Likes Received:
    107
    The xPRO can do up to 2.5A per phase which is overkill for almost all NEMA 17s. Most NEMA 23's are rated around 2.5 - 2.8A. With the 2.8A rated NEMA23 you will still be able to drive them with out an issue but you will loose a little bit of the spec'ed torque.
     
  12. ian carfagna

    Builder

    Joined:
    Sep 4, 2014
    Messages:
    9
    Likes Received:
    2
    Hello, sorry for this Noob question. My stepper motors, specifically the nema 23 came with 4 wires: red, yellow, green and blue.

    Im assuming the yellow is ground
    Your wiring images show motors with 2 reds and 2 blacks.

    Can someone please let me know the correct way to wire these motors on the xpro?

    Im not sure what color should go on B1, B2, A1 A2,

    And second, if im slaving the second x axis motor, do i just use the same x-axis and reverse the wires?
    upload_2014-11-5_7-51-15.png
     
  13. Serge E.

    Serge E. Journeyman
    Builder

    Joined:
    May 6, 2014
    Messages:
    730
    Likes Received:
    252
    True, however, if one still can't find the wiring scheme of their steppers, just need to do a quick continuity test ... When the right pair of wires is found, the continuity test will 'beep'. The other pair of wires will be for the other coil. One pair: A1/A2, the other is: B1/B2. To reverse direction of the stepper, invert just ONE pair at the controller.

    As for slaving the A driver for the second X stepper, look carefully at the CNC xPro ... It typically comes preset to slave the Y axis. So one might have to get the old soldering iron and solder pump out to change that. If the xPro is not yet ordered, the supplier might be able to configure the xPro before shipping it out.

    The jumber setting is shown on the back screening of the CNC xPro. Typically, it is the Y axis with two steppers.
     
  14. ian carfagna

    Builder

    Joined:
    Sep 4, 2014
    Messages:
    9
    Likes Received:
    2
    So then if I don't want to solder the board (which im not good at anyway) i would then just wire the 2 stepper motors for the x axis in the same terminal, but reversing the coils on one of the motors?
     
  15. Izzy

    Izzy New
    Builder

    Joined:
    Aug 4, 2014
    Messages:
    5
    Likes Received:
    0
    Ok these is what I got.
    copy of the ox build the only difference is the size
    X and Y axis nema 23
    Z axis nema 17
    Xpro board
    power supply 24 volts 15 amp (Tried an ATX power supply as well)
    grbl v 0.8
    windows 8.1 and windows 7
    [​IMG]


    This is a video of the machine moving and trying to cut a 1 inch diameter circle it makes a weird noise and I don't know what is wrong can some body help please.
     
    #75 Izzy, Nov 5, 2014
    Last edited: Nov 6, 2014
  16. Serge E.

    Serge E. Journeyman
    Builder

    Joined:
    May 6, 2014
    Messages:
    730
    Likes Received:
    252
    First, why are you using two steppers on your X but only one for Y ? X is the left-right axis, moving the assembly carrying Z (up down axis). This leaves Y as the front-back movement, typically needing the two steppers as it moves "everything" in most 'OX' configurations. Then again, one can change things around as needed by their design.

    You could connect two steppers to one driver, but it is not recommended (load on driver). Especially when the controller offers slaving to an other (spare) driver.

    As for reversing a stepper, only reverse connection to ONE of the two coils, leaving the other unchanged. I believe GRBL has a setting to achieve the same thing ... a bit of "calculation" to set the respective value.
     
  17. GrayUK

    GrayUK Openbuilds Team Elder
    Staff Member Moderator Builder

    Joined:
    May 5, 2014
    Messages:
    1,668
    Likes Received:
    627
    Noisy Steppers!

    Check this out: A video a couple of postings above.
    http://www.openbuilds.com/posts/8886/

    JWhitten. First Test of CNC Router (X & Z Axis Only)

    We had this a little while ago. I believe it was down to a low power supply to the Steppers.
    I'm sure someone will confirm

    Gray
     
  18. Izzy

    Izzy New
    Builder

    Joined:
    Aug 4, 2014
    Messages:
    5
    Likes Received:
    0
    http://www.openbuilds.com/posts/8886/

    In this video the motors are driven by different electronics
    The Xpro can drive the motors that smooth or I will need to buy a different board and drivers?
    I have tried the gshield with the same settings same result
    If I need to buy different electronics I will just want to be sure of what to buy this time
     
  19. ian carfagna

    Builder

    Joined:
    Sep 4, 2014
    Messages:
    9
    Likes Received:
    2
    I guess that is what i was confused about. Which Axis moved the carriage front and back, and which moved it side to side. I have 2 motors for front and back. Is that the Y axis, therefore the board is wired to slave the Y?
     
  20. GrayUK

    GrayUK Openbuilds Team Elder
    Staff Member Moderator Builder

    Joined:
    May 5, 2014
    Messages:
    1,668
    Likes Received:
    627
    Do a search in the name of:- "Michael". He's the Guy who makes the XPro.
    Follow his threads or even start a conversation with him. I'm sure he can help you out.
    Can someone point Izzy in the direction of the discussion we had on Noisy Stepper Motors not too long ago?
    And or confirm the fault was in the area of Power to the Steppers.

    Gray
     
  21. snokid

    snokid Journeyman
    Builder

    Joined:
    Oct 11, 2014
    Messages:
    335
    Likes Received:
    104
    I have no idea but I noticed it looks like it's going to cut a circle bigger than 1" more like 3"
     
  22. Izzy

    Izzy New
    Builder

    Joined:
    Aug 4, 2014
    Messages:
    5
    Likes Received:
    0
    Yes it does and that is why I'm asking for help I got very noisy motors and not accurate moving on the axis
     
  23. Robert Hummel

    Robert Hummel Custom Builder
    Moderator

    Joined:
    Nov 14, 2013
    Messages:
    978
    Likes Received:
    715
    Your motor issues I can say almost 100% is due to a bad ground as for scale I believe your issue may lie in the settings "step rate" or something silly
     
  24. Robert Hummel

    Robert Hummel Custom Builder
    Moderator

    Joined:
    Nov 14, 2013
    Messages:
    978
    Likes Received:
    715
  25. Serge E.

    Serge E. Journeyman
    Builder

    Joined:
    May 6, 2014
    Messages:
    730
    Likes Received:
    252
    Yes, that's it. You should be fine using the (typical) pre-configured CNC xPro then.

    I know the feeling, I tend to get things backwards as well. The beams for X are actually part of the Y gantry, and the Y beams are what everything else rides on.

    I blame it on being southpawed and partly dyslexic : If life gives you melons then you're probably dyslexic!

    Use the thumb, index finger and forefinger of your left hand at (approximately) 90 degrees relative to each other. Your thumb points up (positive Z), index finger points away from you (positive Y) and your forefinger points to the right (the positive X). Where all three fingers 'meet' is your origin (0, 0, 0). See, that left hand has some good uses after all. o_O
     
  26. Spark Concepts

    Spark Concepts Journeyman
    Builder

    Joined:
    Dec 17, 2013
    Messages:
    131
    Likes Received:
    107
    Wow, this thread took off quickly, thank you all! So, starting from the top:

    Ian: Are you good on motor wiring and axis slaving? By default the xPRO is set to run two Y stepper motors, just remember that you need to reverse the wires on one coil for the slaved motor (the one that goes into the blue terminal strip). If you have any questions feel free to pm me as well. If you are still unsure about the coils on your motors just send me a part number and I will get the info to you.

    Izzy: Let's see if we can get this noise sorted out (typically it is a setting thing). Could you send command "$$" to the board and send a screenshot of the response (this will dump all the GRBL settings through the serial port to your screen)? Are you using the Openbuilds motors? Last, could you send a picture of you wiring with the PSU and the xPRO board? As for the scaling this will be an issue with the steps/mm setting in GRBL but we can sort that out at the same time ;)

    Love this! Everyone is always preaching the "right hand rule" but no one mentions the "left hand rule"!
     
    William Otto likes this.
  27. Serge E.

    Serge E. Journeyman
    Builder

    Joined:
    May 6, 2014
    Messages:
    730
    Likes Received:
    252
    Excuse my frenglish : "forefinger" (which is the index finger) should read "middle finger".

    Being a lefty, I could never figure out the 'right hand rule', even to this day. I always end up with one of the axis being negative ... or me looking rather foolish. It's so much easier, and discrete, with the "left hand rule'. The left hand does RULE ! :p

    Yap ... all my coffee cups, amongst other items, are for lefties as well, their handles being on the left. o_O :ROFL:
     
  28. Paruk

    Paruk Journeyman
    Builder

    Joined:
    Jul 13, 2014
    Messages:
    397
    Likes Received:
    149
    Do you have the micro stepping set right for the 26.67 steps/mm? Should be 1/8. It sounds like that. The Z doesn't do it, because you are closer to the right settings for that one (200 steps/mm).
     
  29. Izzy

    Izzy New
    Builder

    Joined:
    Aug 4, 2014
    Messages:
    5
    Likes Received:
    0
    2014-10-08 19.36.48.jpg 2014-10-11 18.54.04.jpg 2014-10-11 19.13.56.jpg 2014-10-12 13.50.10.jpg 2014-10-08 19.36.48.jpg 2014-10-11 18.54.04.jpg 2014-10-11 19.13.56.jpg 2014-10-12 13.50.10.jpg 2014-11-08 17.04.00.jpg 2014-11-08 17.04.38.jpg 2014-11-08 17.05.19.jpg 2014-11-08 17.11.53.jpg 2014-11-08 18.00.10.jpg

    1 x 8mm Metric Lead Screw / ACME
    (Length: 300mm)
    24 x GT3 Timing Belt - By the Foot
    3 x GT3 Aluminum Timing Pulley - 20
    3 nema 23 X and Y axis
    1 nema 17 Z axis

    the voltmeter image is for the amps wen the Y axis move ( I'm not an expert so - 0.26 A reading means ???)
    The xpro is set for 1/8
    I'm learning as I progress with the build so wen I finish I will post it focusing on people like me that want to get in to machining (Like my kids they don't sop bugging me to let them play with it)
    The 1 inch circle file got to be wrong because I measure the distance wen it moves and is very close to perfect but X and Y motors sound and shake a lot Z motor not so much I use a link for a calculator for the shapeoko cnc
    The wires are different color because that is what I got on hand for extension but the wires are connected the same as picture 1
     
  30. Spark Concepts

    Spark Concepts Journeyman
    Builder

    Joined:
    Dec 17, 2013
    Messages:
    131
    Likes Received:
    107
    Izzy,

    A few things from the pictures you posted.

    1) The blue wire that is tying the xPRO to the ac (green) ground needs to be removed. This wire is effectively creating an ac-dc ground loop - not a good thing with switching mode power supplies. This wire is redundant but if you would still like to you it please wire it to the V- of your power supply.

    2) In one picture you have jumpers set for 1/8 microstepping and in the other you have them set for 1/32 microstepping - which of these will be your run state? This will effect your steps/mm setting (scaling).

    As for the noise - here are the first things to try:

    1) Adjust the current settings on the motor drivers - the motors you are using can pull up to 2.8A. Try adjusting the trimpots right above the ustep jumpers. Either do this with a non-conductive screw driver or power off the board before you make adjustments ;).

    2) Check that the axis are free moving by hand - no binding or pinch points.

    3) Also check the belt tightness, too much tension on the belt will put a strange load on the motor axle and cause the motor to do strange things (learned this one first hand on one of my first builds and it took forever to find :banghead:).

    4) Adjust the acceleration to 25 instead of 50

    My bet is on the ac-dc ground loop and a combination of 1 and 3 above.

    Let us know,
    Mike
     
    Mark Carew and Izzy like this.

Share This Page

  1. This site uses cookies to help personalise content, tailor your experience and to keep you logged in if you register.
    By continuing to use this site, you are consenting to our use of cookies.
    Dismiss Notice