Welcome to Our Community

Some features disabled for guests. Register Today.

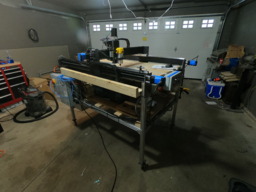
1510 Workbee Modified

Discussion in 'CNC Mills/Routers' started by Jacob Lotter, Dec 2, 2018.

  1. sharmstr

    sharmstr OpenBuilds Team
    Staff Member Moderator Builder Resident Builder

    Joined:
    Mar 23, 2018
    Messages:
    2,059
    Likes Received:
    1,448
    do a search for 15mm x 1500mm linear bearings.

    I got my lead screw from McMaster. Again, check halfway down my build page. Link above
     
  2. Skip S.

    Skip S. Well-Known
    Builder

    Joined:
    Jun 6, 2018
    Messages:
    63
    Likes Received:
    23
    Mine came with leads but it's not the gargantuan toys you kids have
     
  3. twr412

    twr412 New
    Builder

    Joined:
    Jan 15, 2020
    Messages:
    3
    Likes Received:
    0
    I was hoping to find something cheaper than McMaster. Thats where I get a lot of stuff but the prices arent always the best


  4. Giarc

    Giarc OpenBuilds Team
    Staff Member Moderator Builder Resident Builder

    Joined:
    Jan 24, 2015
    Messages:
    3,017
    Likes Received:
    1,682
    I got mine from McMaster Carr as well. The price and shipping was very fair.
     
  5. twr412

    twr412 New
    Builder

    Joined:
    Jan 15, 2020
    Messages:
    3
    Likes Received:
    0
    Which one did you go with from McMaster?
     
  6. sharmstr

    sharmstr OpenBuilds Team
    Staff Member Moderator Builder Resident Builder

    Joined:
    Mar 23, 2018
    Messages:
    2,059
    Likes Received:
    1,448
    Again, all the info is half way down my build page.

    "Like @Giarc (build link), I used 1/2"-10 5 start screws from McMaster (link). I also found nut blocks that fit within the C-beam (eBay link). I used Dayton flange bearings (ebay link)."
     
    Giarc likes this.
  7. Skip S.

    Skip S. Well-Known
    Builder

    Joined:
    Jun 6, 2018
    Messages:
    63
    Likes Received:
    23
    So I'm nearly done with my conversion, and just have one last question about the method mounting the spindle.
    I've got 2 of the black 65mm mounts for a 1.5kw spindle and I noticed that after mounting my spindle it had limited range.
    After checking the z axis (all over..inch by frustrating inch) I finally found that the spindle mounts slightly get in the way of the linear blocks.
    Has anyone found a work around for this?
    Once mounted my amount of travel is being limited by the blocks holding the spindle.
    Should I trim the corners off them?
    I mean, I've already overbored holes, "modified" *winces* my mounting plates in places etc.. One more fiddly bit wouldn't surprise me.
    Or did someone find the holy Grail of ideas to get the spindle out of the way?
    Thanks!
    Almost finished:
    Dropbox - 20200322_175710.jpg - Simplify your life

    Corners in the way:
    Dropbox - 20200322_175730.jpg - Simplify your life

    Spindle:
    Dropbox - 20200322_175742.jpg - Simplify your life
     
  8. Skip S.

    Skip S. Well-Known
    Builder

    Joined:
    Jun 6, 2018
    Messages:
    63
    Likes Received:
    23
    So I got my build done and I've gotta say that it's nicer than the original v wheels, and third (?) the vote that openbuilds should offer this as an upgrade to their current build choices for the Workbee.
    But..
    I find that one drawback is that if you don't have the taller Y Axis plates, then your cutting envelope is considerably shortened from the original wheeled version, so that would have to be part of the upgrade version.
    I've lost 5 inches of cut envelope because the X axis bearing block no longer clears the Y axis blocks.
    I may have to upgrade in the future but until then I need to make sellable products to afford that move. I haven't noticed an appreciable change in the stiffness of the machine when moving the z and x axes by hand but once I start cutting I'll look for any differences.
    Thanks for posting this build, it offered a deeper look into changes and construction of the machine.
     
  9. Enroof

    Enroof New
    Builder

    Joined:
    Jan 20, 2018
    Messages:
    4
    Likes Received:
    0
    Hey guys, I have a few questions, I have an OX build I did with lead 8mm Lead screws and the wheels. I have been wanting to improve the rigidity and accuracy. I was thinking of adding the linear bearing on the tops of my current rails which are not c-beam thinking it would help stiffen the extrusion. I am thinking of changing the rails out with C-beam. Now is it better to put the linear bearings on the top and bottom edges on of the extrusion or the sides like this machine.? Sphinx 55 on MGN12 linear rails

    Also, my machine bed is about 40x40" what lead screw would you go with. I see some here are running 1/2" from McMaster. would these be better than the china ball screws?

    thanks for any input

    Ian
     
  10. Giarc

    Giarc OpenBuilds Team
    Staff Member Moderator Builder Resident Builder

    Joined:
    Jan 24, 2015
    Messages:
    3,017
    Likes Received:
    1,682
    @Enroof
    I can't answer all your questions, but I can tell you about my Ox experience. First, if your 8mm lead screw is still long enough when you are done with the modification, it should be fine. I am in the process of converting my lead screw driven Ox to have linear rails. I use the McMaster Carr 1/2"-10 5 start screws on my Y but 3/8" 4 start on my X. I thought the modification would be a simple process, but the linear rails mounted on 20x80 v-slot profiles made it so the Y gantry plates had to be bumped out 1/4" due to the width of the linear rail blocks. This is why you see the modified workbees running the rail on the inner v slot. I did not realize this until after I purchased the linear rails. I now have to replace the lead screw - or lose cutting area - so I went with the OpenBuilds 8mm. It will fit nicely in the package that is coming to me with my new Cbeams.:thumbsup:

    My original plan was to cut new spacer plates out of 1/4" aluminum for the ends of the X axis beam. I did not want to loose any cutting area, hence the spacer. If I did not use a spacer, I would have had to disassemble the entire base to shrink the width as well. So, after spending hours designing it all and recognizing all sorts of complications I bought the LEAD High Z mod and extra pieces (cbeams etc...) to do a modified version of that. I have spent probably 20 hours modeling this, but I am glad I did because I found many holes that didn't line up which also happened to me on my first build. At least on this build I have a CNC machine to make my parts so I do not have to hand cut and drill everything like before.

    In a nutshell, I found that with an Ox design the linear rail mod leads to more mods due to the lack of being originally built with c beams. Here is what I am doing currently based on Jacobs design in this thread. There still needs to be a couple brackets added. Although the pictures show the X axis raised, I will run it in a lower position a majority of the time for increased Z rigidity. The whole X will be joined as one piece.
    april10 2.png
    april10.png
     
    #70 Giarc, Apr 10, 2020
    Last edited: Apr 10, 2020
  11. Enroof

    Enroof New
    Builder

    Joined:
    Jan 20, 2018
    Messages:
    4
    Likes Received:
    0
    Giarc,
    Thanks for the info! How do you like the extrusion for the gantry uprights vs aluminum plates as far as rigidity?
    Ian
     
  12. brrian

    brrian Well-Known
    Builder

    Joined:
    Dec 6, 2019
    Messages:
    122
    Likes Received:
    52
    I haven't actually cut anything yet... just got all this done, but I put my rails on the top & bottom. It's one of quite a few modifications I made. I like the rails this way because it keeps the head tucked back closer to the gantry. And I'm sure it helps stiffen the gantry,but I also doubled up the c-beam to further stiffen mine.

    [​IMG]
     
  13. jeffmorris

    jeffmorris Journeyman
    Builder

    Joined:
    Nov 6, 2017
    Messages:
    496
    Likes Received:
    115
    Did you make or buy the dust shoe shown in the image in the above post?
     
  14. Enroof

    Enroof New
    Builder

    Joined:
    Jan 20, 2018
    Messages:
    4
    Likes Received:
    0
    So did u put a C-Beam behind the one in the picture, I see some allen bolts above and below the lead screw?
     
  15. Giarc

    Giarc OpenBuilds Team
    Staff Member Moderator Builder Resident Builder

    Joined:
    Jan 24, 2015
    Messages:
    3,017
    Likes Received:
    1,682
    I do not know yet. Right now I have a two 2080 v slots bolted together as my X axis. I figure replacing them with two C beams that will be joined the full length by an aluminum plate should stiffen things up. They are still on their way here. I wanted something I could cut thicker foam and I could engrave on boxes and thicker items. I also cut some aluminum and a lot of HDPE plates so I like the idea of lowering the entire x gantry for cutting thinner material.

    I also bought parts to build a CNC lathe, but I may try to run a rotary axis under the high Z just to see if it works. Basically, I will unplug the x stepper and plug it into the rotary axis stepper for the lathe.
     
    Enroof likes this.
  16. Enroof

    Enroof New
    Builder

    Joined:
    Jan 20, 2018
    Messages:
    4
    Likes Received:
    0
    I basically wanna cut the same stuff you do, I have thought about a 4th axis down the road at some point. Lowering the gantry tho is something I have not considered.
     
  17. Giarc

    Giarc OpenBuilds Team
    Staff Member Moderator Builder Resident Builder

    Joined:
    Jan 24, 2015
    Messages:
    3,017
    Likes Received:
    1,682
    I will start a build thread of my own so I can stop hijacking this one. It is beautiful out now so I need to get some fresh air first.
     
  18. brrian

    brrian Well-Known
    Builder

    Joined:
    Dec 6, 2019
    Messages:
    122
    Likes Received:
    52
    Yes - the c-beams are bolted through, and bonded with VHB tape. The rails are both on the front beam; the back on is there just to help with twist (and it does). Eventually i'll post my build on here.. right now i'm trying to get caught up on jobs I've gotten behind on while I set this new machine up.
     
    Giarc likes this.
  19. WR_Rider

    WR_Rider New
    Builder

    Joined:
    Apr 3, 2019
    Messages:
    63
    Likes Received:
    3
    I realize this upgrade was started sometime ago. I'm wanting to do the same thing type of upgrade to my "workbee" using linear rails. Anyway of getting the "X", "Y" and "Z" axis blocks cut? They would be a bit challenging for me to cut. I didn't see what size linear rails you were using but I was thinking 20mm rails inlew of 15mm or would 15 be ok?

    Thanks
    Doug
     
  20. azrael_sk

    azrael_sk New
    Builder

    Joined:
    May 13, 2015
    Messages:
    10
    Likes Received:
    4
    Made them out of 5mm (x and y) and 10mm (z) thick aluminum L profiles. You can download drawings and fusion models from here: Workbee on rails documentation
    Rails used are hgr15 and hgh15ca blocks/sliders.
     
    WR_Rider likes this.
  21. WR_Rider

    WR_Rider New
    Builder

    Joined:
    Apr 3, 2019
    Messages:
    63
    Likes Received:
    3
    Thank you, that is pretty cool. Maybe I can find someone to make the parts for me around here. I don't have a way to do it myself.
     
  22. Giarc

    Giarc OpenBuilds Team
    Staff Member Moderator Builder Resident Builder

    Joined:
    Jan 24, 2015
    Messages:
    3,017
    Likes Received:
    1,682
    You could take the file for the bearing blocks to a machine shop and have them do it. The file is posted in the "files" section.
     
  23. Prometheus

    Builder

    Joined:
    Mar 21, 2015
    Messages:
    17
    Likes Received:
    0
    Are you selling these X/Y/Z plates somewhere? I am looking to upgrade my stock 1515 to linear rails ASAP and like the upper and lower rail design that for some reason, those companies that offer upgrade kits, are mounting the linear slides on the face of the C-Beam and STILL use the poly wheels for rotational support I guess.. Please let me know what you charge for a plate set!
     
  24. Valthol

    Valthol New
    Builder

    Joined:
    Mar 21, 2020
    Messages:
    14
    Likes Received:
    4
    @Jacob Lotter - this is the one and only desing/modification that I was looking for on forums without any success. I literally laughed for victory when someone showed me your project! This is 100% exacly what I am looking for and OpenBuilds should add something similar as an option decades ago! I got fed up with loose wheels and I have a lot of play in Z Axis - cutting aluminium has to be very conservatie and even while v-carving plywood I can't go deeper than 3mm single pass.

    Right now I want to only mod my Z axis because this one is giving me 99% problems. I made some notes and few questions, would be awesome if you guys in this project could help me out :)

    I was also using @azrael_sk designs and notes.

    1. Do you find using only 2 carriages on Z axis enough? I don't mind spending a lil bit more to make my Z finally stiff, but just wondering are 4 carriages way better than 2? @azrael_sk made quite nice desing for 4.
    2. As I said I want to upgrade only Z axis at the m oment so I want to screw it back to the original X gantry plate. I see here that you guys are doing some custom holes for you custom X gantry plates, but what if I want to use the original one, is there any easy way to which original holes could I use and how to mount?
    3. Also about holes - how I can secure my carriages holders to the Z axis original plate? The holes made by @azrael_sk don't match and that's because I want to use original plates I bet.

    I attach some photos of getting everything set up. As you can see - there is not much clearence to use screws to screw it to original X.

    Thanks a lot! I feel that this is the answer to my problems, but I just need to dial it up a little bit :)


    top.jpg back.jpg front.jpg x assembly.jpg
     
  25. JustinTime

    JustinTime Veteran
    Builder

    Joined:
    Dec 18, 2013
    Messages:
    784
    Likes Received:
    259
    If you have 4 carriages use them! I have on my Z four since I used 2 300mm rails and each rail came with two carriages.
     
  26. Giarc

    Giarc OpenBuilds Team
    Staff Member Moderator Builder Resident Builder

    Joined:
    Jan 24, 2015
    Messages:
    3,017
    Likes Received:
    1,682
    I concur. I am in the process of modifying mine similar to the LEAD High Z modification with two Cbeams. I am using 4 carriages on X and Z and 8 on the Y.
    Capture.PNG
     
  27. sharmstr

    sharmstr OpenBuilds Team
    Staff Member Moderator Builder Resident Builder

    Joined:
    Mar 23, 2018
    Messages:
    2,059
    Likes Received:
    1,448
    Parts list when you are done please and thank you :)
     
  28. Giarc

    Giarc OpenBuilds Team
    Staff Member Moderator Builder Resident Builder

    Joined:
    Jan 24, 2015
    Messages:
    3,017
    Likes Received:
    1,682
    Oh boy. It may be a while. I basically am reusing all the old socket cap screws, nuts, angle brackets, etc... From my old one, but I can't start the disassembly unless I am absolutely sure I have all plates cut. Then it will probably be a hand count.

    I can share the Fusion file with you if you want. I am no expert in CAD and my son and I are part of an ADHD genetic study so, there are a lot of files related to it within the main one due to me jumping around, but all parts in the build so far are in the main drawing.
     
    sharmstr likes this.
  29. Robert White

    Builder

    Joined:
    Oct 17, 2020
    Messages:
    36
    Likes Received:
    3
    So what size rail are you using. Are th HGH15 guide rails with 15mm linear rails.
     
  30. Robert White

    Builder

    Joined:
    Oct 17, 2020
    Messages:
    36
    Likes Received:
    3
     

Share This Page

  1. This site uses cookies to help personalise content, tailor your experience and to keep you logged in if you register.
    By continuing to use this site, you are consenting to our use of cookies.
    Dismiss Notice