Welcome to Our Community

Some features disabled for guests. Register Today.

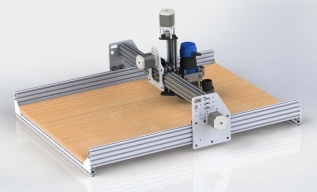
Another Aluminium OX - Just started

Discussion in 'CNC Mills/Routers' started by sgspenceley, Dec 5, 2014.

  1. sgspenceley

    sgspenceley Veteran
    Builder

    Joined:
    May 27, 2014
    Messages:
    249
    Likes Received:
    293
    Thank you, so much for this suggestion! I was looking at videos which show you needed to do complex formula's! Mach3 settings makes this a very easy procedure with digital calipers to measure distance moved!
     
    Hytech2k likes this.
  2. sgspenceley

    sgspenceley Veteran
    Builder

    Joined:
    May 27, 2014
    Messages:
    249
    Likes Received:
    293
    Thank you Dave. It feels great when you see it move for the first time. But still so much to learn... In the end I decided to make X axis 24" 610mm. In my opinion the X beam 750mm will be fine if you drill and screw the beams together, this really, really helps reduce flex in addition to using the aluminium side plates.
     
  3. Tweakie

    Tweakie OpenBuilds Team
    Moderator

    Joined:
    Jan 18, 2014
    Messages:
    784
    Likes Received:
    326
    Nice work with the upgrades Steve - a really neat job. :thumbsup:

    Tweakie.
     
    sgspenceley likes this.
  4. sgspenceley

    sgspenceley Veteran
    Builder

    Joined:
    May 27, 2014
    Messages:
    249
    Likes Received:
    293
    Thank you Tweakie it's been a real fun adventure.

    Next part of the project is to make a custom bracket for my router. I have a spare Dewalt DWP611 1 1/4 hp whicj I'm going to try.

    My Z axis has a nema 23 so I'm assuming to will lift this small router with no problem.

    dewalt-dwp-611-router.jpg
    Dewalt611-RouterMount.JPG
     
  5. Hytech2k

    Hytech2k Veteran
    Builder

    Joined:
    May 6, 2014
    Messages:
    429
    Likes Received:
    331
    A Nema 23 will lift it no problem .... I'm running the same 23 motors your are..
     
  6. sgspenceley

    sgspenceley Veteran
    Builder

    Joined:
    May 27, 2014
    Messages:
    249
    Likes Received:
    293
    That's great... They look so small and compact I had to ask!
    I have another newbie question. When I turn the machine on and it's not moving the motors quietly buzz when not moving, I assume this is perfectly normal?
     
  7. GrayUK

    GrayUK Openbuilds Team Elder
    Staff Member Moderator Builder

    Joined:
    May 5, 2014
    Messages:
    1,668
    Likes Received:
    627
    Could an be Amp and Voltage thing.

    Gray
     
  8. Hytech2k

    Hytech2k Veteran
    Builder

    Joined:
    May 6, 2014
    Messages:
    429
    Likes Received:
    331
    My Nema 23 does that on the Z axis, just kind of quietly hums, been that way for 2 years, I use a 48V 20amp power supply. Might be something about how Gecko driver handles holding power, something about a energy saving thing while the motors are at rest... Is the 540 set properly for the motors it's driving? My 203V Gecko drives required a resistor for the 23 and nothing for the 34's.

    On the strengths of the 23's, wait till the first time you accidentally drive a bit into the table or a workpiece, the whole gantry will flex back like a piece of pasta before that motor will stall.. Just watch your decimal places (ie; .05 versus 5). Don't ask me how I know this. :)
     
    #98 Hytech2k, Feb 1, 2015
    Last edited: Feb 1, 2015
    sgspenceley likes this.
  9. sgspenceley

    sgspenceley Veteran
    Builder

    Joined:
    May 27, 2014
    Messages:
    249
    Likes Received:
    293
    The Power supply is 48volts, 12.5amps, 600 watts. Each motor has a slightly different hum sound when not turning. They appear to run fine..

    Cncrouterparts does not mention the need for resistors with the cables you buy from them? I assumed this was part of the cable?
    http://www.cncrouterparts.com/g540-nema-23-wiring-instructions-p-144.html

    Curious how did you install resistor? Did you cut the end off or add a mini cable between with D9 connectors.
     
  10. Rick 2.0

    Rick 2.0 OpenBuilds Team
    Staff Member Moderator Builder Resident Builder

    Joined:
    Dec 20, 2013
    Messages:
    2,896
    Likes Received:
    1,555
  11. sgspenceley

    sgspenceley Veteran
    Builder

    Joined:
    May 27, 2014
    Messages:
    249
    Likes Received:
    293
    Thank you Rick, now I feel better!
     
  12. Hytech2k

    Hytech2k Veteran
    Builder

    Joined:
    May 6, 2014
    Messages:
    429
    Likes Received:
    331
    Well Rick solved that mystery... :) I have totally different drives on my other machine, that's the one I was referring too. With the Gecko 203V's you need to install a resistor based on the amp rating of the motor connected to that drive...
     
    sgspenceley likes this.
  13. n0kjf

    n0kjf New
    Builder

    Joined:
    Feb 10, 2014
    Messages:
    18
    Likes Received:
    3
    I'm really late to the party but I do have a comment on Mach 3 / computers and OS. The comments regarding the 32 bit Win XP are of interest. I "acquired" a half dozen older 32-bit machines with parallel ports that were going back to Dell for recycling. The computers are single and dual core, +/-2.4 GHz with about 1 gig or less ram. Very primitive machines by today's standards. I use the computer to run the machine only, we load Win7, off line, no updates at all. Strip the hhiberfil.sys, games, everything, bare as possible. Mach 3 runs just fine, and it all fits in about 12 gb on a hdd. Since the computer has no internet / network connection, no need for resource robbing antispyware or antivirus software, the older machine can more than handle to work. Gcode files are moved by "sneaker net" flash drives. I have several older hdds that I have cloned the system to. If we have a failure, it is a very easy swap, even the entire computer if necessary since I have spares. Microcenter.com routinely sells older computers for $75 to $150 that will work fine for running Mach 3 on Win7.

    I guess I'm interested if the desire for a more powerful computer to run the router is because it is multitasking all purpose computer.

    Lew Heifner
     
    tore micaelsen likes this.
  14. Hytech2k

    Hytech2k Veteran
    Builder

    Joined:
    May 6, 2014
    Messages:
    429
    Likes Received:
    331
    I run 2 machines using 3ghz dual core CPU's 2 gigs of ram 80gig sata drives and Windows 7 64bit with no issues what so ever. These machines are not connected to any internet or network, OS isn't stripped, standard Win 7 Pro installs... I run Mach 3 with 2010 screenset. These machines are connected to the BOB's with ethernet smootsteppers.. I think alot of the problems are with that LPT port, seems like if it isn't timing related its low power issues..

    Gerald
     
    n0kjf likes this.
  15. sgspenceley

    sgspenceley Veteran
    Builder

    Joined:
    May 27, 2014
    Messages:
    249
    Likes Received:
    293
    Hi Lew, I'm currently running on an old dell workstation running windows xp. I still need to strip it down to the basics...
     
    #105 sgspenceley, Feb 1, 2015
    Last edited: Feb 1, 2015
    n0kjf likes this.
  16. sgspenceley

    sgspenceley Veteran
    Builder

    Joined:
    May 27, 2014
    Messages:
    249
    Likes Received:
    293
    #106 sgspenceley, Feb 1, 2015
    Last edited: Feb 1, 2015
  17. Nick W

    Nick W Well-Known
    Builder

    Joined:
    Oct 22, 2014
    Messages:
    99
    Likes Received:
    61
    Steve, I really like that router mount. Fancy making me one too? I want to use the 611 on my build too
     
  18. Hytech2k

    Hytech2k Veteran
    Builder

    Joined:
    May 6, 2014
    Messages:
    429
    Likes Received:
    331
    Here is the users manual PDF, it explains it alot better then I can actually. The biggest thing I really like about the ethernet SS is I can put the computer a long way away from the machine itself, my current workshop is a 16' x 24' addon to my 40' x 60' pole barn. We're in the process on putting in a concrete floor and walling in the 40 x 60, i'm building a 10' x 15' "clean room for the PC's, so I can design out of the dust. I use it coupled with a PMDX-126 breakout board just so I could have a ton of inputs and relays for extras... But a cheaper board thats still good quality would be PMDX-122, less features but still great quality. I have had excellent service from them, when I cooked my PMDX-134 motherboard, they overnighted me a replacement. This is the CHEEP way to go, Ebay $8.00.... LOL this is the control board cncrouterparts has installed in that Nema 23 package. 8 dollar board connected to a 200 dollar SS, been working good so far just very limited on ports for limit switches, I had to piggyback a bunch to make it work for me.
     

    Attached Files:

    #108 Hytech2k, Feb 1, 2015
    Last edited: Feb 1, 2015
  19. sgspenceley

    sgspenceley Veteran
    Builder

    Joined:
    May 27, 2014
    Messages:
    249
    Likes Received:
    293
    Hi Nick, I'm happy to make another one. My version will be cut this week when I know everything is perfect I will contact you.
     
    Nick W likes this.
  20. Hytech2k

    Hytech2k Veteran
    Builder

    Joined:
    May 6, 2014
    Messages:
    429
    Likes Received:
    331
    Looking great Steve !! Can't wait to see this one start making chips...

    Gerald
     
  21. sgspenceley

    sgspenceley Veteran
    Builder

    Joined:
    May 27, 2014
    Messages:
    249
    Likes Received:
    293
    Thank you for your help & support Gerald. Seeing it move under it's own power is really great, seeing it cut something real will be even better.
    My limit switches should be here soon, the soft limits in Mach3 at least provide some level of safety confidence.

    I have been watching various training videos about Mach3... It has lots & lots of options & parameters.

    Still lots of learning about LPT ports, pins, Bobs, smooth steppers, etc:-}
     
  22. sgspenceley

    sgspenceley Veteran
    Builder

    Joined:
    May 27, 2014
    Messages:
    249
    Likes Received:
    293
    I decided I want to try linear bearing on the X axis, with the intention to remove ALL flex and provide strong smooth movement.

    I'm planing to bolt a 1/4" * 4" * 24" plate to my X rail. Then mount two SBR16 linear rails which will also be attached to two new gantry plates. The Z axis plate mounted to the bearings is the same physical size as the original with the same mounting holes, I may change this design later but want to focus on one improvement at a time.

    See below early concept design ideas...
    xAxis-LinearRailConcept1.JPG xAxis-LinearRailConcept2.JPG
     
    #112 sgspenceley, Feb 4, 2015
    Last edited: Feb 5, 2015
    Knut Bøje, GrayUK and Hytech2k like this.
  23. Hytech2k

    Hytech2k Veteran
    Builder

    Joined:
    May 6, 2014
    Messages:
    429
    Likes Received:
    331
    That's a really sharp idea. Only thing I might change is the 1/4 plate, to better resist flexing it might be a good idea to go to 1/2", price difference and weight difference is negligible and it would greatly increase the stiffness. I'm not sure exactly how your mounting the SBR's, they're on stands with a bolt pattern to mount the stand to whatever correct? The SBR's are going to also rely on the stiffness of what they are mounted to in order to resist the twisting motion of a router cutting below the center axis. Just my thoughts. Overall the concept is solid, X axis design kinda resembles the 6090 CNC, just you've added a back plate and rails with stands, should be a very rigid setup for sure. Anxious to see what your going to come up with for the Y axis !!

    Great concept !!

    Gerald
     
  24. sgspenceley

    sgspenceley Veteran
    Builder

    Joined:
    May 27, 2014
    Messages:
    249
    Likes Received:
    293
    Thank you. The round rails are mounted and fully support along the length on an aluminium rail with bolts.
    sbr16sspecsWM.jpg

    I'm thinking about using the same concept for the Z axis but smaller versions.

    My logic was the original beams bolted together, 1/4" plate & these beams bolted through both was over engineered... But physical testing will provide the honest answer.

    Your 100% correct the cost difference would be small to go from 1/4" to 1/2", plus I could then add cross bolts to the gantry plates. The is in addition to the cross bolts which go into the end of the rails.

    Your guessing right, X axis is step one in multiple re-design approach. But that one I think will be rack & pinion like you approach.

    I originally started the project to cut carbon fiber & G10 sheets, now I'm thinking why not make it strong enough to accurately cut aluminium. Motors & electronics are the same... The machine just needs to be stiffened up... Which is a fun design challenge!
     
    #114 sgspenceley, Feb 5, 2015
    Last edited: Feb 5, 2015
  25. Hytech2k

    Hytech2k Veteran
    Builder

    Joined:
    May 6, 2014
    Messages:
    429
    Likes Received:
    331
    Sounds like a great idea !! Can't wait to see this one evolve ...

    Gerald
     
  26. sgspenceley

    sgspenceley Veteran
    Builder

    Joined:
    May 27, 2014
    Messages:
    249
    Likes Received:
    293
    I have to wait for the parts from China... In the mean time I can complete the original design and start cutting.
    When you consider $45 ish for extreme wheels VS $86 for two rails & 4 bearings it was worth a try!
     
  27. sgspenceley

    sgspenceley Veteran
    Builder

    Joined:
    May 27, 2014
    Messages:
    249
    Likes Received:
    293
    I have been adjusting the Z axis wheels to try to remove the flex on the Z axis. Have other people found that the Z axis has a good amount of flex even when light pressure is applied?

    I have redesigned Z axis with linear bearings SBR-12's, 1/2" 5 start thread. I ordered some good quality pillow block bearings for the threaded rod.
    NewZAxis.JPG NewRailCloseup.JPG NewXAxisRear.JPG NewXAxisFront.JPG
     
    #117 sgspenceley, Feb 7, 2015
    Last edited: Feb 8, 2015
    Hytech2k likes this.
  28. Dave Lowry

    Builder

    Joined:
    Dec 18, 2014
    Messages:
    25
    Likes Received:
    4
    Hi Steve. Are you seeing the flex when mounted to the original extruded x-beams, or as a subassembly on the bench? It's hard to tell size by your pics, but the linear bearings and shafting look kinda small by comparison to the original aluminum extrusions. I have no feel for this because I do not have a machine yet, so have no hands on experience. But I could see those shafts flexing sooner than the original extrusions.
     
    sgspenceley likes this.
  29. Dave Lowry

    Builder

    Joined:
    Dec 18, 2014
    Messages:
    25
    Likes Received:
    4
    Then again, look at this video, seems to have rails like your model.
     
    Hytech2k and sgspenceley like this.
  30. sgspenceley

    sgspenceley Veteran
    Builder

    Joined:
    May 27, 2014
    Messages:
    249
    Likes Received:
    293
    Hi Dave, I honestly don't think the flex in the original design is the aluminium extrusion in the Z axis or X axis. I think the flex comes from the wheels in the V channel. Plus the front & rear Z axis plates only have 5mm bolts holding the whole carriage together. When I first assembled the X carriage I put the wrong size spacers in the center and was shocked to see how much the 5mm bolts bowed!

    Many CNC machines use the round rail system and linear bearings. My gut feeling was linear reals which are mounted along the full length would be even stronger when mounted to a 5" tall plate.

    The X axis still has the original 20 * 60 double beam which is bolted together, so when you combine this with an aluminium plate & these linear rails which are also bolted along the length, I don't imagine seeing the X flex or twist. But we will see!

    If I do then I will replace the two 20 * 60 beams with something much beefier.

    The original design is not bad, I'm just having fun doing the mod's and design work.
     
    #120 sgspenceley, Feb 7, 2015
    Last edited: Feb 7, 2015

Share This Page

  1. This site uses cookies to help personalise content, tailor your experience and to keep you logged in if you register.
    By continuing to use this site, you are consenting to our use of cookies.
    Dismiss Notice