Welcome to Our Community

Some features disabled for guests. Register Today.

Another Aluminium OX - Just started

Discussion in 'CNC Mills/Routers' started by sgspenceley, Dec 5, 2014.

  1. sgspenceley

    sgspenceley Veteran
    Builder

    Joined:
    May 27, 2014
    Messages:
    249
    Likes Received:
    293
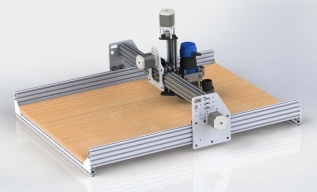
    Design concept model can be seen below.
    3QuarterCloseRear.JPG 3QuarterCloseRear2.JPG 3QuarterCloseRear3.JPG 3Quarter.JPG X-TravellerDetail.JPG
     
    mybuild14, GrayUK, Kyo and 1 other person like this.
  2. SatMike

    SatMike New
    Builder

    Joined:
    Feb 12, 2015
    Messages:
    27
    Likes Received:
    5
    Nice job. I was working towards this same thing, but without already having the complete machine. I had bought the plates before reading more (mostly hytech and your builds), and deciding that I wanted a stronger Ox. I didn't want to chuck the plates or lose money reselling them, and figured that there were others in the same situation(having an ox, and wanting to upgrade it), so I was looking into ways to adapt the stock ox plates. You beat me to the punch, and I like what you have done, but i have to be different; so you have now made up my mind to move forward with my latest plan of scrapping the plates and creating a heavily modified system.
     
  3. Larry_AK

    Larry_AK New
    Builder

    Joined:
    Oct 6, 2014
    Messages:
    26
    Likes Received:
    32
    Now that looks good, well done!
     
  4. sgspenceley

    sgspenceley Veteran
    Builder

    Joined:
    May 27, 2014
    Messages:
    249
    Likes Received:
    293
    Thank you, Larry & SatMike.
    It's so easy to think "well" I will just re-design original plates & replace them. It's more of a fun design challenge to adapt the original plates and you save some money.

    SatMike building a much stronger CNC machine from the ground up is much easier than trying to adapt the current OX, if you have access to 3D modeling software. In my experience you modify the X axis beam to a larger size & stiffer, then the standard plates don't fit, then you modify the X carriage to fit the beam, then you start looking at the Z axis, then you look at the Y extrusion and think this should really be stronger, then you start thinking about changing the wheels... etc. "May as well, design process"... VS being happy with the good little OX
     
    #154 sgspenceley, Mar 18, 2015
    Last edited: Mar 18, 2015
  5. sgspenceley

    sgspenceley Veteran
    Builder

    Joined:
    May 27, 2014
    Messages:
    249
    Likes Received:
    293
    I have ordered the parts for this upgrade from my local laser cutting company. Below is the pricing for anyone interested in doing this upgrade.

    Two x axis End Frames cut from our 1/8 mild steel @ $22.00 Each
    Four Gantry Mounting plates, 1/8 mild steel @ $6.40 Each
    One X-Axis Carriage Plate, 1/4" Alum 6061 @ $9.00 Each
    Two Y-Axis Mounting Plates, 1/4" Alum 6061 @ $13.00 Each

    I will post some photographs when complete...
     
    #155 sgspenceley, Mar 23, 2015
    Last edited: Mar 23, 2015
    GrayUK likes this.
  6. sgspenceley

    sgspenceley Veteran
    Builder

    Joined:
    May 27, 2014
    Messages:
    249
    Likes Received:
    293
    As many of you know, building a machine is often slow workshop progress because you think everything is ordered and then you wait until it arrives only to find your missing something else.
    Four bearings arrived for the leadscrews but they are the wrong size. 12mm NOT 1/2" so now waiting again...

    I thought I would have a little fun and design a new complete OX plate set which is ready to mount 1/2" acme leadscrews. I'm curious if anyone might be interested in buying 1/4" laser cut aluminium plates or G10 versions? I think Gerald will cut the G10 & I can have the aluminium versions laser cut.

    PlateSet.JPG
    3QuarterFront.JPG 3QuarterRearShowingBeams.JPG
    The rear of the X axis has two 40 * 20 beams are add extra strength, the lead screw runs between these & the original twin 60 * 20 beams.


    3QuarterFrontClose.JPG

    3QuarterRearClose.JPG
    Above shows the Y axis acme leadscrew detailing.

    3QuarterRearShowingBeamDetail.JPG
    Above shows the extra two 40 * 20 X axis beams.

    3QuarterRear.JPG
     
    #156 sgspenceley, Mar 29, 2015
    Last edited: Mar 29, 2015
  7. Dave Hylands

    Builder

    Joined:
    Sep 29, 2014
    Messages:
    6
    Likes Received:
    2
    DeepK7 and sgspenceley like this.
  8. sgspenceley

    sgspenceley Veteran
    Builder

    Joined:
    May 27, 2014
    Messages:
    249
    Likes Received:
    293
    Excellent Dave, thank you for sharing.

    Note the top Z axis carriage plates use the version 80 Dwg files, which the bolt pattern on the top wheels are 1.5mm too small. I originally thought this was my cutting error, but since learned other people observed the same issue with rev 80 drawings.
     
    #158 sgspenceley, Apr 3, 2015
    Last edited: Apr 3, 2015
  9. jminardi

    jminardi New
    Builder

    Joined:
    Apr 4, 2015
    Messages:
    3
    Likes Received:
    0
    Man i love your x axis lead screw design i have been looking for some ideas just like that. i am going to adapt lead screw to my machines x as i get alot of backlash from mine. Nice job!
     
  10. MonsterMark

    Builder

    Joined:
    Mar 20, 2016
    Messages:
    1
    Likes Received:
    0
    Any chance you might publish the updated plates for the acme screw mods you posted?
     

Share This Page

  1. This site uses cookies to help personalise content, tailor your experience and to keep you logged in if you register.
    By continuing to use this site, you are consenting to our use of cookies.
    Dismiss Notice