Welcome to Our Community

Some features disabled for guests. Register Today.

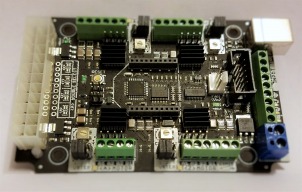
CNC xPRO Driver

Discussion in 'Other Builds' started by Spark Concepts, May 25, 2014.

  1. BOZINATOR

    BOZINATOR New
    Builder

    Joined:
    May 9, 2014
    Messages:
    7
    Likes Received:
    1
    Hi Mike,
    I received my board today ... Thank you so much!
    Can you tell me What software was meant to be used with the USB input. I have been using the Mach 3 with the parallel port setup, and never the USB port.
    Thanks for all of your support!
    Jim
     
  2. Spark Concepts

    Spark Concepts Journeyman
    Builder

    Joined:
    Dec 17, 2013
    Messages:
    131
    Likes Received:
    107
    @Jim Boswell, We just QC-ed and shipped the first round of kickstarter rewards and pre-sales. We are QC-ing the remainder of the lot this week and will have them listed as "in-stock" very shortly.

    @BOZINATOR, Thank You! I use Universal Gcode Sender 1.0.7, can download from github https://github.com/winder/Universal-G-Code-Sender, link is about a quarter of the way down the page. You could also use GRBL Controller 3.0 from http://zapmaker.org/projects/grbl-controller-3-0/. Let me know if you need anything else (quicker responses via email: Mike at spark-concepts.com)
     
  3. Serge E.

    Serge E. Journeyman
    Builder

    Joined:
    May 6, 2014
    Messages:
    730
    Likes Received:
    252
    I received my populated xPRO yesterday (well, picked it up yesterday while it came in a day or so earlier).

    It is about to go into the myOX build as the Arduino with CNC shield does not seem to drive the steppers. Here's hoping the xPRO makes the task that much easier for me. GRBL Controller is communicating ok with the Arduino and should do as fine with the xPRO.
     
  4. Serge E.

    Serge E. Journeyman
    Builder

    Joined:
    May 6, 2014
    Messages:
    730
    Likes Received:
    252
    It worked right out of the box !

    I pulled the Arduino/CNCshield out and dropped in the xPRO. I connected one stepper directly while an other through the cable I had made and thought was the problem when trying the Arduino path. Loaded GRBL Controller on the MacBook and ... tada ... steppers are stepping !

    I might be sick tomorrow, unable to go to work, as I look at the work left to get my myOX making chips. ;)
     
  5. Spark Concepts

    Spark Concepts Journeyman
    Builder

    Joined:
    Dec 17, 2013
    Messages:
    131
    Likes Received:
    107
    Glad to hear the xPRO is out there doing us proud! Thanks for the feedback.

    Gotta love those sick days, always seem to be the most productive!
     
  6. Serge E.

    Serge E. Journeyman
    Builder

    Joined:
    May 6, 2014
    Messages:
    730
    Likes Received:
    252
    Well, I ended going to work ... bad idea, but bills have to get paid somehow.
     
  7. dawie22

    dawie22 New
    Builder

    Joined:
    Aug 29, 2014
    Messages:
    19
    Likes Received:
    1
    Good afternoon all,

    Firstly, brilliant work on the controller.

    With myself looking into making a CNC router and having stumbled onto here (great resource by the way). I'm intrigued with this little controller.

    I was wondering if these are going to go into production (and if so what are the prices going to be like) or if not are the schematics for the PCB's available?

    I only ask as I'm in the process of costing a router at the moment and think this little chappy would be perfect.

    Regards,

    Mr Me (D Jvr)
     
  8. Rhinofart

    Rhinofart New
    Builder

    Joined:
    Jul 22, 2014
    Messages:
    34
    Likes Received:
    6
    This is definitely the controller I'm going to put into my OX build. The last shipments of my mechanical installation should arrive early next week.
     
  9. Spark Concepts

    Spark Concepts Journeyman
    Builder

    Joined:
    Dec 17, 2013
    Messages:
    131
    Likes Received:
    107
    dawie22, Thanks! The boards are in full production from our run with Kickstarter and are available here. Schematics are also available online and we do sell unpopulated xPRO PCB's for those wanting to assemble their own.

    Rhinofart, Glad to hear it! Good luck with the build!
     
  10. Rhinofart

    Rhinofart New
    Builder

    Joined:
    Jul 22, 2014
    Messages:
    34
    Likes Received:
    6
    @dawie22
    I'm in the same boat as you dawie. I took a break from building custom gaming PCs for people for a few years, and just recently decided to get back into it. I saw during my absense that the "competition" has heated up a fair bit, so in order to bring me back into the top tier of builders, I decided that I had to go with some extreme builds. So in order to do that, I decided to get into custom case building as well, which brought me to using nice compact power tools. I have a Rigid 1.5HP hand router which is perfect size for anything I need to do, but I found that my hand routing skills were not quite up to snuff, so I started looking around, and came across this site too. Only took a couple hours of digging around to figure out that the OX is the system for me. I started gathering everything up. The only thing left to arrive is my OX plates from a fantastic shop over in Calgary which is laser cutting the plates for me out of 1/4" aluminium, and 1 pack of 25 T-Nuts coming in from Protodrake.
    I've decided to make myself an all in 1 solution. Design - Cut. So, I am placing a custom rack mount liquid cooled computer inside my "router table" which will act as both a design system, and controler for the OX. Once my physical build is completed, I'm going to get this controler, mount it inside the computer case where I'll be able to properly provide more than adequate cooling for it, and start cutting up some acrylic and aluminium for my next showpiece build.

    @Michael

    Thanks! I'm sooooooo looking forward to completing this build, and cutting some stuff up! I had my dad help me with cutting the V-Slot because he has all sorts of fancy dancy saws n stuff because in his retirement, he has taken up woodworking hardcore. When I'm done mine, and he sees how well it works for me, he is wanting me to see about a 4' x 8' version that we could create. I'm thinking that could be a fun challenge to try out!
     
  11. Rhinofart

    Rhinofart New
    Builder

    Joined:
    Jul 22, 2014
    Messages:
    34
    Likes Received:
    6
    Hey Justin.
    Normally, I would agree with you. But I'm far from normal. ;) The computer I'm using for this project is just spare parts I have kicking around. AMD 1090t 6 Core proc with 16Gb RAM, and an AMD HD 4890. It's going to be running headless (I will be controlling the system with VNC, and it will be on it's own DMZ Subnet and therefore completely isolated from the rest of my network, and the internet). My OX is going to be setup in a little chamber I'm creating for this project with a dedicated dust collection system. (aka shop vac) Also, the radiators for the liquid cooling have their tubing running out of the chamber so there will be no dust or debris to clog up the rads, and as such no fans or normal heatsinks on the PC itself to get clogged up from any debris that may find it's way outside of the cutting chamber. I'll be doing most of my cutting and stuff in the evenings, and overnight hence the separate chamber for the OX. going to try and make it as soundproof as I possibly can. Thankfully my neighbours are all in their 80's, and nothing but open fields across the road.
     
  12. Rhinofart

    Rhinofart New
    Builder

    Joined:
    Jul 22, 2014
    Messages:
    34
    Likes Received:
    6
    Aaaaaah! They are out of stock now. :( Do you know when you will have more in stock?
     
  13. javabug

    javabug New
    Builder

    Joined:
    Sep 10, 2014
    Messages:
    2
    Likes Received:
    0
    Mike, when driving the CNC xPro with ATX power supply, what voltage does the xPro controller use to drive the steppers? 12V or 24V? If 12V, does it mean I need a a 24V power supply to drive steppers with decent amp/speed? Thanks
     
  14. Spark Concepts

    Spark Concepts Journeyman
    Builder

    Joined:
    Dec 17, 2013
    Messages:
    131
    Likes Received:
    107
    Rhinofart, we shipped a set of 10 to Kram for listing in the OB partstore - should be available shortly ;).

    Javabug, please do not hookup and ATX and a 24V supply - only one power supply should be used with the xPro, (ATX supply) or a (12V thru 24Vmax power supply). When using the CNC xPRO with an ATX power supply the stepper drivers use 12V to drive the steppers. However if your application requires running the motors at a faster rate, a 24V power supply may increase your motor torque/speed performance. Again only one power supply is required, there are one board regulators to drop the 12/24V supplies down to 5V and 3.3V as needed. Using and ATX supply and a 12/24V supply will undoubtedly release xPRO’s magic smoke.

    A little more detail on the difference of the AX and 12/24V supplies:

    Since the xPRO stepper drivers regulate the current (not voltage), the voltage acts like a means to allow current to flow faster or slower. If you increase voltage, you are pushing the current through the motor windings at a faster rate. So, depending on your application 12 volt operation may perfectly fine, while running with a 24v power supply may allow the motors to be a tad more responsive. By how much?.. it will depend widely on the motors you’re using. At slow speeds, each step the motors take should have plenty of time to fully rise to 100% current and deplete. You will receive maximum power and thus, the reason why torque-speed curves have high torque at the low speeds.
     
  15. GorillaBob

    Builder

    Joined:
    Nov 14, 2013
    Messages:
    18
    Likes Received:
    0
    Mike,

    I am in the process of connecting the limit switches, this may be a dumb question but do I set up the switches to complete or break the circuit? Also, for the OX are there any of the jumpers or settings I need to tweak for the machine.

    I do have the board running and can move all of the Axis [carefully] and I have a nice 3D printed enclosure for the board. I will post a photo once I get the wire nest cleaned up a little inside.
     
  16. Spark Concepts

    Spark Concepts Journeyman
    Builder

    Joined:
    Dec 17, 2013
    Messages:
    131
    Likes Received:
    107
    GorillaBob,

    You want to setup the switches to complete the circuit when triggered. Easiest way to think about this in the future or for other project is that you don't want the switch to change the circuit until it is triggered. So with the xPRO the connection between switch_input and ground is open, so you wire the physical switch to be Normally Open. Then, when the switch is triggered it will close the circuit connecting switch_input to ground and producing a signal that the processor can detect (probably more information than you wanted).

    Sounds awesome, I can't wait to see it!
     
  17. Serge E.

    Serge E. Journeyman
    Builder

    Joined:
    May 6, 2014
    Messages:
    730
    Likes Received:
    252
    Actually, "more" would of included the possibility of putting more than one switch in ... parallel - as in one at each extremity of the possible movement. The goal being to stop movement no matter which switch is being triggered. Where the logic (program) keeps track of the actual travel direction, it could figure out which limit switch was triggered.

    In the case of myOX, I'm planning on having 'stoppers' that can be positioned depending on the mode being used since myOX could be working in the deep opening in the middle of my table rather than the full width, hair over 4', or its 2+' length.
     
  18. Spark Concepts

    Spark Concepts Journeyman
    Builder

    Joined:
    Dec 17, 2013
    Messages:
    131
    Likes Received:
    107
    Serge: As long as the switches are all NO setup, you can put as many switches as you would like in parallel at the screw terminals. From the boards perspective it doesn't matter. For your setup it sounds like the tricky part will be figuring out the mechanics so the deep switches are not triggered while working at full length/width.
     
  19. Serge E.

    Serge E. Journeyman
    Builder

    Joined:
    May 6, 2014
    Messages:
    730
    Likes Received:
    252
    I think I figured a somewhat simple, maybe too simple, way. Details over at myOX. Basically : sliding stopper on respective V-slot with the limit switches on the moving part so they are mounted in a fixed location... Just loosen stopper, slide to new position and tighen.

    Now the trick is how to mount the limit switches in just the right places, not to be triggered by the chips and dirt ... :rolleyes:
     
  20. GorillaBob

    Builder

    Joined:
    Nov 14, 2013
    Messages:
    18
    Likes Received:
    0
    I connected one of the switches and hit a jog of 10mm and pressed the switch while it was moving and nothing happened...
    With the switch wired up, i can touch the 2 terminals with my multimeter and get no continuity. If I press the switch, I get continuity.

    I'm confused!

    Any one able to take a high quality photo of the back of their board? Mine is mounted already and I need to see how to set the jumpers and it would require a total dismantle of the box to get the photo
     
  21. Spark Concepts

    Spark Concepts Journeyman
    Builder

    Joined:
    Dec 17, 2013
    Messages:
    131
    Likes Received:
    107
    Gorilla, sounds like the "hard limits' option in grbl has not been turned on. You can check this by connecting to the board and sending command "$$" (no quotes). This will list all of the settings on the board. To turn on hard limits us "$16=1" and to turn on homing "$17=1". By default the hard limits and homing are deactivated. Here is a link to the grbl wiki for more information on configuring the board - https://github.com/grbl/grbl/wiki/Configuring-Grbl-v0.8

    The shunt jumpers will be used to define the micro-stepping of each motor driver:
    No shunt - Full step
    Shunt 1 - 1/2 step
    Shunt 2 - 1/4 step
    Shunt 1 and 2 - 1/8 step
    Shunt 3 - 1/16 step
    Shunt 1 and 3 - 1/32 step
     
    Texflyboy likes this.
  22. GorillaBob

    Builder

    Joined:
    Nov 14, 2013
    Messages:
    18
    Likes Received:
    0
    On the Pause, Resume, and Abort buttons, Should they be momentary switches or On/Off switches?
     
  23. GorillaBob

    Builder

    Joined:
    Nov 14, 2013
    Messages:
    18
    Likes Received:
    0
    Michael,
    Thank you for the help. I will go check that now.
    By the way, for those of you connecting to the limit switches, are you soldering direct to the switch or using a female spade connector? I have looked and the smallest I have seen listed is an 18-20 fitting. That seems a little to big for these connectors. They are less than 5mm wide.
     
  24. GorillaBob

    Builder

    Joined:
    Nov 14, 2013
    Messages:
    18
    Likes Received:
    0
    IT"'S ALIVE... MWHahahah....erm... Sorry!
    That did it Michael
     
  25. Serge E.

    Serge E. Journeyman
    Builder

    Joined:
    May 6, 2014
    Messages:
    730
    Likes Received:
    252
  26. Johnboy

    Johnboy New
    Builder

    Joined:
    May 26, 2014
    Messages:
    1
    Likes Received:
    0
  27. Mark Carew

    Mark Carew OpenBuilds Team
    Staff Member Moderator Builder Resident Builder

    Joined:
    Jun 28, 2013
    Messages:
    2,758
    Likes Received:
    2,440
    Just an update to let you guys know OpenBuilds Part Store now carries the xPRO CNC Stepper controller/Driver board!:thumbsup:
    http://openbuildspartstore.com/cnc-xpro-controller-stepper-driver/
    We really like the ease of use of this board and that it can handle most builds we are working on.
    Because its simple to use, we are hopeful this driver will become somewhat of a standard here for OpenBuilds projects.
    We are happy to be working with Spark-Concepts and look forward to and exciting future ahead and we hope that all of us here in the OpenBuilds community can supply helpful feedback.
    Thank you
    Mark
     
    Blades likes this.
  28. DiggerJ

    DiggerJ Journeyman
    Builder

    Joined:
    Sep 2, 2014
    Messages:
    412
    Likes Received:
    109
    Good score!
     
    Mark Carew likes this.
  29. KerryH

    KerryH New
    Builder

    Joined:
    May 26, 2014
    Messages:
    63
    Likes Received:
    21
    Is there an ideal "minimum" atx psu to be used for this controller? IE all 4 drivers being used at near max capacity, is there a minimum wattage psu recommended or perhaps a certain amperage on the 12v rail or something to that effect. I have access to a few spares, but what is good enough?
     
  30. DiggerJ

    DiggerJ Journeyman
    Builder

    Joined:
    Sep 2, 2014
    Messages:
    412
    Likes Received:
    109
    From Mike @ Spark:
    The main thing for spec-ing out the ATX PSU is the AMP rating on the +12V line. Anything over 12A will do. Most supplies above 400W provide this amperage.
    Personally I like this one from Newegg -> http://www.newegg.com/Product/Product.aspx?Item=N82E16817822008&cm_re=atx_20%2b4-_-17-822-008-_-Product
    The CNC xPRO can also be powered from a standard 12/24V supply like these two from OpenBuilds:
    http://openbuildspartstore.com/12v-30a-power-supply/
    or
    http://openbuildspartstore.com/24v-20a-power-supply/
     
    #60 DiggerJ, Oct 1, 2014
    Last edited: Oct 1, 2014
    Mark Carew likes this.

Share This Page

  1. This site uses cookies to help personalise content, tailor your experience and to keep you logged in if you register.
    By continuing to use this site, you are consenting to our use of cookies.
    Dismiss Notice