Welcome to Our Community

Some features disabled for guests. Register Today.

IndieLC

Discussion in '3D printers' started by Indieflow, Apr 11, 2015.

  1. Indieflow

    Indieflow Journeyman
    Builder

    Joined:
    Mar 28, 2014
    Messages:
    127
    Likes Received:
    135
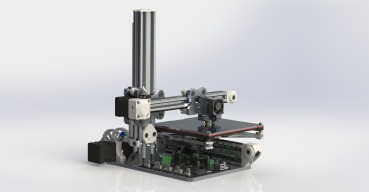
    The overall design could be heavily modified to use Nema 17's, though it would be a lot of work and move away from the main idea of a small transportable printer!
     
  2. a_wordy

    a_wordy New
    Builder

    Joined:
    Jan 24, 2021
    Messages:
    3
    Likes Received:
    0
    I came across this build a few months back, and finally got started! For anyone thinking about this project, Simon was a pleasure to buy from. The plastics he sent me were perfect.

    The metal base really pushed my little CNC machine to the limits, but I learned a lot about proper feeds and speeds for aluminum while I was at it. One broken bit and some ruined stock is a fair trade, I think! I've decided to ruin Simon's aesthetic by mounting my power supply on the base, as I'm less worried about portability. The additional cutouts are for a Duet 3 Mini 5+ control board, Raspberry Pi, buck converter, and USB-C breakout.

    20210807_161055.jpg
    20210807_230722.jpg

    One noob question: what's the 5mm dia hole bored into the bottom side of Gantry Plate 1 for? This is my first printer and the answer isn't jumping out at me. I'm hoping I can skip it as that will be the hardest feature to machine. Cheers!
     
  3. Indieflow

    Indieflow Journeyman
    Builder

    Joined:
    Mar 28, 2014
    Messages:
    127
    Likes Received:
    135
    Great looking plates, can’t wait to see the rest of the build as it progresses :thumbsup:

    The original build used a Hall-O sensor for the Z-Axis limit, the 5mm hole is where the magnet was secured in the plate. If you use standard limit switches then you can forget the hole on the bottom side of the Gantry plate ;)
     
  4. a_wordy

    a_wordy New
    Builder

    Joined:
    Jan 24, 2021
    Messages:
    3
    Likes Received:
    0
    Thanks Simon, that's got me well on the way.

    It's amazing what a mess I've made of my house creating this small machine! Axes are all moving happily and I'm waiting on a few parts to finish it off - I went a bit overkill with my heat bed wire gauge, and de-laminated one of the contacts while heating them up. Lesson learned!

    I was pleasantly surprised by just how rigid your design is, I thought there would be more compromise with the cantilevered X-axis than I'm seeing. I'll post some pics once a bit more progress is made.
     
  5. a_wordy

    a_wordy New
    Builder

    Joined:
    Jan 24, 2021
    Messages:
    3
    Likes Received:
    0
    Parts finally arrived - I've got a silicone heater on the bed, which works well. I like your dual hot end setup, but keeping it simple for now until I figure out how to use one. I had some trouble with the extruders grinding until I added some blue loc-tite to the nuts holding the tension bolts and the big external gear, which was unwinding during use of the right side extruder. They were easy to open up and clean out - great design. I need to buy some tiny nylock nuts.

    I'ts been a few days of dialing in settings, but I'm incredibly happy with the end result. With pressure advance enabled, I've got the speeds very slow otherwise my infill suffers - I'm not sure if my speeds are normal, or if the machine can handle more with better tuning. Max 30mm/s, 15mm/s on the delicate stuff, and 200mm/s travel with PETG and a 0.4mm nozzle. Some persistent blobs I can't seem to get rid of, but nothing that won't buff out.

    This thing's hypnotic to watch - this is a fantastic machine, Simon. Thank you.
    machine.jpg part 2.jpg
    part.jpg
     
  6. Indieflow

    Indieflow Journeyman
    Builder

    Joined:
    Mar 28, 2014
    Messages:
    127
    Likes Received:
    135
    The machining on those X-Axis plates looks amazing! :)

    I’ve not used PETG though the blobs can be reduced by tweaking retraction (super fast), wipe in G-code and hot end temp reduction I believe. Slight down side to Bowden tube setup.

    Would love to see a video of your amazing build in action :thumbsup:
     
  7. SadPanda

    SadPanda New
    Builder

    Joined:
    Dec 15, 2021
    Messages:
    1
    Likes Received:
    1
    After looking at several 3D printer projects recently, I've came to realize how well documented this project is, when compared to others.
    It's really nice to have drawings of everything.
    So congratulations to mr. Indieflow for that. And thanks.
     
    Indieflow likes this.

Share This Page

  1. This site uses cookies to help personalise content, tailor your experience and to keep you logged in if you register.
    By continuing to use this site, you are consenting to our use of cookies.
    Dismiss Notice