Welcome to Our Community

Some features disabled for guests. Register Today.

IndieLC

Discussion in '3D printers' started by Indieflow, Apr 11, 2015.

  1. nilrog

    nilrog New
    Builder

    Joined:
    Sep 3, 2015
    Messages:
    6
    Likes Received:
    1
    Sounds like a good plan :)

    For me things are still just in the planning phase as i'm trying to find the best place to source parts from.
    I'm from Sweden so anything in the EU is usually okayish, depending on their shipping rates. I looked at your kits also but since I saw that you wrote about the aluminium plates thought I would wait a bit and see what happens.

    I found a few sites that sells OpenBuilds stuff in EU but some charge a lot both for parts and shipping. And for some i'm not so sure if it is "safe" to order from there. And some only have a few of the things but not other parts. The C-Beam seems to be the hardest part to get hold of in EU although not impossible.

    I was originally planning on building a CNC router but right now those plans are on ice since I found this design (and attended a Sci-Fi fare with my son that triggered a lot of ideas :p )...except for maybe sourcing additional V-Slot's etc. for one while i'm anyway ordering things to build a 3D printer.
     
  2. Indieflow

    Indieflow Journeyman
    Builder

    Joined:
    Mar 28, 2014
    Messages:
    127
    Likes Received:
    135
    I feel your pain and know exactly what you mean about having to place multiple orders with different companies/sites to source the parts for a build! This is why I've tried to create kits at a reasonable price for those hard to source items.

    Like I say I will try and get some rendered images together by weekend to give an update on my plans.
     
  3. nilrog

    nilrog New
    Builder

    Joined:
    Sep 3, 2015
    Messages:
    6
    Likes Received:
    1
    Any update on the progress? :)
     
  4. Indieflow

    Indieflow Journeyman
    Builder

    Joined:
    Mar 28, 2014
    Messages:
    127
    Likes Received:
    135
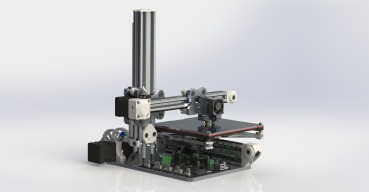
    I've just started producing my first set of Ali plates to piece together my prototype of Version 2 (which I'm calling the Indie140).

    Comparison render of the IndieLC next to the Indie140, more photographs to follow.

    [​IMG]

    As you can see I need to carry out a little more design work on the X-Carriage plate (I would like to add a few more attachment holes for alternative hotends) and design a base plate to hold everything together.

    Main upgrades include:
    • Aluminium plates for greater strength.
    • Encapsulated (3D Printed) moving components, which greatly reduces the vitamins required and V-Slot lengths.
    • Dual Extruders.
    • Acme screw for Z-Axis.
    • Belt tensioning system.
    All components are designed as upgrades for the IndieLC base design.

    Once I'm happy with the design for the 140 I will move on to the 200 which will just need a different Y-Axis carriage.
     
    mario likes this.
  5. nilrog

    nilrog New
    Builder

    Joined:
    Sep 3, 2015
    Messages:
    6
    Likes Received:
    1
    Interesting redesign/evolution :thumbsup:

    I'm thinking about starting to build the v1 version now, as is. While watching you finalize the redesign. And then I will probably upgrade it. Unless the redesign is finished by the time I have collected all the parts that I can't produce myself.

    Biggest hurdle right now is to be able to order from emakershop (the hobbed bolt). I'm stuck in a catch 22 right now since I never got the password email and i'm waiting for a response from the site admin.
     
  6. Indieflow

    Indieflow Journeyman
    Builder

    Joined:
    Mar 28, 2014
    Messages:
    127
    Likes Received:
    135
    Sounds like a plan :thumbsup:

    If you struggle with your eMaker account further then let me know as I think I have a few Hobbes bolts! Additionally I believe these should also work!
     
  7. nilrog

    nilrog New
    Builder

    Joined:
    Sep 3, 2015
    Messages:
    6
    Likes Received:
    1
    Ok, thanks for the tip on the alternative to the hobbed bolt.

    Re. PSU how much juice do you recommend that it should be capable of, roughly?
     
  8. Camini

    Camini New
    Builder

    Joined:
    Jun 26, 2015
    Messages:
    9
    Likes Received:
    4
    [​IMG]
    I changed some of the plexy plate with Aluminium plate (base/Bed support/pulley support/X carriage) , this printer is amazing now!
    Just need to make a support for the extruder motor fan.
     
    Indieflow and mario like this.
  9. mario

    mario New
    Builder

    Joined:
    Jul 9, 2014
    Messages:
    4
    Likes Received:
    5
    Hello Camini, well done!! Please, can you post some information about the hot-end mount?

    Thank you very much ;-)
     
    #129 mario, Oct 11, 2015
    Last edited: Oct 11, 2015
  10. Camini

    Camini New
    Builder

    Joined:
    Jun 26, 2015
    Messages:
    9
    Likes Received:
    4
  11. Vslot

    Vslot New
    Builder

    Joined:
    Oct 28, 2015
    Messages:
    3
    Likes Received:
    0
    I'm also having problems creating an account. I've mailed you @ [email protected]. Could you please check this?
    Kindest Regards
     
  12. Indieflow

    Indieflow Journeyman
    Builder

    Joined:
    Mar 28, 2014
    Messages:
    127
    Likes Received:
    135
    Very nice work :thumbsup:! Jealous, wish I had some more spare time to devote to the full Ali upgrade for Indie140 (Version 2). Fingers crossed the christmas break may help!
     
  13. Indieflow

    Indieflow Journeyman
    Builder

    Joined:
    Mar 28, 2014
    Messages:
    127
    Likes Received:
    135
    Sorry Vslot I've only just seen your post! Feel free to contact me direct at [email protected] for sales if you have no luck with eMaker, not sure what is going on there!
     
  14. Selvakumaran

    Builder

    Joined:
    Mar 22, 2015
    Messages:
    15
    Likes Received:
    0
    You have used Mini wheels in all the axis. Is it to minimise the weight? If it is to minimise the weight, then for the X-axis it is applicable. But, in Y and Z axis also Mini wheels are used. Any particular reason for that? Price wise both the Solid and Mini wheels are almost the same.
     
  15. Indieflow

    Indieflow Journeyman
    Builder

    Joined:
    Mar 28, 2014
    Messages:
    127
    Likes Received:
    135
    Correct the design was based around a minimalistic approach to keep the weight and size to a minimum (one of the main reasons why I avoided aluminium for the plates originally).

    The mini wheels are far smaller (nearly 10mm diameter), discreet visually and lighter. If larger wheels are used then the plates would also need to be bigger to allow for the increased diameter/offset from the beams. Additionally the beams would need to be longer to allow the same distance of movement. All very minor I know ;)
     
    #135 Indieflow, Dec 23, 2015
    Last edited: Jan 10, 2016
    Selvakumaran likes this.
  16. Selvakumaran

    Builder

    Joined:
    Mar 22, 2015
    Messages:
    15
    Likes Received:
    0
    But, in your V2 design you are going to upgrade to Aluminium plates only... :)
     
  17. Steven Taylor

    Builder

    Joined:
    Sep 20, 2014
    Messages:
    4
    Likes Received:
    0
    Here are some pictures of my build. I changed some things up so I could use the motors I have from my current printer. I also added a mount for an auto leveling probe.

    [​IMG][/URL][/IMG]
    [​IMG]
    [​IMG]
     
  18. Indieflow

    Indieflow Journeyman
    Builder

    Joined:
    Mar 28, 2014
    Messages:
    127
    Likes Received:
    135
    Nice work :thumbsup: will be interesting to see how those 3D Printed parts hold up to the additional weight of the axis extension and Nema 17's! Keep us posted ;)
     
  19. Bad Sequel

    Bad Sequel Well-Known
    Builder

    Joined:
    Aug 19, 2015
    Messages:
    83
    Likes Received:
    32
    Hi,

    I know nothing of 3d printers but I'd like to build one and learn. I wonder if this IndieLC printer would perhaps be a nice starting point for a diy 3d printer?

    Been drooling over diy 3d printers on this site and the IndieLC and C-bot strikes my fancy...
     
  20. Indieflow

    Indieflow Journeyman
    Builder

    Joined:
    Mar 28, 2014
    Messages:
    127
    Likes Received:
    135
    Then build them both! :p I guarantee once you build one you'll get the bug and want to build another one.

    Both machines are quite different so it really depends on what suites your needs! For instance I designed the IndieLC to be small, light weight and transportable (able to flat pack) with a 140x140 print area, which is quite different to the C-bot's cube shape and massive 300x200 print area!

    I really like the C-bot design and one day will build one myself for when I need to make larger prints, though currently I prefer to print smaller high definition parts. Obviously the bigger the part and higher the definition then the print time goes through the roof along with the risk of failure.

    My advise would be to look at what you are actually after making with your machine, where it will live within your house and obviously cost of the design before you dive into a particular model :thumbsup:
     
  21. Bad Sequel

    Bad Sequel Well-Known
    Builder

    Joined:
    Aug 19, 2015
    Messages:
    83
    Likes Received:
    32
    Primarily I want to print upgrade parts to my X-Carve and later to do the same for an OX type cnc mill.

    How is progress on the Indie14o design going? I'd like to build that when design is done.
     
  22. Indieflow

    Indieflow Journeyman
    Builder

    Joined:
    Mar 28, 2014
    Messages:
    127
    Likes Received:
    135
    Slowly getting there :thumbsup:

    [​IMG]
     
    mario likes this.
  23. Steven Taylor

    Builder

    Joined:
    Sep 20, 2014
    Messages:
    4
    Likes Received:
    0
    Man that looks cool!!!
     
  24. Bad Sequel

    Bad Sequel Well-Known
    Builder

    Joined:
    Aug 19, 2015
    Messages:
    83
    Likes Received:
    32
    Nice! Me wants it! :)
     
  25. Steven Taylor

    Builder

    Joined:
    Sep 20, 2014
    Messages:
    4
    Likes Received:
    0
    getting close to being done with mine just gotta order a few more parts.
    [​IMG]
     
  26. jezter6

    jezter6 New
    Builder

    Joined:
    Jan 31, 2016
    Messages:
    23
    Likes Received:
    3
    So yeah, I just ordered the parts kit from you. I look forward to this being my first 3d printer build.
     
  27. jezter6

    jezter6 New
    Builder

    Joined:
    Jan 31, 2016
    Messages:
    23
    Likes Received:
    3
    While I'm waiting for my parts to arrive, I'm trying to get psyched up to get the build started and had some questions.

    1) Looks like that board is quite expensive to buy/ship to the US. I have a Mostly-Printed CNC (thingiverse) that runs a Ramps/Marlin with Ardunio combo. Would this machine be easily able to use a Marlin firmware configuration? If so, any hints on what kind of edits to the firmware might be necessary to make this work?

    2) Can you provide some additional pictures or diagrams related to the belting? I didn't even realize until I read through today that it's a semi-closed-loop type thing and I can see the wire-tied ends a little in the video, but I'm unsure how things like the X carriage are belted so that they are properly tied to/tensioned move as the belt moves. Same goes for the Y and the bed setup. I can only assume once I dig into the Z assembly diagram I'll question that one as well.

    3) The BOM just lists a heated bed from ReprapPro, do you have a link to exactly what size bed? I'm going to have to source more stuff here from the USA and thus, would need to get properly matching parts.

    4) Somewhere in the discussions, there was something about 623/625 bearings being wrong on the BOM. I'm not sure if there's a BOM version history, but I want to know if this is right:

    Misc 623 Bearing 3


    For anyone else who's done a build, any tips, hints, or advice would be great.
     
  28. Indieflow

    Indieflow Journeyman
    Builder

    Joined:
    Mar 28, 2014
    Messages:
    127
    Likes Received:
    135
    Hi Alan,

    1. You can use any set of 3d printer electronics that you have at hand! I used the Minitronics on this design as it fitted the bill, small and cheap! Was going to post your parts tomorrow (finally finished the parts off today)though if you don't mind waiting a little longer I could source you a Minitronics and parcel it up with the parts!

    2. Belting is very simple and will become evident when you start your build! Belts are tensioned after cable tied by extending the acrylic plates at the end of the beams.

    3. Unfortunately RepRapPro have now gone out of business though again I have a hotend and heated bed if you wanted!

    4. BOM are correct, 623's!
     
  29. jezter6

    jezter6 New
    Builder

    Joined:
    Jan 31, 2016
    Messages:
    23
    Likes Received:
    3
    Thanks for the response!

    I'm going to repurpose my Ramps board if the settings are easy enough to modify in the firmware. I have no idea where to start there, so I'll ask a billion questions more when the time comes.

    I'll see what it all looks like when the parts come together...I'm just not seeing where the belts actually move things. I do see some areas in the printed parts that look like the belt wraps on each side of the pieces, but darn if I just don't "see" it.

    Last question for the day (and before you ship maybe)...part "bowden start" - as you mention RepRapPro is dead. I don't see anywhere to buy that in the US, and on eMakershop it looks like reprappro is one of the vendors that sells it there, so they may not have any more. I see a bunch of junk on AliExpress, but 30 day shipping from China sucks.

    Any chance you have/sell those? If so, send me an invoice :)

    In the end, i'm going to get someone to print me the E3Dv6 mount as that's the hot end I plan on using for this...will see how that all shakes out.
     
  30. Indieflow

    Indieflow Journeyman
    Builder

    Joined:
    Mar 28, 2014
    Messages:
    127
    Likes Received:
    135
    Unfortunately the only ones I have are part of HotEnd kits so I can't sell them separately! Alternatively you can carefully heat the part and thread in a pneumatic fitting to attach the bowden tube to or thread straight in to an M4 nut placed in the slot!
     

Share This Page

  1. This site uses cookies to help personalise content, tailor your experience and to keep you logged in if you register.
    By continuing to use this site, you are consenting to our use of cookies.
    Dismiss Notice