Welcome to Our Community

Some features disabled for guests. Register Today.

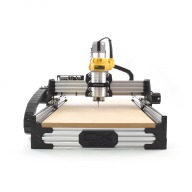
ooznest OX CNC Machine

Discussion in 'CNC Mills/Routers' started by Ryan Lock, Apr 28, 2015.

  1. Ryan Lock

    Ryan Lock Veteran
    Builder

    Joined:
    Oct 12, 2014
    Messages:
    530
    Likes Received:
    293
    Yes, i would imagine a 1.5kw water cooled spindle would be too heavy for the machine. 500w would be adequate. We recommend the Dewalt 26200 which is 900w, outputs 620watts. If noise is a concern, you can get brushless spindles which are quite a bit quieter. Cutting and the Vacuum, are just as loud on there own.

    At it's maximum the machine is 452mm high. So 500mm should do nicely.
     
    Conehead likes this.
  2. Alan Foster

    Builder

    Joined:
    Sep 14, 2016
    Messages:
    28
    Likes Received:
    10
    Hi Ryan I just wanted to say, that when I received my Ooznest 1500 X 1500 last month I was a bit shocked to see that it was a full "kit" so to speak and I thought oh no this is going to take me ages.

    Needless to say I've took my time with it and have built up the mechanicals and I've loved every minute of it. it's like Meccano for 50 year olds very therapeutic, great kit and even greater instructions you can't go wrong.

    Just the electronics to go next, that my business partner is tackling and put the bed in.

    Also I have some software that I need to use with it called v-carve pro, does anyone know if it will work with the Ox, or will I need something else as well.

    Well done Ryan, with this cracking piece of kit

    Alan
    Atherton Media
     
    GrayUK likes this.
  3. GrayUK

    GrayUK Openbuilds Team Elder
    Staff Member Moderator Builder

    Joined:
    May 5, 2014
    Messages:
    1,668
    Likes Received:
    627
    Another happy customer Ryan! :D
    Good Job Done :thumbsup::thumbsup:
    Gray
     
    Ryan Lock likes this.
  4. NLucier

    NLucier New
    Builder

    Joined:
    Sep 11, 2016
    Messages:
    18
    Likes Received:
    11
    "It's ALIVE!" I was finally able to carve time out this weekend for assembly with my step-father. Amazing job on the instructions and labeling of parts. Only one problem came up with the labeling and it was more entertaining than anything else in that the X & Y cable chain Fixed Ends were swapped and my step-father probably spent 5 minutes looking like a monkey doing a math problem trying to figure out why the one he was holding wasn't looking like the picture in the manual (I had read it several times so knew what was wrong, but had to see how long it would take him). One small hiccup came up that was easily solved, none of the 2040 V-Slot was tapped, and the HUGE device is up and operational (1500mm x 1500mm laid out on my floor to test size didn't really do it justice), albeit with making drawings on paper so far (spindle still en-route). My kids are very entertained watching the thing move and draw.

    That fast-decay setting that I saw mentioned for someone else in the thread, is there a downside to just doing it? I have tested out the calibration of all the axis' and they are spot on, but I did notice a little bit of jaggie in the circles that I have had it draw. I was going to play around with changing the micro-steps to 16 and 32, just to see what that brings to the table, but that fast-decay thing has me thinking. Which would be better in most hobbiest circumstances?
     
  5. OldDogSleeping

    Builder

    Joined:
    Oct 22, 2015
    Messages:
    11
    Likes Received:
    11
    fast-decay will make the motors a little bit noiser, and is less efficient. However the DRV8825 driver used in the XPro can have trouble managing the current, particularly with increased microstepping and/or higher voltage. fast-decay helps;

    I have some screen grabs from when I was testing with a current probe.

    These are the current steps at 1/8th Stepping, 12v, AutoMixed Mode (Default), Nema 23 2.8A motor
    [​IMG]

    This is what happens when things go wrong; 1/32 Stepping, 24v, AutoMIxed Mode
    [​IMG]
    as you can see the driver is now completely failing to control the current during the increasing steps.

    and how fast-decay helps; 1/32 stepping, 24v Fast-decay mode
    [​IMG]

    a big improvement, but still not good enough current regulation to make 1/32 stepping worth while.

    I think sticking with 1/8th Stepping, 12v supply, and enabling fast-decay, will give the most stable setup.

    for comparison this what 1/32 stepping looks like using a (much) more expensive driver
    [​IMG]
     
    dddman likes this.
  6. Ryan Lock

    Ryan Lock Veteran
    Builder

    Joined:
    Oct 12, 2014
    Messages:
    530
    Likes Received:
    293
    @Alan Foster Good to see you got it built. Yes V-Carve works great, just export as standard G-Code, and use UGS or similar to send the file to the machine.

    @NLucier Sorry about the 20x40's not being tapped, but glad you got it sorted. As @OldDogSleeping said 1/8th on fast decay is the best setup, there isn't any advantage accuracy wise to go over 1/8, so i would stick at that. On our next batch of xPro's they are going to be defaulted to fast decay. You will get a high pitch squeal with motors in fast decay, but this is drained out by the cutting noise. Also if you have endstops enabled, we have had customers report that they were getting false triggered when in fast decay.
     
  7. Alan Foster

    Builder

    Joined:
    Sep 14, 2016
    Messages:
    28
    Likes Received:
    10
    Thanks for the reply Ryan, I'm glad it will work, it will justify the asking price for the software.

    Also where would be the best place to ask for feed rates and tools/spindle speeds for cutting 3mm aluminium composite, and 3mm acrylic, I'm totally new at this and would like to know where there is any information like this.
     
  8. Ryan Lock

    Ryan Lock Veteran
    Builder

    Joined:
    Oct 12, 2014
    Messages:
    530
    Likes Received:
    293
  9. Alan Foster

    Builder

    Joined:
    Sep 14, 2016
    Messages:
    28
    Likes Received:
    10
    Brilliant thanks Ryan. I fired her up checked all the axis and they are wired correctly, i noticed it sounds like it "creaks"a bit. So will probably check the eccentric screws in case a couple are too tight.

    Alan
     
  10. Alan Foster

    Builder

    Joined:
    Sep 14, 2016
    Messages:
    28
    Likes Received:
    10


    Heres the video of it working and the noise its making, im chuffed though that its working

    Alan
     
    ChrisCassin likes this.
  11. GrayUK

    GrayUK Openbuilds Team Elder
    Staff Member Moderator Builder

    Joined:
    May 5, 2014
    Messages:
    1,668
    Likes Received:
    627
    Those motors sound low on power.
     
  12. Alan Foster

    Builder

    Joined:
    Sep 14, 2016
    Messages:
    28
    Likes Received:
    10
    Righto is that where you control the ouput power on the pots on controller?

    Thanks
    Alan
     
  13. GrayUK

    GrayUK Openbuilds Team Elder
    Staff Member Moderator Builder

    Joined:
    May 5, 2014
    Messages:
    1,668
    Likes Received:
    627
    I'm sure Ryan can advise you much more than myself, as he will be far more conversant with the supplied equipment. :thumbsup:
    Your motors will have a sweet-spot, Amp and Voltage wise, establish their required power rating.
    Research the Power Supply, Control Board and Drivers you are using, and confirm they are all capable of meeting the required demands and set accordingly.
    Gray
     
  14. NLucier

    NLucier New
    Builder

    Joined:
    Sep 11, 2016
    Messages:
    18
    Likes Received:
    11
    My new build sounded like that when I first ran some jogging commands. I found a couple of things that was causing it in my case. First being the kitchen table I had it sitting on {and pleasing the wife to no end} and the spoiler board were both vibrating like heck kind of making a sounding board like a guitar or violin and amplifying the motor vibrations. Second was I upped the mm/min for free move from what was in the back of the electronics assembly manual from {off of memory} 2500 to ~4500. That quieted the motor noise down immensely, even still on the table w/ spoiler in place, when it was transitioning to the next spot to cut. I am still waiting for delivery of my spindle, so I've only done "air cutting" and using a pen to draw out what would have been cut, which makes the motors noticeable at all as I imagine they aren't audible when really cutting {can't wait to find that out for real}.

    Nate
     
  15. Alan Foster

    Builder

    Joined:
    Sep 14, 2016
    Messages:
    28
    Likes Received:
    10
    thanks Grey, heres another video, it isn't cutting right and the depth is all over the place, we are just trying to work out how to set the settings in vcarve which is puzzling to me, all the different heights, above below material, z1 z2, etc, then to find th eright end mills for alicomposites and plastics etc
    Thats a big help Nate thanks
     
  16. ChrisCassin

    Builder

    Joined:
    Jun 2, 2016
    Messages:
    4
    Likes Received:
    1
    I had exactly the same noise and rough movement. Tried loads of different options to fix, I was told to solder the jumpers on the board. Mine was resolved when the xPro was set to fast decay.
     
  17. Ryan Lock

    Ryan Lock Veteran
    Builder

    Joined:
    Oct 12, 2014
    Messages:
    530
    Likes Received:
    293
    @Alan Foster Try setting the xPro to fast decay, the jumpers on the back (Underneath serial sticker), doing this will improve the noise dramatically. To set the current, use the pots behind the motor terminals, but the defaults they are set to should be good.
     
  18. Alan Foster

    Builder

    Joined:
    Sep 14, 2016
    Messages:
    28
    Likes Received:
    10
    Thanks Ryan I'll try that
     
  19. Alan Foster

    Builder

    Joined:
    Sep 14, 2016
    Messages:
    28
    Likes Received:
    10
    Righto we have done the fast decay, mod and everything is running a lot smoother now.

    One other thing, I have been trying to source, single flute carbide router bits with a 1/4 inch shank, and I am not having any luck.

    I have seen that I can buy 1/8 or 3/16 inch collets off the net for the de-Walt 26200 but the bits I can get which are 3mm 4mm or 6mm shafts so will the collets fit these, or am I just better getting a high speed spindle with metric collet.

    Thanks
    Alan
     
  20. Conehead

    Conehead New
    Builder

    Joined:
    Aug 30, 2016
    Messages:
    38
    Likes Received:
    5
    And another happy customer :)
    1am and I just finished my build.
    Amazing work with the manual and the seperated parts!
    It was huge fun. Do you think a Kress 1050 should be working fine (besides the mount)?
    It weights less and seems to have better specs than the Dewalt.
    This weekend I will start with the Arduino Controller and see if I can get the motors running!

    Keep up the good work!
     
    GrayUK likes this.
  21. GrayUK

    GrayUK Openbuilds Team Elder
    Staff Member Moderator Builder

    Joined:
    May 5, 2014
    Messages:
    1,668
    Likes Received:
    627
    The Kress is an excellent,German, spindle. You will see it being used by many people on Youtube, doing some pretty
    tough work. I think you need to pay that bit more for the one with the wider speed range. Comes with lots of spare parts as well.
     
  22. Ryan Lock

    Ryan Lock Veteran
    Builder

    Joined:
    Oct 12, 2014
    Messages:
    530
    Likes Received:
    293
    @Alan Foster Great! I have just taken a look at my normal sources for bits, and i can't find a single flute 1/4" either. There is this site where you can get 6mm collets Elaire Corporation - Dewalt Router Collets
    I think you should be fine with the Dewalt, just need to find a good combination of bits/collets which work for you.

    @Conehead Thanks, glad you liked it. as GrayUK said the kress is a great spindle.
     
  23. Muxa

    Muxa New
    Builder

    Joined:
    Sep 9, 2016
    Messages:
    23
    Likes Received:
    12
    I've been trying to find information about "fast decay" and how to enable it on xPro v2. Also found a post that states that xPro v2 automatically switches between fast and slow decay modes. Can somebody help?
     
  24. Alan Foster

    Builder

    Joined:
    Sep 14, 2016
    Messages:
    28
    Likes Received:
    10
    we soldered the jumpers across on the back for fast decay, the motor make a wierd noise after this was done but was advised by Ryan that all was ok.

    we now have a different problem we have upgraded the spindle to an 800watt one with separate speed controller it has 3 collets for 2, 4, and 6 mm which is what we wanted, but now the problem is the machine stops after 2 or 3 minutes and lights a yellow light up on the xpro just above the 2 green ones where it says SPL, is this a warning of overheating or something or communication failiure.

    tia

    Alan
     
  25. Ryan Lock

    Ryan Lock Veteran
    Builder

    Joined:
    Oct 12, 2014
    Messages:
    530
    Likes Received:
    293
    @Muxa As Alan said there is solder jumpers on the back, if you peel off the serial sticker. You will get a high pitch noise with the drivers once in fast decay, but this is normal for DRV drivers, when bought as a standalone driver.

    @Alan Foster I have never experienced this error before, i will contact mike and see if he has any ideas. I am thinking it could be interference from the spindle.
     
  26. Alan Foster

    Builder

    Joined:
    Sep 14, 2016
    Messages:
    28
    Likes Received:
    10
    Thats what we were thinking as we have routed the cabling in with the usb will test more tomorrow.

    Thanks
    Alan
     
  27. Alan Foster

    Builder

    Joined:
    Sep 14, 2016
    Messages:
    28
    Likes Received:
    10
    well tried a different USB lead and left it out of the trunking, and its working fine now, no more crashing, we also had a usb to usb extender which used a cat 5 cable in between but that didn't work as we were thinking as a shielded pair might pick up less interference.

    another couple of issues we could do with getting a bit more height on the Z axis, what would be the best way to do this longer Z axis end plates (and has anyone done any) or drop the bed somehow, we would like about another 25mm so that we can make a vacuum bed for the machine.

    Still chuffed to bits with this machine though Ryan, especially now i can see some fruits of my labour.

    Alan
     
  28. Suzie

    Suzie New
    Builder

    Joined:
    Mar 11, 2015
    Messages:
    3
    Likes Received:
    0
    That's a great work! I would need an information about the screws of this machine. I ordered the screws in France (I'm french) except the M5 15mm screws cause I can't find it in that dimension and I was wondering if it was a problem if I use 14 or 16mm screws instead?
    I would be really grateful if anyone could advise me on this^^
     
  29. dddman

    dddman Journeyman
    Builder

    Joined:
    Mar 2, 2014
    Messages:
    468
    Likes Received:
    187
    No problems using 14 or 16mm screws
     
  30. Suzie

    Suzie New
    Builder

    Joined:
    Mar 11, 2015
    Messages:
    3
    Likes Received:
    0
    Thank you for that answer!
     

Share This Page

  1. This site uses cookies to help personalise content, tailor your experience and to keep you logged in if you register.
    By continuing to use this site, you are consenting to our use of cookies.
    Dismiss Notice