Welcome to Our Community

Some features disabled for guests. Register Today.

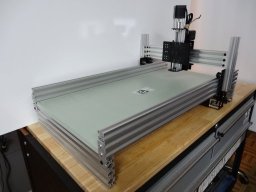
Routy CNC Router (V-Slot Belt & Pinion)

Discussion in 'CNC Mills/Routers' started by Mark Carew, Nov 11, 2013.

  1. vze2pm3q

    vze2pm3q New
    Builder

    Joined:
    Feb 15, 2016
    Messages:
    14
    Likes Received:
    0
    Does anyone know if you can use nema 23 motors instead of the nema 17?
     
  2. Ronald van Arkel

    Staff Member Builder Resident Builder

    Joined:
    May 7, 2014
    Messages:
    472
    Likes Received:
    245
    Yes you can but you have to fiddle to fit the motor supports to the gantry plates by using 3mm spacers, you also need to put feet underneath the machine so the motors will not touch the table surface. If you want NEMA23 motors you better look at the OpenBuilds Ox.

    Now, to get 30% more precision and torque out of your NEMA17 motors, just use the 14t pulley and not the 20t that is in the parts list (BoM).

    -Ronald
     
  3. vze2pm3q

    vze2pm3q New
    Builder

    Joined:
    Feb 15, 2016
    Messages:
    14
    Likes Received:
    0
    ok, thanks for your advise, now just stick to original build
     
  4. Ronald van Arkel

    Staff Member Builder Resident Builder

    Joined:
    May 7, 2014
    Messages:
    472
    Likes Received:
    245
  5. vze2pm3q

    vze2pm3q New
    Builder

    Joined:
    Feb 15, 2016
    Messages:
    14
    Likes Received:
    0
    What size tap should I use for the tapping the screw holes in the rails?
     
  6. Ronald van Arkel

    Staff Member Builder Resident Builder

    Joined:
    May 7, 2014
    Messages:
    472
    Likes Received:
    245
    M5 if you use M5 screws, pre-drill the holes with 4.2mm. Or didn't I understand the question well?

    -Ronald
     
  7. vze2pm3q

    vze2pm3q New
    Builder

    Joined:
    Feb 15, 2016
    Messages:
    14
    Likes Received:
    0
    Thanks, I just need to know what size tap to use for the rails, think all the screws are M5
     
  8. Ronald van Arkel

    Staff Member Builder Resident Builder

    Joined:
    May 7, 2014
    Messages:
    472
    Likes Received:
    245
    Yes they are all M5, we have M4 for the MeanWell 24vDC power supply but the rest is all M5.

    -Ronald
     
  9. vze2pm3q

    vze2pm3q New
    Builder

    Joined:
    Feb 15, 2016
    Messages:
    14
    Likes Received:
    0
    thanks again
     
  10. vze2pm3q

    vze2pm3q New
    Builder

    Joined:
    Feb 15, 2016
    Messages:
    14
    Likes Received:
    0
    I noticed in the pictures thats they are using both types of wheels, but plans only show the solid v wheels. Should I buy both or just one type?
     
  11. DarkAlchemist

    DarkAlchemist Well-Known
    Builder

    Joined:
    Aug 2, 2014
    Messages:
    401
    Likes Received:
    22
    I personally can't believe anyone would not buy the solid extreme wheels if they are using a router or anything heavy. Now for a 3d printer it wouldn't be needed unless using some massive extruder like The Kraken.
     
  12. vze2pm3q

    vze2pm3q New
    Builder

    Joined:
    Feb 15, 2016
    Messages:
    14
    Likes Received:
    0
    I guess your trying to say get the solid v wheel, ok
     
  13. Rick 2.0

    Rick 2.0 OpenBuilds Team
    Staff Member Moderator Builder Resident Builder

    Joined:
    Dec 20, 2013
    Messages:
    2,892
    Likes Received:
    1,551
    This is a very old build and was likely the V-wheels were all that was on hand at the time. The v-wheels were used for the openrail system which pre-dated the V-slot system. In the V-slot campaign you'll note only V-wheels were used as that was all there was at that point. The solid V-wheels followed the V-slot production but there was a definite lag in availability and may not have been fully available when this unit was created.

    The solid V-wheels are more appropriate for use with V-slot extrusions.
     
  14. vze2pm3q

    vze2pm3q New
    Builder

    Joined:
    Feb 15, 2016
    Messages:
    14
    Likes Received:
    0
    Thanks
     
  15. DarkAlchemist

    DarkAlchemist Well-Known
    Builder

    Joined:
    Aug 2, 2014
    Messages:
    401
    Likes Received:
    22
    Yep, as Rick said but I would get the extreme ones if it were me. Yes, they cost more but I think are much better for anything with weight on them.
     
  16. vze2pm3q

    vze2pm3q New
    Builder

    Joined:
    Feb 15, 2016
    Messages:
    14
    Likes Received:
    0
    thank you
     
  17. RAB3RD

    RAB3RD New
    Builder

    Joined:
    Mar 23, 2016
    Messages:
    1
    Likes Received:
    1
    I ordered this parts list and after I paid I realized that there were no single T-slot nuts listed. Think the parts list needs a bit of an update. Cant wait to get the parts to start assembly.
     
    DarkAlchemist likes this.
  18. Simzter

    Simzter New
    Builder

    Joined:
    Jan 7, 2017
    Messages:
    4
    Likes Received:
    0
    Hey all,

    I'm hoping to build my 1st CNC router and have stumbled across this. I see this thread was designed a while ago... is this still a good design to go for?

    Are t-slot nuts an alternative to tap/threading the bolts into the aluminium?

    What options are there for the spindle mount in this design?

    Thanks

    Wayne
     
  19. Rick 2.0

    Rick 2.0 OpenBuilds Team
    Staff Member Moderator Builder Resident Builder

    Joined:
    Dec 20, 2013
    Messages:
    2,892
    Likes Received:
    1,551
    Yes, it's still a good basic design. About the only thing I would change would be to increase the gantry beam and make it a little stiffer but that's only a few dollars difference. As far as spindles go I probably wouldn't go any bigger than the Makita trim router (RT0701C). As far as mounts go, there's one in the parts store that works if you shim it but if you are working on limited funds there's another approach shown in the gallery that's truly worth a look. (I plan to use a variation of that one myself finishing up my Ox build.) And finally, yes t-nuts are an appropriate solution. You'll note they are shown in the photos but apparently are missing from the parts list.
     
  20. Simzter

    Simzter New
    Builder

    Joined:
    Jan 7, 2017
    Messages:
    4
    Likes Received:
    0
    Thanks for the quick response Rick :) Are there any sources that supply these standard parts in the UK?

    Including delivery, this project comes to just over £500 - which is less than it'd cost me to buy a 6040.
     
  21. Giarc

    Giarc OpenBuilds Team
    Staff Member Moderator Builder Resident Builder

    Joined:
    Jan 24, 2015
    Messages:
    3,015
    Likes Received:
    1,680
  22. Simzter

    Simzter New
    Builder

    Joined:
    Jan 7, 2017
    Messages:
    4
    Likes Received:
    0
    Cheers Giarc.

    I've seen them on eBay, Robocutters is another I've come across - are they the same or just copied pieces?

    Their prices are significantly lower than ooznest
     
  23. Giarc

    Giarc OpenBuilds Team
    Staff Member Moderator Builder Resident Builder

    Joined:
    Jan 24, 2015
    Messages:
    3,015
    Likes Received:
    1,680
    I assume they are copies unless they are Openbuilds affiliates. Search the forums here for comments on Robocutters. I have no experience with them, but others have.
     
  24. Simzter

    Simzter New
    Builder

    Joined:
    Jan 7, 2017
    Messages:
    4
    Likes Received:
    0
    I think I'll be sticking with affiliates...

    I wrote to Ooznest with a parts list (as per this build) and asked them for their best price. They replied - on a Sunday evening... and gave me a discount. Total cost is £437 including delivery.

    This is minus the Arduino and GbrlShield... so I think they're going to get my business.

    Going to speak with them and make sure they have the length of the timing belt correct - and then I'll order :)

    Something that's puzzled me, how do the screws connect to the end pieces of the extrusion?
     
  25. Rick 2.0

    Rick 2.0 OpenBuilds Team
    Staff Member Moderator Builder Resident Builder

    Joined:
    Dec 20, 2013
    Messages:
    2,892
    Likes Received:
    1,551
    End holes need to be threaded to receive the screws.

    [​IMG]

    Self Tapping Screw may also be used without tapping.
     
  26. islahcnc

    islahcnc New
    Builder

    Joined:
    Jan 28, 2017
    Messages:
    7
    Likes Received:
    3
    It´s really good job. Congratulations.
     
  27. Nosveratau

    Builder

    Joined:
    Aug 12, 2017
    Messages:
    8
    Likes Received:
    2
    Hi All

    I am completely new to the CNC scene apart from a Prusa Anet A8 3D printer and I am looking to add a budget CNC router. My main use is in model building, specifically to-scale battleships and will be cutting mdf, balsa, plywood, acrylic and plasticard.

    I have some questions.

    1) What is the working area of this design in mm
    2) Is it capable of cutting metals, for example aluminium and brass in the up to 1mm thickness range (this is to replace having to send away to get photo etch parts done, I could mill them myself)
    3) I have seen similar machines for £500 on ebay that come with a 4 axis unit for lathe work, could I add a 4 axis to this machine so that I could turn my turret barrels in aluminium?
    4) Could the working area be increased to 800mm x 500mm while keeping its accuracy?

    Regards

    DJ
     
  28. Efja

    Efja New
    Builder

    Joined:
    Sep 5, 2017
    Messages:
    3
    Likes Received:
    0
    Would drilling and countersinking the bed and then installing screws into the beams with the nut plates provide better stiffness?
     
  29. Rick 2.0

    Rick 2.0 OpenBuilds Team
    Staff Member Moderator Builder Resident Builder

    Joined:
    Dec 20, 2013
    Messages:
    2,892
    Likes Received:
    1,551
    While that is the best way to install the bed it really wouldn't do much toward overall stiffness as you aren't really stiffening anything that is under significant amount of flexure. Installing the bed that way does go a long way toward keeping the frame square though.

    About the only way to use the bed to increase the overall stiffness would be to lay a couple 3/4" square hardwood rails full length along the top edges of the bed just inside of the side rails and anchor these down into the bed and into the side rails. This will help reduce roll and sway of the side rails but is not without its drawbacks. Swelling of the bed due to humidity changes could push the rails out of alignment. Besides, this is really not necessary. While this is a very capable system, it is still a light grade machine and if you are pushing it to the point that flexure of the side rails matters you are expecting way too much from the system.
     
  30. Efja

    Efja New
    Builder

    Joined:
    Sep 5, 2017
    Messages:
    3
    Likes Received:
    0
    Thanks Rick,

    I'm looking to build something that will get me started in learning CNC and I've found this project most interesting because of the quality and the fact you can customize it how you want. I'm still open to other ideas if you have suggestions, I'm going to be using solidworks and designing custom brackets out of sheet metal for aircraft stuff (I work on light aircraft). I'm planning on using this to make the OX brackets for upgrading down the road as well. Also if you can recommend a clamping system for the bed? That's one thing I haven't seen a lot of. I'm used to using the Grizzly style clamps for work around the shop. Thanks!
     

Share This Page

  1. This site uses cookies to help personalise content, tailor your experience and to keep you logged in if you register.
    By continuing to use this site, you are consenting to our use of cookies.
    Dismiss Notice