Welcome to Our Community

Some features disabled for guests. Register Today.

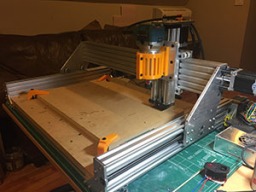
Salmon Sphinx 1.0

Discussion in 'CNC Mills/Routers' started by Brian Popp, Apr 27, 2017.

  1. ApexPredatorEffects

    Builder

    Joined:
    Apr 20, 2017
    Messages:
    7
    Likes Received:
    2
  2. Brian Popp

    Brian Popp Well-Known
    Builder

    Joined:
    Feb 27, 2017
    Messages:
    33
    Likes Received:
    57
    It's a cheap, chinese knockoff so your milleage may vary. Some of them are junk.. some of them are okay. Your best bet would be to buy one that someone has vouched for. Reviews seem okay, but I'm not sure how meaningful that is on AliExpress. By the way, not sure where you are located, but just in case you didn't notice, this is a 220v model. Most of the spindles over 500w or so will be 220 and require special wiring in your house (at least in the US).
     
  3. ApexPredatorEffects

    Builder

    Joined:
    Apr 20, 2017
    Messages:
    7
    Likes Received:
    2
    No problem I'm in Italy so 220v is our standard. Yeah it's Chinese and could be good or bad : /
    The 2,2kw kit of this seller has a Lot of positive feedback that's why I'm considering to buy this one
     
  4. daisosasen01

    Builder

    Joined:
    Sep 24, 2016
    Messages:
    58
    Likes Received:
    2
    Hello Brian
    I am trying to build the same CNC. Is it possible for me to bug you for questions? I'm looking for some help so I can cut my first aluminum parts to finish off the sphinx build.
     
  5. Brian Popp

    Brian Popp Well-Known
    Builder

    Joined:
    Feb 27, 2017
    Messages:
    33
    Likes Received:
    57
    Sure. Ask them here if you think it might help others. If not, just drop me a private message.
     
  6. daisosasen01

    Builder

    Joined:
    Sep 24, 2016
    Messages:
    58
    Likes Received:
    2
    1) What electronics are you using?
    2) What software combination are you using?

    I can ask based on those two questions.
     
  7. Brian Popp

    Brian Popp Well-Known
    Builder

    Joined:
    Feb 27, 2017
    Messages:
    33
    Likes Received:
    57
    So far I'm using Arduino Uno/GRBL (GRBL 1.1) with basic A4988 drivers. For software, I'm using Fusion 360 for CAD/CAM, and then nextgen Universal GCode Sender (UGS). It's about as low cost as you can get, but works well once you get the hang of it. I'm planning on switching to something LinuxCNC based with dedicated drivers at some point.
     
  8. ApexPredatorEffects

    Builder

    Joined:
    Apr 20, 2017
    Messages:
    7
    Likes Received:
    2
    How is going on with the new gantry plate on z axis?
     
  9. PaulJones

    PaulJones New
    Builder

    Joined:
    Jul 9, 2017
    Messages:
    20
    Likes Received:
    1
    Nice build Brian. I enjoyed going over what you have done. Would I be able to get the 3D files for printing please mate. It would be most appreciated.
     
  10. 3dRay

    3dRay New
    Builder

    Joined:
    Jul 7, 2017
    Messages:
    4
    Likes Received:
    0
    Nice job Brian! I'm new to the Open Build community and am in the planning stages of my build. I love what you have done so far. I was thinking of 3D printing my plates for awhile now and hoped that it would be sturdy enough to be able to cut the final aluminum plates on. Then I came across your build, thanks for validating, I'm going to start printing the plates tomorrow. I do have a question though. Why did you expand your build in the X direction? I would think that expanding in the Y direction would still achieve the larger work area as well as making the machine a bit stronger with a shorter c-beam across the X axis. I think I'm going to expand on the Y axis but wanted to ask in case I would be making a mistake by going in that direction for some unforeseen reason. Thanks and keep up the great work!
     
  11. Brian Popp

    Brian Popp Well-Known
    Builder

    Joined:
    Feb 27, 2017
    Messages:
    33
    Likes Received:
    57
    Yeah, that's a good observation. Structurally, it would absolutely be better to expand in the Y direction. Having said that, at these lengths, I honestly don't think it's a huge difference. I haven't done any kind of structural analysis, but there is no perceivable deflection in the middle. The only deflection I do see is in the Z axis, and I don't think this would be much better with the stock length. I did add a 20x40 rail underneath the X axis CBeam, but I'm not sure if this really does anything.

    I opted for expanding the X because I have this located on a L-shaped desk that is exactly 2 feet deep. This build was primarily to learn CAD/CAM, and I wanted to be able to clearly see the cut-area. It's also slightly cheaper to expand the X because you don't need as much C-Beam and threaded rods. More important than any of that, though, I think it looks better aesthetically. :)
     
  12. Gary Caruso

    Gary Caruso OpenBuilds Volunteer
    Staff Member Moderator Builder

    Joined:
    May 19, 2016
    Messages:
    1,193
    Likes Received:
    532
    Did you bond the 2040 to the c-beam? It will help anytime you give your wheels more distance, increase leverage of the carriage and decrease force at the wheels.

    Interested to know your feeds speeds and DOC, Lube, on aluminum cutting? I'm having issues with a half inch aluminum project i get about 3/8 down and get chatter.
    I'm fine until that depth i'm doing .015" DOC with a 3/16 2 flute carbide. Been working on learning Fusion might need to do some adaptive type cutting, or pocketing a channel to achieve chip clearance.
     
  13. 3dRay

    3dRay New
    Builder

    Joined:
    Jul 7, 2017
    Messages:
    4
    Likes Received:
    0
    Thanks so much for the quick reply. I'm excited and looking forward to working with the community.
     
  14. Brian Popp

    Brian Popp Well-Known
    Builder

    Joined:
    Feb 27, 2017
    Messages:
    33
    Likes Received:
    57
    Yeah, I did bond them together using blind joints.

    I started out with good, carbide bits, but I kept breaking them due to stupid setup problems. Since then, most of my aluminum cutting has been with cheap, 2 flute 1/8" HSS bits. With those, I use .2mm DOC and around 500-600mm/min. Since I've reinforced the plastic with aluminum, I've been able to push those speeds up a little bit, though, and can usually get away with 700mm or more. For large cuts, they don't last more than a few operations, but they are *cheap* and I don't cry when they break (my wife hates it when I cry). :)

    The 3/8" aluminum I cut out was pretty sketchy. I was an emotional wreck by the time it finished. If you can get away with it, use a 1/4" bit or larger for cutting out 1/2". The rule of thumb I was told is that the bit should be no less than 1/2 the width of the thickness of what you are trying to contour cut in order to clear chips. Any thicker, and you are supposed to do an extra roughing pass (option in the "Passes" tab)
     
    #44 Brian Popp, Jul 14, 2017
    Last edited: Jul 14, 2017
  15. daisosasen01

    Builder

    Joined:
    Sep 24, 2016
    Messages:
    58
    Likes Received:
    2
    I just installed Fusion 360. Can we trade emails? Just finished my C-beam.
    1) adjusted some things on the sound proof enclosure
    2) Externalized all wiring
    3) Made Dust shoe and DUst collector/seperator.

    Want to do:
    4) Install Rasberry Pi 3 for the bluetooth and wifi access. Will minimize wires.

    I will have questions getting started.
     

    Attached Files:

    • 187.JPG
      187.JPG
      File size:
      103.4 KB
      Views:
      59
    • 186.JPG
      186.JPG
      File size:
      147.1 KB
      Views:
      64
  16. MikeP

    MikeP Well-Known
    Builder

    Joined:
    Apr 29, 2020
    Messages:
    39
    Likes Received:
    27
    Greetings,

    Thank you for sharing your Sphinx remix from 3D to Aluminium plate machining.

    I too am looking to venture down the same route and was curious to find out what thickness did you make the 3D printed side plates and how much infill you used.

    Greatly appreciated
     
  17. santiaguitosb

    Builder

    Joined:
    Feb 2, 2018
    Messages:
    1
    Likes Received:
    0
    benas tardes con todos bonito proyecto no se si tendras la placa portico para perfil 20x20 lo podrias compartir grasias por su respuesta
     

Share This Page

  1. This site uses cookies to help personalise content, tailor your experience and to keep you logged in if you register.
    By continuing to use this site, you are consenting to our use of cookies.
    Dismiss Notice