Welcome to Our Community

Some features disabled for guests. Register Today.

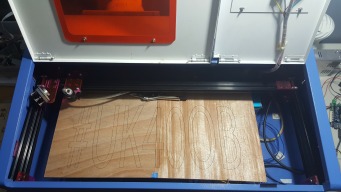
UK40OB

Discussion in 'Laser Cutters' started by Ariel Yahni, Sep 26, 2016.

  1. WZ9V

    WZ9V New
    Builder

    Joined:
    Jan 9, 2015
    Messages:
    18
    Likes Received:
    1
    Did you eventually achieve a 300x500 cutting area?
     
  2. Ariel Yahni

    Ariel Yahni OpenBuilds Team
    Staff Member Moderator Builder Resident Builder

    Joined:
    Oct 22, 2015
    Messages:
    144
    Likes Received:
    498
    No. I ended a little short on Y, about 250. Need to remake this plates
     
  3. WZ9V

    WZ9V New
    Builder

    Joined:
    Jan 9, 2015
    Messages:
    18
    Likes Received:
    1
    250 sounds pretty good especially with the gain in X. Thanks.
     
    Ariel Yahni likes this.
  4. 101LEDS&MORE

    Builder

    Joined:
    Jul 30, 2017
    Messages:
    4
    Likes Received:
    1
    Which ones? I just started cutting acrylic for the build, hope it wasn't something I already cut.
     
  5. Ariel Yahni

    Ariel Yahni OpenBuilds Team
    Staff Member Moderator Builder Resident Builder

    Joined:
    Oct 22, 2015
    Messages:
    144
    Likes Received:
    498
    It would nee to be a whole redesign to get those missing mm. For now i will leave it like that. What was gained is already more than stock :)
     
  6. 101LEDS&MORE

    Builder

    Joined:
    Jul 30, 2017
    Messages:
    4
    Likes Received:
    1
    No problem, I will be sure to find them.:cool: My build is just based off yours and so far no bracket or plate is the same as in the files, I have already seen a few things to tweak for max size. Thanks
     
    Ariel Yahni likes this.
  7. Ariel Yahni

    Ariel Yahni OpenBuilds Team
    Staff Member Moderator Builder Resident Builder

    Joined:
    Oct 22, 2015
    Messages:
    144
    Likes Received:
    498
    Awesome, be sure to post what you did and how it ends, maybe i need to do yours :)
     
    101LEDS&MORE likes this.
  8. Michael Duffin

    Builder

    Joined:
    Nov 13, 2017
    Messages:
    2
    Likes Received:
    0
    Hi Ariel, excellent build!

    I have ordered the bits in your BOM to modify my own K40 but I have a question or two if you don't mind?

    Where did you place the laser power supply to be out of the way of the working area?

    Also, is it possible to use the existing controller (stock Nano board in my unit), I would like to do one bit at a time if possible.

    Cheers!
     
  9. Ariel Yahni

    Ariel Yahni OpenBuilds Team
    Staff Member Moderator Builder Resident Builder

    Joined:
    Oct 22, 2015
    Messages:
    144
    Likes Received:
    498
    Sure

    I have placed it outside of the case to the right. its screwed to the side of the case

    In theory, yes. Are you adding a second stepper for the Y axis or using the default? If using 2 steppers you would need to attached both to the same Y axis cable and im not sure the stock board can handle that.
     
  10. Michael Duffin

    Builder

    Joined:
    Nov 13, 2017
    Messages:
    2
    Likes Received:
    0
    Thanks for the reply - my parts have arrived but I have realised that I will need spacers for the delrin wheels, would you recall which ones you used?

    Thanks again.
     
  11. Ariel Yahni

    Ariel Yahni OpenBuilds Team
    Staff Member Moderator Builder Resident Builder

    Joined:
    Oct 22, 2015
    Messages:
    144
    Likes Received:
    498
    I'm sorry, I just realised that's is not in the BOM. I used 6mm spacers. Note that you can accommodate to what you have or get since the X profile need to be cut to length
     
    Michael Duffin likes this.
  12. djmartins

    djmartins New
    Builder

    Joined:
    Sep 22, 2014
    Messages:
    11
    Likes Received:
    2
    I am looking at doing this to my K40 but I see there is issue with the Y axis.
    There are parts missing!
    Either you need another idler plate and a rod to go across so one stepper runs the Y axis,
    or another motor plate and stepper.
    Can anyone post pics of the assembly so this is clearer?

    I just don't see how this goes together without one or the other....
    Also, is it possible to use the stock Openbuilds n17 motor plate and idler plates?
     
  13. Ariel Yahni

    Ariel Yahni OpenBuilds Team
    Staff Member Moderator Builder Resident Builder

    Joined:
    Oct 22, 2015
    Messages:
    144
    Likes Received:
    498
    Yes, 2 stepper motors are used in Y or use the stock stepper with a rod.
     
  14. djmartins

    djmartins New
    Builder

    Joined:
    Sep 22, 2014
    Messages:
    11
    Likes Received:
    2
    More pictures would be a big help.
     
  15. Ariel Yahni

    Ariel Yahni OpenBuilds Team
    Staff Member Moderator Builder Resident Builder

    Joined:
    Oct 22, 2015
    Messages:
    144
    Likes Received:
    498
    I'm sorry. At the moment I'm traveling and will not get back for 2 week.i have a couple of videos in YouTube that could help. Try to search for my name
     
  16. djtwin1324

    Builder

    Joined:
    Jul 3, 2015
    Messages:
    2
    Likes Received:
    0
    Hey Ariel. Great build! I am in the middle of doing my build as well. I was wondering if your mirror holder slot accommodated the mirror screws well or if you used really big washers or something to help guide it in the slot? My mirror uses M3 screws and this slot on the mirror holder looks like it is meant for a m5 screw.

    Also... have you done a z-axis bed using v-slot? That would be something I may tackle if someone hasn't already.
     
  17. Ariel Yahni

    Ariel Yahni OpenBuilds Team
    Staff Member Moderator Builder Resident Builder

    Joined:
    Oct 22, 2015
    Messages:
    144
    Likes Received:
    498
    Thanks.

    I used a m3 screw with a washer, but you can certainly modified to your need.

    I have done a Z axis since i was planning on doing a Z table. Go ahead with your planning and make sure to share :)
     
  18. M4GIC

    M4GIC New
    Builder

    Joined:
    Feb 4, 2019
    Messages:
    4
    Likes Received:
    1
    Hi Ariel
    I've noticed it's been a while since your last update.. and I'm seriously considering extending my K40.
    was the max size then 250 x 500? - just checking...
    also have you got any instructions how to build the adjustable bed once the old one is scrapped? :)
    I can see you've fully replaced honeycomb with some metal mesh... (any specific name as I can not find it in my local shops.)
     
  19. Ariel Yahni

    Ariel Yahni OpenBuilds Team
    Staff Member Moderator Builder Resident Builder

    Joined:
    Oct 22, 2015
    Messages:
    144
    Likes Received:
    498
    Hey, i havent updated it since then, ive been meaning to do so.
    Max size is correct.
    For the bed i did a very basic manual thing using the following order for level: Wood > Bolt > Nut > washer > Spring > bed > washer > Wingnut

    As for the bed used a steel diamond mesh but ill recommend a honeycomb bed, youll have much less reflection of the laser to your material
     
  20. M4GIC

    M4GIC New
    Builder

    Joined:
    Feb 4, 2019
    Messages:
    4
    Likes Received:
    1
  21. Ariel Yahni

    Ariel Yahni OpenBuilds Team
    Staff Member Moderator Builder Resident Builder

    Joined:
    Oct 22, 2015
    Messages:
    144
    Likes Received:
    498
    Im not sure exactly how he gets that size but re designing the gantry parts could give you expanded space. Also look that he is using a different sliding system
     
  22. M4GIC

    M4GIC New
    Builder

    Joined:
    Feb 4, 2019
    Messages:
    4
    Likes Received:
    1
    Quick question .. Any specific reason why you used 2x4 not 2x2?
     
  23. Ariel Yahni

    Ariel Yahni OpenBuilds Team
    Staff Member Moderator Builder Resident Builder

    Joined:
    Oct 22, 2015
    Messages:
    144
    Likes Received:
    498
    I felt since i needed to place them vertically, 2x4 would give me more rigidity specially by the way the x axis is attached to the y plates
     
  24. M4GIC

    M4GIC New
    Builder

    Joined:
    Feb 4, 2019
    Messages:
    4
    Likes Received:
    1
    since there very little wight on them and I might have some 2x2 "reused" I might go ahead and try to build it with 2x2 which in theory would give me extra 4inch space each way :D
     
    Ariel Yahni likes this.
  25. Freeway99

    Freeway99 New
    Builder

    Joined:
    Oct 2, 2016
    Messages:
    4
    Likes Received:
    0
    Could you take some pictures to help some of us who are attempting the build?
     
  26. Ariel Yahni

    Ariel Yahni OpenBuilds Team
    Staff Member Moderator Builder Resident Builder

    Joined:
    Oct 22, 2015
    Messages:
    144
    Likes Received:
    498
    Im Sorry, currently the machine is not in my reach but I can say this should be very straight forward. You need to build an XY gantry and then attach it to the inside of the K40 case.

    Do you need help with anything specific?
     
  27. Brad Marreno

    Builder

    Joined:
    Nov 7, 2019
    Messages:
    1
    Likes Received:
    0
    How much or many of the extrusions did you buy?
     
  28. Ariel Yahni

    Ariel Yahni OpenBuilds Team
    Staff Member Moderator Builder Resident Builder

    Joined:
    Oct 22, 2015
    Messages:
    144
    Likes Received:
    498
    One 20x40 of 1500mm and you have some spare
     
    Anthony Bolgar likes this.
  29. Benny the builder

    Builder

    Joined:
    Sep 1, 2018
    Messages:
    10
    Likes Received:
    2
    Hello Ariel, are the small plates that go in the gantry side plates and the laser head holder for the limit switches? no photo shows were they go. If they are, what limit switches fit into the rectangle holes? cant quite figure it out.. :)

    Was the new set up quite easy to align?, i did an extended bed on my k40 but was an still is a bugger to get aligned, hence why im going to give yours a go.
     
  30. Ariel Yahni

    Ariel Yahni OpenBuilds Team
    Staff Member Moderator Builder Resident Builder

    Joined:
    Oct 22, 2015
    Messages:
    144
    Likes Received:
    498
    Benny

    There are no limit switches plates here, anything that you can make where switch makes contact with the wheel will work.

    Alignment is far easier if and only if you are making sure the Y axis is at the exact same hight.

    Hope this helps
     

Share This Page

  1. This site uses cookies to help personalise content, tailor your experience and to keep you logged in if you register.
    By continuing to use this site, you are consenting to our use of cookies.
    Dismiss Notice