
I started with a long time searching for the best desgin for what I needed. Several forum helps me.

Then another iteration, more robust, but more exepensive

Once I found what I wanted. I start to build it. I order 20mm aluminium plate and cut them with an angular saw without any problem.
![[IMG]](proxy.php?image=https%3A%2F%2Fopenbuilds.com%2Fdata%2Fattachments%2F36%2F36211-386881a26be277399933d9478ef123b5.jpg&hash=cb4a8700ac6519b6eae07fb9f8472747)
I round the edges and begin to drill holes as precise as possible.
![[IMG]](proxy.php?image=https%3A%2F%2Fopenbuilds.com%2Fdata%2Fattachments%2F36%2F36213-cd94859d1cb53b12740c6e95c0329a88.jpg&hash=73d65154f85103bb582a031598ce18dd)
The result is not to bad I think. After a lot of drilling, deburring, tapping, cleaning,... I can start to assemble the machine! I used serie 8 heavy profile aluminium.
The x axis has two profils screw together to have a better rigidity as you can see below. If you want to have more details on this method please ask me.
Here is one of the Y axis block. Under it are two Hiwin HGR20. This plate is used to support x axis plate and attach the ballscrew.
After some difficulties to assemble the ballscrew to the BK15 support I found a solution. I tighten the ballscrew between two pieces of wood to not damage it and gently hit the internal bearing of the BK15 whit a hammer until you can screw the locknut then you just have to screw in until the BK15 is in place. Or you could try the heat and cold method.
Assemble the frame, The rails and the X, Z axis.
So glad everything went well and to see it for the first time.
I can then start the electronic part. A lot of cable, soldering,...
I choose a Gecko G540 for the stepper motor as it is easy to use and very reliable.
Soldering the DB9 connerctors:
![[IMG]](proxy.php?image=https%3A%2F%2Fopenbuilds.com%2Fdata%2Fattachments%2F36%2F36226-e61793c125374d3de7ee1eba7b8b02bd.jpg&hash=379071be7562409bb06f8df0436cdbe9)
I 3d printed a back case for the stepper to protectect the cable I choose
NEMA23 381oz/in 3.5A they are perfect with a gecko 540
Here is the electric cabinet.
As I have no other way to do correct aluminium part for the NEMAA23, I choose to laser cut MDF to create it. I plan to do them soon.
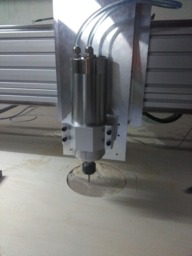
I just received the 2.2kw watercooled spindle.
Add the earth wire
All this build was a real investment, it took a lot of time of planning, research, learning, building, but it was a real adventure and I'm really happy to have discover this awesome word. I'll do my best to help everyone that have any questions or want to know more about CNC.
Here is the full build today, I have some little details to do but I already have tested it !
A temporary touch plate
Thanks everyone !
Brice's CNC Router Build
Build in 'Cartesian Style CNC' published by BOlivier, Dec 1, 2018.
I'm building a CNC router for a long time. Here's the result on this long journee. I tried to do my best with the basic tools I have. Don't hesitate to ask if you have questions.
-
-
Build Author BOlivier, Find all builds by BOlivier
-
- Loading...
-
Build Details
- Build License:
-
- CC - Attribution NonCommercial - No Derivs - CC BY NC ND
-
Parts list
Qty Part Name Part Link Comments 0 Link
![[IMG]](proxy.php?image=https%3A%2F%2Fopenbuilds.com%2Fdata%2Fattachments%2F36%2F36212-490d3da567d0c7b22988b9a452609e38.jpg&hash=f3473f879a14b98c1eba1389c871cbc0)
![[IMG]](proxy.php?image=https%3A%2F%2Fopenbuilds.com%2Fdata%2Fattachments%2F36%2F36214-46803811c4b370787c1db05001e4a3e8.jpg&hash=c52781cfdea218cc70f948e25b377fc9)
![[IMG]](proxy.php?image=https%3A%2F%2Fopenbuilds.com%2Fdata%2Fattachments%2F36%2F36215-8736b42c1637c383c071235dbb558b29.jpg&hash=ece0d01fef40c7166ff0fbbd1ed606e7)
![[IMG]](proxy.php?image=https%3A%2F%2Fopenbuilds.com%2Fdata%2Fattachments%2F36%2F36216-932586669c9590d390c04f7a1e816185.jpg&hash=88e7448a9580aef7512c766ded3f9f72)
![[IMG]](proxy.php?image=https%3A%2F%2Fopenbuilds.com%2Fdata%2Fattachments%2F36%2F36219-e14d73e0c24a04c4f8956e02a51983f7.jpg&hash=e3ea8b1727882592d78c03c3ef241aa3)
![[IMG]](proxy.php?image=https%3A%2F%2Fopenbuilds.com%2Fdata%2Fattachments%2F36%2F36218-beac483420876d5822d7eb25c70bfa32.jpg&hash=02e36b9ed139f3ac9ee1a14d4de96ceb)
![[IMG]](proxy.php?image=https%3A%2F%2Fopenbuilds.com%2Fdata%2Fattachments%2F36%2F36217-cb9f920f5f3569915c03c6a28fbe59f0.jpg&hash=459de9c8adfd0825cda70d4f91c286dd)
![[IMG]](proxy.php?image=https%3A%2F%2Fopenbuilds.com%2Fdata%2Fattachments%2F36%2F36221-9a492ead9bdf53a95b12c1b62a2f28c4.jpg&hash=a4f5629f1deb64d45aec17853a7d7c9b)
![[IMG]](proxy.php?image=https%3A%2F%2Fopenbuilds.com%2Fdata%2Fattachments%2F36%2F36222-fe16f95f0e64a97d297d5659cdbd68c8.jpg&hash=458b53a528b7443d27bb37a94dc87e24)
![[IMG]](proxy.php?image=https%3A%2F%2Fopenbuilds.com%2Fdata%2Fattachments%2F36%2F36223-325db2eb256329f19fedb0821375ecfd.jpg&hash=9a8551eb7003b9eb6cd3cd4ef5112133)
![[IMG]](proxy.php?image=https%3A%2F%2Fopenbuilds.com%2Fdata%2Fattachments%2F36%2F36224-71e37e573c9f8294aedb61c6d401af29.jpg&hash=5d5037064552d35befcea3f77cb30177)
![[IMG]](proxy.php?image=https%3A%2F%2Fopenbuilds.com%2Fdata%2Fattachments%2F36%2F36242-ebd83a83ee2809f2d3dc691d8c4d1ea1.jpg&hash=4158a0fdb32b98686c408c75bb128a66)
![[IMG]](proxy.php?image=https%3A%2F%2Fopenbuilds.com%2Fdata%2Fattachments%2F36%2F36241-f8d0366d33cb43ed13e987378539002a.jpg&hash=002d030604ffa05bb11ffe47b8138755)
![[IMG]](proxy.php?image=https%3A%2F%2Fopenbuilds.com%2Fdata%2Fattachments%2F36%2F36244-d1482118b1d61398e8d8b650d297c2c0.jpg&hash=08cda4b48a6ff5e6cf9c7435dd74599c)
![[IMG]](proxy.php?image=https%3A%2F%2Fopenbuilds.com%2Fdata%2Fattachments%2F36%2F36243-8e034c59adb884790d45938aa7362122.jpg&hash=4567bffd4efbd12a11491e07816fc33e)
![[IMG]](proxy.php?image=https%3A%2F%2Fopenbuilds.com%2Fdata%2Fattachments%2F36%2F36225-a9d87d94eafdda09ca3fc8e6e6cea634.jpg&hash=97ac1ad9901d155e8bf6a08962b0f731)
![[IMG]](proxy.php?image=https%3A%2F%2Fopenbuilds.com%2Fdata%2Fattachments%2F36%2F36233-1eca363027e9d06bd5d4c52fc1ea5344.jpg&hash=c50103a4a83e7dfa9dd888960124fb39)
![[IMG]](proxy.php?image=https%3A%2F%2Fopenbuilds.com%2Fdata%2Fattachments%2F36%2F36227-f77b81253ac4a779fcc25f27d16c0613.jpg&hash=5d3b32c5d13ddccac0a7864e4cb23948)
![[IMG]](proxy.php?image=https%3A%2F%2Fopenbuilds.com%2Fdata%2Fattachments%2F36%2F36228-02ad11fdf18e5a973216e3f071c225bd.jpg&hash=30dcecb53a0ca675fe6c9c91cc1964c1)
![[IMG]](proxy.php?image=https%3A%2F%2Fopenbuilds.com%2Fdata%2Fattachments%2F36%2F36229-5713d6d6fd05c50c7c661f111a8318c3.jpg&hash=f96db05f639db374afc1f67c755b183e)
![[IMG]](proxy.php?image=https%3A%2F%2Fopenbuilds.com%2Fdata%2Fattachments%2F36%2F36230-186bea041187d89307e1c2fb5e84f265.jpg&hash=f8cc10156803822239ff3ad80c546aba)
![[IMG]](proxy.php?image=https%3A%2F%2Fopenbuilds.com%2Fdata%2Fattachments%2F36%2F36231-ad6ff6601456ea0c930e2b9a1ee04b46.jpg&hash=cd0b00d97a2d461de4e6c133c379d165)
![[IMG]](proxy.php?image=https%3A%2F%2Fopenbuilds.com%2Fdata%2Fattachments%2F36%2F36232-fa6d1942c853434eda0ae927224bb5dc.jpg&hash=85a23cfbc273c2df6fbdd635d23d4a4d)
![[IMG]](proxy.php?image=https%3A%2F%2Fopenbuilds.com%2Fdata%2Fattachments%2F36%2F36234-a28b9b6152d1e441d351a268ac39e844.jpg&hash=3b0b2989012b9258fee4107cc2e19913)
![[IMG]](proxy.php?image=https%3A%2F%2Fopenbuilds.com%2Fdata%2Fattachments%2F36%2F36235-16601ed2263e4f603b62ff5123de07e5.jpg&hash=6e90b4b1c388832e890ed58fc53beae1)
![[IMG]](proxy.php?image=https%3A%2F%2Fopenbuilds.com%2Fdata%2Fattachments%2F36%2F36236-8ff232c9cdfd02b5f23a14b68436b7c7.jpg&hash=2b8223d9efb15746aa55b7fdf95c3e95)
![[IMG]](proxy.php?image=https%3A%2F%2Fopenbuilds.com%2Fdata%2Fattachments%2F36%2F36237-4c4631fc052b76be1916a4433c9dc801.jpg&hash=7735b6c5db517ecadfc9b7a2a62224a9)
![[IMG]](proxy.php?image=https%3A%2F%2Fopenbuilds.com%2Fdata%2Fattachments%2F36%2F36238-a7381b9245d1a7120e4b771e85e88c37.jpg&hash=102ad166c4636b8edcabd1b99913dbe4)
![[IMG]](proxy.php?image=https%3A%2F%2Fopenbuilds.com%2Fdata%2Fattachments%2F36%2F36239-8bdc0bed37144374d6021ec6d5021e92.jpg&hash=0ee431a06632638417b4ffd79fa332b0)
![[IMG]](proxy.php?image=https%3A%2F%2Fopenbuilds.com%2Fdata%2Fattachments%2F36%2F36240-cec90eef7bf1a830d588abf9180a36c5.jpg&hash=4ec4183b7e9032728d2bcff0d08a63b9)
![[IMG]](proxy.php?image=https%3A%2F%2Fopenbuilds.com%2Fdata%2Fattachments%2F36%2F36249-4029216d146a80133d4b73e483940f65.jpg&hash=d30c7d6d2a79ec092970a69286f57a85)
![[IMG]](proxy.php?image=https%3A%2F%2Fopenbuilds.com%2Fdata%2Fattachments%2F36%2F36248-98d633839cc55bd80cae528f141bee13.jpg&hash=a449b92ff0517c85f5887e923f9ee417)
![[IMG]](proxy.php?image=https%3A%2F%2Fopenbuilds.com%2Fdata%2Fattachments%2F36%2F36245-7d562586f5c2fe8e5c10e2231e24632b.jpg&hash=7f3b77fd2a5a4502d8810411dc91d0f0)


