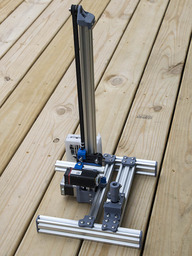
This project evolved from my Horizontal Cantilever or Vertical Diode Laser Engraver build. I have an extra diode laser & thought it would be nice to have a dedicated rotary axis engraver and there seems to be interest from others for this type of machine. This has less hardware, a simpler build & more compact than the other engraver. I am using all 2040 V-Slot for this build, 4 - 2040x250mm lengths for the base parts connected with Inside Hidden Corner Brackets or brackets of your choice. The Carriage X axis is 2040x500mm. The carriage axis could be a 2020, but not much difference in price & seems better for added support. I am attaching the turntable directly to a separate 2040 V-Slot with 4 T-nuts 20mm away and parallel to other 2040. Using a separate 2040 allows you to use a wider turntable if needed. This makes it all one assembly rather than having the turntable separate. Since the turntable is attached to the V-Slot, it is easy to line it up with diode laser. Once it is aligned, this should not need to be changed. I am including a pen holder that fits the bamboo pens you can find on Amazon or a China site. You could also use a drill chuck or a lathe chuck. I will make a modification to my self-centering turntable ( Self-Centering Turntable for use with Vertical Laser Engraver by GeoDave) so that can also be use & update the info here when that is done.
To setup rotary axis with Lightburn & a GRBL controller board, here are the settings I used with a DRV8825 driver. The linear axis has to be the X-axis, but the rotary axis can be either Y or Z. Most people will probably use Y axis, so I will show that as an example.
For the firmware settings with DRV8825 driver set either of these depending on whether you are using Y or Z for rotary axis
$101 = 64 ;DRV8825 & 1.8-degree Nema 17 1/32 step
$101 = 128 ;DRV8825 & 0.9-degree Nema 17 1/32 step
$101 = 32 ;A4988& 1.8-degree Nema 17 1/16 step
In the Lightburn Rotary Setup, set 100.00 mm per rotation. From my testing, that number should not change.
You might also have to change the axis direction for the rotary axis, but probably not the X-axis.
$3 = 0 ;No reversing directions
$3 = 1 ; Reverse X direction only
$3 = 2 ; Reverse Y direction only (Rotary axis)
$3 = 3 ; Reverse X & Y direction
$3 = 4 ; Reverse Z direction (Rotary axis)
$3 = 5 ; Reverse X & Z direction


Dedicated Compact Rotary Axis Laser Engraver
Build in 'LASER - PLASMA BUILDS' published by David Bunch, Aug 8, 2022.
Compact Dedicated Rotary Axis Laser Engraver
-
-
-
- Build Progress:
-
- Build in Progress...
Attached Files:
Royman Hutadjulu, chx111, ASinc and 6 others like this. -
-
Build Author David Bunch, Find all builds by David Bunch
-
- Loading...
-
Build Details
- Build License:
-
- CC - Attribution NonCommercial - CC BY NC
Reason for this Build
Create Dedicated Rotary Axis Laser Engraver -
Parts list
-
Attached Files:
-


