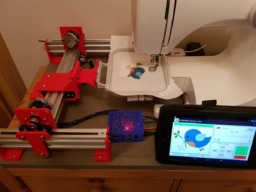
This project follows on from my previous build: Embroidery machine with XY belt and pinion drive and utilises readily available Arduino components combined with 3D printed parts:


The three wheel plastic gantry plates with end supports seem to work really well and the system feels really solid - although the longevity remains to be seen! The design utilises a standard sewing machine and thus requires control of the 230 VAC mains supply to the machine. This is provided by a DIY power controller that is fully isolated - I take NO responsibility for the suitability of this design for any other builds. The main control activity is provided by an Arduino Nano with CNC shield and Bluetooth RS232 module.


Needle up detection is provided by a retro-reflective detector mounted inside the machine. This proved much more reliable than trying to fit a detector on the embroidery foot.
The user interface runs on an Android tablet and was by far the most time consuming part of this project:


A hastily produced video shows the machine in operation on an old shirt:
The eagle eyed amongst you will notice that the design slipped slightly in the hoop but it still shows how the machine operates. If you watch the video to the end you will see a couple of other trials that turn out well.
DIY Embroidery Machine V2
Build in 'Everything Else' published by sausagePaws, Jun 11, 2019.
My second attempt at an affordable sewing machine embroidery add on. This one uses readily available electronics modules and 3D printable parts where possible.
-
-
-
- Build Progress:
-
- Build Complete!
-
Special Notes
The mains power controller should only be constructed by a practitioner in the field and should be tested using PAT testing equipment. The author takes no responsibility for the suitability of this design to your project.
teren, Markal, Rodrigo Ibañez Mamani and 50 others like this. -
-
Build Author sausagePaws, Find all builds by sausagePaws
-
- Loading...
-
Build Details
- Build License:
-
- CC - Attribution NonCommercial - CC BY NC
Reason for this Build
To improve my previous attempt. -
Attached Files:
-
