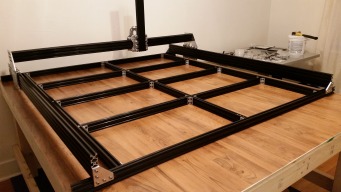
Parts ordered but not all used. I will go through and break everything down to what I actually used at a later time:

12 x Aluminum Spacers
(Size: 1/8")
10 x Nylon Insert Hex Locknut
(Size: 5mm)
50 x Precision Shim - 10x5x1mm
13 x Eccentric Spacer
(Length: 1/4")
32 x L Bracket
(Size: Double)
2 x Low Profile Screws M5
(Length: 10mm/25 Pcs)
6 x Low Profile Screws M5
(Length: 8mm/25 Pcs)
3 x Low Profile Screws M5
(Length: 15mm/25 Pcs)
2 x Low Profile Screws M5
(Length: 30mm/10 Pcs)
1 x Low Profile Screws M5
(Length: 45mm/10 Pcs)
1 x Low Profile Screws M5
(Length: 65mm/10 Pcs)
1 x Low Profile Screws M5
(Length: 20mm/25 Pcs)
7 x Tee Nuts (25 Pack)
8 x Cast Corner Bracket
9 x Black V-Slot 20mm x 40mm Linear Rail
(Length: 1500mm)
2 x Black V-Slot 20mm x 60mm Linear Rail
(Length: 1500mm)
1 x Black V-Slot 20mm x 60mm Linear Rail
(Length: 500mm)
2 x Black V-Slot 20mm x 80mm Linear Rail
(Length: 1500mm)
1 x 1/4" x 8mm Flexible Coupling
2 x Lock Collar
(I.D.: 8mm)
2 x Ball Bearing 688Z 8x16x5
1 x Nut Block for 8mm Metric Acme Lead Screw
28 x Xtreme Solid V Wheel Kit
3 x Aluminum Spacers
(Size: 1-1/2")
1 x 8mm Metric Acme Lead Screw
(Length: 500mm)
3 x Low Profile Screws M5
(Length: 15mm/25 Pcs)
3 x Low Profile Screws M5
(Length: 20mm/25 Pcs)
3 x Tee Nuts (25 Pack)
(Size: M5)
3 x GT3 Aluminum Timing Pulley - 20 Tooth
6 x Xtreme Solid V Wheel Kit
8 x Cast Corner Bracket
2 x Black V-Slot 20mm x 40mm Linear Rail
(Length: 1500mm)
1 x Black V-Slot 20mm x 60mm Linear Rail
4 x Eccentric Spacer
(Length: 1/4")
10 x L Bracket
(Size: Double)
--SPINDLE SETUP--


This is a 110V 1.5KW liquid cooled motor spindle w/ER11 collet and 110V 1.5KW inverter. I only have 110V single phase available to me as I am currently renting my home so 220V is not an option.
Wiring
Wall outlet to VFD
Hot = R/1
Neutral = T/3
Ground = Ground/9
Spindle to VFD
Pin1 = U/6
Pin2 = V/7
Pin3 = W/8
Pin4 = Ground/9
Programming VFD
Step 1: Factory Reset VFD (Pd013 and select 1)
Step 2: Change the following Pd codes and leave the remaining to factory default:
Pd002 - 1
Pd003 - 400.00
Pd004 - 400.00
Pd005 - 400.00
Pd006 - 2.50
Pd008 - 110.00
Pd009 - 14.0
Pd010 - 7.0
Pd014 - 0.1
Pd015 - 10.0
Pd016 - 20.0
Pd017 - 20.0
Pd018 - 40.0
Pd019 - 40.0
Pd020 - 80.0
Pd021 - 80
Pd023 - 1
Pd041 - 08
Pd070 - 1
Pd072 - 400.00
Pd141 - 120.0
Pd142 - 5.0
Pd144 - 3000
Pd173 - 110.0
Pd174 - 7.0
Pd175 - 0
Longhorn OX (Under Construction and In Progress)
Build in 'Cartesian Style CNC' published by nlfawcett, Mar 30, 2015.
I ran across the OX and knew it was the one I wanted to build. Some of the things I wanted to include was make it bigger and a little more solid than what the original plans called for. So here is where I am at so far. It will have a cutting area of 48" x 48". The waste board support frame will have more support rails. The Y axis will have (3) 20mm x 60mm rails instead of the original (2) that is called for. 1/4" aluminum OX plates. And a few more odds and ends.
-
-
-
- Build Progress:
-
- Build in Progress...
Attached Files:
TC Cramer, Jeff Cholewinski, Jamal and 2 others like this. -
-
Build Author nlfawcett, Find all builds by nlfawcett
-
- Loading...
-
Build Details
- Build License:
-
- CC - Attribution - CC BY
Reason for this Build
More cutting area and rigidity.

![[IMG]](proxy.php?image=http%3A%2F%2Fopenbuilds.com%2Fdata%2Fattachments%2F7%2F7975-5725fc76569a0ffc62c053d23459d819.jpg&hash=18a169e2f41e4bc9234db0b714cdaad7)
![[IMG]](proxy.php?image=http%3A%2F%2Fwww.openbuilds.com%2Fdata%2Fattachments%2F8%2F8064-f0cd3f021814e872f22562e2eeb21ba7.jpg&hash=a25f9d21c20a39cf5e7beed303273301)
![[IMG]](proxy.php?image=http%3A%2F%2Fopenbuilds.com%2Fdata%2Fattachments%2F7%2F7971-8c8f8aaa721b4c7966240714ad466161.jpg&hash=8f60dc3afa5cbe8f9949011a4193fab8)


